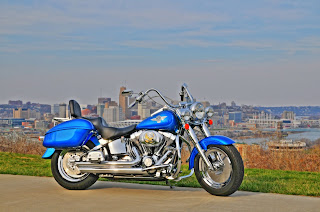
Sorry for the long lapse in posts. About 4 or 5 days into my vacation I broke the LCD on my laptop and I didn't have anyway to get online except my blackberry. I couldn't really post much from there so I figured I'd just wait until I got back. We got back to town Sunday afternoon after a long drive, and it's great to be home. I got right back to work yesterday with 4 photo shoots for United way, then to our favorite hillside shooting location Devou park in Covington to shoot a motorcycle for our friend Ed McDonald. As you can see above it turned out great. I know I have said in the past that I don't like HDR so much because it's kind of "cheating" but I really like the way this one turned out. I think Ed will be happy and hope you guys like it too.
Here's another quick shot from the motorcycle shoot that I went ahead and added a little patriotic flair.
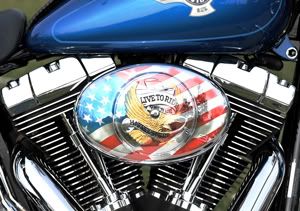
Here's a little how to on how I did it. First I opened the main image (the motorcycle) and I did all of my normal color adjustments on there(levels, curves,etc.) then I went to istock photo and downloaded a large waving flag image. I then went back to my original image and made a copy of the background layer by dragging the background layer to the new layer tab at the bottom of the layers box. Once this was done I selected the first background layer, then pressed the new later tab making a blank layer between the original background layer and the background layer copy. At this point click the little eye next to the background layer copy to turn it off, we'll turn it back on later. Next I opened the flag image into photoshop. I selected the entire image and copied it and pasted it into the new blank layer. Then I went to the top of the page and selected EDIT-FREE TRANSFORM. I sized the flag over the carb cover until I got it where I wanted it and then double clicked the flag to set it there. Now click the eyeball again next to the background copy layer and the flag disappears. Don't worry, it's still there. Now you want to select the background copy layer by clicking anywhere on it. Then at the bottom of the layer box you will click on the layer mask icon. (it's the gray box with the white circle in it) Now you will have a layer mask on your background copy layer. Select your brush tool, then make the opacity something like 35%. Make sure you have black selected as your foreground color, and start "painting" over the area in the image that you want to see the flag. If you click a little too much and don't want the flag to come through as much, just change to white and paint back over that area. "Paint" until it looks like what you want. Have fun!
That's it for me today. I'm beat, and we still have a lot of shooting left to do this week. See everyone tomorrow. Jason




No comments:
Post a Comment