Wednesday, February 25, 2009

Some Random tid bits and thoughts


This is another shot from the first session in the new place. It's another beautiful model, this time not in a bikini though. The shot was done with 4 white lightning strobes, camera setting were 1/250 ISO200 f/11.

Prints. Where do I get mine done. When do I go to a professional lab and pay more, and is the local drug store good quality? Well when I'm shooting anything for me, I generally take my stuff to Sam's club. They have a nice printing and processing center setup over there. The colors are always dead on, and I know for a fact that they calibrate their systems (at least in Tricounty Sam's) every morning. I have made friends with the people that work in the photo lab, so they generally take care of me. They do a good job with Digital prints, and with print film. If I'm going to be developing Slide film I take my stuff to Cord Camera in Tri County and Josh takes care of me over there. Now for any paid work that I do. Weddings, portraits, etc.. I go with Madison Photo Works in Covington Ky. They are the best top quality lab in Cincinnati. They are a pro shop, that delivers pro results. They offer almost any service that you can think of, including color retouching. Great place to deal with. Last but not least, I occasionally use Mpix which is an online retailer. They have the same quality as Madison, but a little cheaper. That's it on the printing. Not a whole lot to it.

Light sphere. I've been meaning to tell you all about this great little product that I have called the Light Sphere. They are made by Gary Phong, and I'm sure you have seen a photographer somewhere with one on his or her camera. It looks like a little piece of Tupperware on top of your flash. Wedding photographers love them. Here's what they look like:

Photobucket

I use the clear one, Shad uses the cloudy one. They really don't have that much of a different look to them. I'm really happy with mine, and would recommend it to anyone using flash.

Ok, that's it for the moment. If I think of anything else today I'll put some more stuff on. I've been fighting a cold the past few days, that's the reason for my lack of posts. Hopefully I'll be better in a few days. Talk to you later, Jason Read more on this article...

Monday, February 23, 2009

Officially Official


We're official now. We got into our new studio this week! Shad and I have decided to combine forces and do the studio together. Shad and Wendy(Shad's wife) spent all day Saturday painting the shooting room, and Shad and I spent most of the day Sunday painting the front room. The paint was barely dry, and we had a backdrop and lights setup because we had some shots we had to take care of. Business waits for no one! What you see above is one of the finished images of Caryn, a bikini model for Ruby Ice productions. They are going to be putting out a swimsuit calender and this is one of the headshots that I took for the model. Since we're combining we're going to no longer have separate business names, and instead become Red Door Photography. This is because of the bright red door that people look for when coming to the studio. As you can see in this photo of a monkey, I mean Shad standing in front of the place.

Photobucket

Anyway, we're hoping to have an open house party sometime in March. I'll keep you updated on that. We're about 5 blocks from Newport on the Levee so hopefully we'll be in there soon handing out fliers, and advertisements. Also for those who haven't signed up, the workshop for the 7th is almost full. Make sure if you want to attend you sign up ASAP.

One of the readers asked me about how I did the sunrise shot that I posted last week, so I thought that would be a good topic for today. First let me give you my settings for that shot. I was shooting ISO200, f/3.5 17mm 1.3seconds. So obviously the first thing to note is that I was shooting at ISO200. This is the cameras "native" ISO. This means that it is the ISO that the camera works best at. The lower the ISO, the less noise you will have in your picture. f/3.5 is the aperture that I decided to go with at that particular time. In hindsight I probably should have gone with something a little narrower like f/11. So anyone taking photographs of a sunrise or sunset, remember keep your apertures towards the high end. 17mm was the widest available lens that I had which is why I chose it. If I would have had a wider lens such as the wonderful Tokina 11-16 I would have been using that. With a shutter speed of 1.3 seconds, handholding isn't an option. You have to have a tripod and a cable release or at the minimum use the self timer. The biggest and most important thing to consider is the weather. Obviously it should be a clear morning. Clouds are ok, as long as the sky isn't covered by them. It's good to have something in the sky to reflect the light. Around here in Cincinnati it's rare that we get the nice big fluffy clouds like they do in other parts of the country, but our soupy looking clouds just have to suffice. Other than that, there isn't much to it. Take a photo, check out what it looks like on the display, and go from there. Listen that's it for today. I'm beat from yesterday, and I need a nap. I'll see you all tomorrow. Jason Read more on this article...

Saturday, February 21, 2009

Update

Hey everyone, I have a quick update about the workshop on the 7th of March. We are going to be in Room A. I posted all of the info over at the workshops blog. Please click workshops at the top right of this page. Thanks! Read more on this article...

Thursday, February 19, 2009

Cloned


Cheesy tag line right? Sorry it's the best I could come up with this early. This is actually two images made into one, and it's a whole lot easier to do than you may think. Once you understand layers, it's a piece of cake. Anyway, I hope everyone is having a good morning. We woke up to freezing weather here in Cincinnati, and to top that off, my wife forgot to turn the furnace back on after letting in some fresh air yesterday. I want to tell everyone about a great convention happening in two weeks in Ohio. It's the 56th annual Professional Photographers of Ohio convention, held in Dayton Ohio. It starts on March 4th and runs through March 9th. Admission is $30 for the trade show part. There will be tons of new products available for view, as well as a chance to talk with every major manufacturer in the business. It will be a great show, don't miss it. I plan on going on Sunday the 8th if anyone wants to come along.

With the inclusion of the image above, I thought maybe we'd talk about layers today. What is a layer? Think of them in terms of the clear overhead projector slides that the teachers used in high school. the bottom piece(background layer) would have the test or questions on it, and when everyone was done and it was time to grade your partners answers the teacher would lay another clear piece on top of the first with the answers on it.(the next layer) You could still see the bottom(or background) layer, except where the answers had been added. This is the same idea that is used in photoshop with layers. The only place that is covered up when you add a layer is the additional material on the next layer. For example look at this image of my old Kodak Duaflex:

Photobucket

Now look at the same photo with an added text layer:


Photobucket

That text is an added layer. I can move it around. I can re size it. I can even change the opacity up or down if I like. If I don't like how it looks I can just delete the layer. Layers never actually change the original image pixels, they just add additional "layers" of pixels on top of the original that can be removed or changed at any time. You can do many different things with layers, you can color adjust, you can do curves(contrast), you can do saturation, black and white conversions, etc... To make any of the adjustments that I just listed, you will go to LAYER-NEW ADJUSTMENT LAYER then pick you adjustment from the selection there. It will automatically make whatever adjustment you make on a new layer.

After you have made the adjustment you want, right click on the layer that you just created and select blending options. You will get a box that looks like this:

Photobucket

You can see in that box you have the option of blend mode, blend opacity, advanced blending, and a number of effect options on the left side. There are quite a few blend modes. They all do something different, so try each one out to see how it effects your photograph and see if you like any of them. If not, just leave it on normal. The blend opacity makes that layer more or less transparent. By default it is set to 100% but you can lower that to make it more see through. The key is to play around until you get what you want. Remember if at any point you don't like what you see, you can drag that layer to the little trash can icon and start over.

I have a lot of work to do to get ready for the class on the 7th. I'll see everyone tomorrow. Jason Read more on this article...

Wednesday, February 18, 2009

The Early Bird


Like Ken Rockwell says, "it's not about the equipment so much as it is about just being there". I felt that way when I took this photo. I got to Devou Park about an hour before sunrise, and just waited for the sun to peek over the horizon. The best part about this was just being there. I stood there quietly waiting for the scene to "develop". I turned around and there were two deer that had snuck up behind me while I wasn't looking. They were maybe 20-30 yards away. I tried to get the camera off of the tripod but it was too late, they were gone. All is not lost though, I ended up with this wonderful image of the City of Cincinnati.

So today I thought we might talk about some of the things that I carry in my bag that aren't "main components" but are still very important. These are the things that aren't used on every shoot, but man when you need them, they come in handy. The first thing is the knock off brand of the MC-30. Nikon wants $80 for a manual cable release for the D300 so I went with a knock off brand. They can be found

Here for $40. You may even be able to find them cheaper on Ebay, or Amazon. Here's what the release looks like for the D200,D300,D700,D3,and D3X:
Photobucket

For everyone with the D90 on down, you have a much cheaper, much easier option. Nikon still makes a cable release for you, but for $17.95 plus shipping you can have the ML-L3 wireless remote from Adorama It looks like this:
Photobucket

The only downside to this remote is that it works through IR so you have to point the remote at the IR sensor on the camera. For the price though, it works well.


The next thing that I keep in my bag that is super important is Extra batteries. I keep extra EN-EL3e(camera batteries) fully charged in my bag. Mine are grey like this
Photobucket
Adorama has them Here .
But no matter what style you have, it's good to have at least one extra battery just in case. I also keep AT LEAST two sets of rechargeables for my flashes as well. I like the Energizer Lithium rechargeables.
Photobucket

They hold their charge well, and recharge quickly with the supplied charger. I got mine from Sam's for $28. The pack came with 8 AA rechargeables, and the charger. You can then buy more batteries separately. Something that you may want to do though if you are going to have multiple sets of batteries like I do, is to take a sharpie marker and label each set. I labeled mine 1-7. That way when you go to get a fresh set out of your bag, you can keep the sets together.

Another very very important thing that I keep in my bag is lens cleaner and micro fiber cloths. I use a lens solution like this: Photobucket, and a microfiber like this:Photobucket. They work very well to remove dust and debris from your lenses. The are NOT to be used on the sensor however. I repeat DO NOT clean your sensor with this solution or a cloth like this. If you get dust on your sensor the next little extra that I keep in my bag will help you out. The Giottos rocket blower can be your best friend for those little specs of dust on your sensor.
Photobucket

If you get dust on your sensor, you can use this little baby to remove all but the most stubborn pieces.

Manuals. I know my camera inside and out. I can make all of my adjustments on the fly, and most of them I have set in different shooting modes so all I have to do is change the mode, but from time to time something will pop up that I don't remember how to do, or I just need to reference the manual for something. I keep them in my bag for this reason. There is a "wedding emergency kit" that I take with me to weddings in my bag as well, but it deserves it's own post entirely so I'll hold off on that.


The last thing I want to tell you about that I keep in my bag is my Leatherman Wave tool. If you've never seen a Leatherman before, think of a Swiss army knife on steroids. These things are awesome. They have almost any tool you could think that you may need in the field. Pliers, screw drivers, scissors, knives, saws... etc. If you don't have a pair, you should really look into getting one.

Photobucket

That's if for me. See everyone tomorrow. Jason Read more on this article...

Tuesday, February 17, 2009

Thomas Demand At the Art Museum


I know it's late notice for everyone but a friend(and fellow photographer) of mine Breanna Gaddie told me about a free lecture at the Cincinnati Art Museum tomorrow night 2-18-09. The only thing it will cost you is the $4 to park. Thomas Demand is a German photographer who is world renowned for his ability to make models look life sized and real. You can see some of his work Here . It starts at 7pm. I plan on attending and I hope to see all of you there! Look for a much better more in depth post tomorrow. Sorry I was really busy today so I didn't get a chance to post anything up. On a side note Shad got the Keys to his new studio today. I will be shooting along side of him there, so all of my studio work will be there from now on. We worked out a pretty good deal that the two of us are happy with to share the space. Everyone will get an invite to the open house/grand opening in a couple of weeks when we get finished with all of the improvements. See you all tomorrow. Jason Read more on this article...

Monday, February 16, 2009

Pocket Wizard has anwered my Prayers


What you are looking at above is the New transmitter receiver from Pocket Wizard. Up until this point the only way to get full TTL capabilities with radio frequency dependability was to use radio poppers. They work fine, but they have to be attached to the side of your flash somehow, and they WONT FIRE A STUDIO STROBE. This was the deal breaker for me. I wanted to be able to fire a studio strobe and use TTL when I have my speed lights attached. Thanks to Pocket Wizard, you can do it now. The pocket wizard unit has a hot shoe attachment on the bottom that allows you to attach it to the hotshoe of your camera. On the top of the unit there is a female hot shoe adapter that allows you to place you flash on top as well. This means that you can still use your speed light on the camera and fire other flash units wirelessly with TTL capability. For $219.00 they're a steal. The Canon version is available starting March 1st. The Nikon version won't be available until the second quarter of this year. I hope they hurry up with those Nikon units. I'm going to get on the pre-order list when it's available. Read more on this article...

Homemade Snoot


As promised today I'm going to show you how to make a homemade snoot. Like I said yesterday, a snoot is a light modifier that limits the spread of light as it comes from your light source whether it be a speedlight, studio strobe, or constant light source. Basically it's a long tube attached to the end of your light source. I have seen them made from cereal boxes over at the Strobist , and really nice professionally made ones like they have over at HonL . I prefer something in the middle. After all i don't want to show up at someones wedding with a frosted flakes box wrapped around my flash, not very professional looking. To make a snoot like shown above, you'll need to spend about 7 to 10 dollars at your local Micheals, or Hobby Lobby. Luckily for me, my wife was already going over there so I just added my materials to her list, and it didn't cost me anything! :~) Ok that's a lie, I'm sure it will cost me at some point, but for the moment I have a free snoot.

Photobucket

These are all of the products you need. You will need about 3 feet of hook and loop(Velcro) which can be found at Micheals or Walmart for 2 to 3 dollars. You will also need a sheet of the foam paper or foam board. The wife said that it cost .99. A pair of scissors, a strait edge or ruler, and possibly a razor blade. Here's the process:

Photobucket

First you want to take your flash(in my case my SB800) and attach Velcro to it. Make sure that you install the little diffuser that goes on top and place the Velcro below it. You won't be able to get that diffuser on if you place the Velcro in the way. Pay attention to which side of the Velcro you attach to the flash(fuzzy side, or the rough side) you will want to remember this for later. Now lay your flash down on the piece of black foam paper and wrap it around your flash starting on the right side of the flash. Wrap it all of the way around and overlap the staring point by about 1/2 to 3/4 of an inch. Mark this point and remove the flash. Lay the piece of foam paper flat on the table and using a strait edge mark all of the way across the foam. Using either a razor blade, or a pair of scissors cut the foam. Now, take the opposite side of the Velcro that you placed on the flash, and attach it to the flash all of the way around. Leave the backing on the Velcro at this point because we're not ready to attach it yet. Once you have attached it to the flash all of the way around cut off the excess. Remove the Velcro that you just cut from the flash and set the flash aside. Now lay your piece of foam board on the table that you cut in the previous step. Remove the backing from the Velcro, and starting at one edge stick the Velcro to the foam paper. You should be about 1/2 inch to 3/4 of an inch short depending on how much you overlapped. Now attach your foam board to your flash like below:
Photobucket

Wrap it all of the way around until you have an overlap at the end. once you get to this point you will place another piece of Velcro along the entire seam where the foam overlaps making a complete cylinder from top to bottom. It should look just like the image at the top of this page. Now let me show you what it does.

This is a picture without the snoot attached:

Photobucket

This is the same shot taken with the snoot attached:

Photobucket

Obvious difference. The times that I use a snoot or grid(which produces a similar effect) are when I want to keep everything else in the photograph dark and just illuminate a face or a certain feature. A snoot is great for that. Or, lets say you have your lights setup and any you find that there needs to be an additional amount of light in a very specific place on a subject, you would use a snoot. That's it for me today, see you tomorrow. Jason Read more on this article...

Sunday, February 15, 2009

Modifiers


This is an image I took a while ago at the Krohn. It's really great to have such a large wonderful place so close that we can go anytime of the year to take photographs. No matter what the temperature outside, it's beautiful in there. Today I want to talk about the different modifiers available for the speedlights, and what they do. So lets get to it.

A light modifier is anything that controls the direction of the light, and where it falls. The best examples of ones made for small speedlights are the products made by Honl Photo. Here is a picture of some of their stuff, which is a clickable image. Click on the photo and it will take you directly to his site for purchase of any of these products.

Photobucket


Photobucket

The First and most basic type of modifier is a bounce card. The bounce card is anything attached to the top of the flash that will bounce the light towards the subject when the flash is pointed strait up. The SB800 has a small bounce card built into it, but not really as useful as even a 3 1/2 by 5 inch index card. as you can see from the image above, there isn't a whole lot to it. The best resource I have found on the net is from
A Better Bounce Card . There are some really great video tutorials on there on how to make a flash card. I usually just rubber band an index card around my flash and call it a day.

Photobucket

This is a grid. The basic job of a grid is to narrow the beams of light which produces a small circle of light on the subject. If you take a grid apart it looks like a set of honeycombs. This produces a dramatic effect on the subject. It is a very useful way of limiting the amount of light that spills outside of the intended area. The best units I have found are the ones made by Honl listed above.

Photobucket

Last but not least is the snoot. The snoot is basically a tube that directs light to a specific point. It makes your flash act almost like a spot light. It will put a very concentrated beam of light where you direct it. This is useful when doing dramatic lighting. Tomorrow I am going to do a step by step tutorial on how to do a homemade snoot. See you then. Jason Read more on this article...

Thursday, February 12, 2009

Workshops and Website

Hey everyone I have some news. Because of all of the positive feedback about the workshop we've been getting, we decided to give the subject it's own blog. I placed a link on the top right corner of the page entitled Photo Workshops. Check there frequently for up to date info on upcoming workshops, as well as leaving comments on ideas or things you'd like to know more about at the workshops.
Shad Ramsey Photography Check out all of the cool flash he has going on over there. And Check the monkey picture he put under the about us tab. Shad Finally has his site up and running for everyone to see. :~) Read more on this article...

Wait For No One


This is my good friend Eric. We were doing a shoot of his one week old son Christian, and in the middle of it Christian decided he was hungry. Newborns will wait for no one to eat. :~) This is a classic butterfly lighting setup however you don't get the butterfly shadow under the nose because of the angle that he was turned to feed the baby.

We talk about lighting as photographers all of the time. We say "oh, that's a Rembrandt look", or "we used a basic 3 light setup"; but do you really know what any of that means? If not, you'll find out today.

We're going to start with the Basic of the basics. The Rembandt light. What this consists of is a subject, a background, one light, and the camera. The key in Rembrandt lighting is creating the triangle or diamond shape of light underneath the non light side eye. This can be done with a reflector, or with proper placement of the light. The light should be roughly at a 45 degree angle from the camera. Also the light should be higher than the subject. This is important in creating the triangle of light. Here is an example of how the lights would be setup for a Rembrandt style photo:

Photobucket

Next up is Butterfly Lighting. Butterfly lighting got its name from the small butterfly shadow that is placed under the nose of the subject. There is one light source in this setup high above the photographer pointed down on the subject. This style is used mostly in fashion shoots. Here is an example of the setup below:

Photobucket

Moving on we have another very simple lighting setup called side lighting. This is when you light the subject from one side or the other with one light source. It causes one half of the face to be lit properly, and for the light to fall off very quickly to the non light side. This creates a very dramatic portrait. Here is an example of the light placement for this style of shot:

Photobucket

The last lighting technique we're going to talk about today is the most complex of the "basic" light setups, but is still very simple to accomplish. This is the basic 3 light portrait. It consists of a main light to either side of the camera at a 45degree angle from the photographer set up higher than the subject. On the opposite side of the the main light is the fill light. This is a light set lower than the main light, and again at a 45degree angle from the photographer. This light is used to fill in the shadows on the non main side. This light is usually 1 to 2 stops less than the main light. Last we have a background or separation light. This is placed either directly behind the subject, or off to one side slightly, and pointed at the background. This is usually set 1 to 2 stops higher than the main light. This will separate the subject from the background and eliminate any unwanted shadows. Below is a diagram of the setup:

Photobucket

I'm going to be shooting my favorite little model Matthew tonight, so stay tuned for some more of those(last one was a couple of days ago on the black & white post). Be sure to check out the Pink Productions page, as well as the info for our upcoming workshop. Jason Read more on this article...

Wednesday, February 11, 2009

Bryan Hughes

Hey I wanted to give everyone that is using photoshop CS4 a heads up. I just read an awesome article over at Scott Kelby's Blog . It's Guest Blog Wednesday, and he has Byran Hughes from Adobe there. Bryan gives a really good tutorial on stitching photos together. Check it out, it's a definite must read. Read more on this article...

Crop Factor


I thought with the announcement of the new lens and the whole confusion about crop factor, and DX FX formats, I should talk about what it all means. The image you see above was taken on Fuji 35mm film. An image taken on 35mm film is actually 24mm X 36mm which is the same size as the FX format. FX stands for "full frame". This is represented above by the entire frame. The Standard digital size or DX is 23.6mm X 15.8mm. This is represented above by the inner white box. There are also what's called Medium format digital cameras(Hasselblad style cameras) which are 48mm x 36mm. These are considered medium format cameras, and they cost quite a bit more than the standard Nikon, or Canon's do. When we are talking about the size in mm we are talking about the physical size of the image sensor inside of the camera. This is important because the larger the image sensor, the more area you have to receive light. A 12 megapixel DX sensor and a 12 megapixel FX sensor are completely different. Yes they have the same amount of pixels, but since the FX image sensor is so much larger, the pixels(or light receivers) can be larger. This translates into better performance in low light situations.

Let's talk about the "crop factor" for a minute. What you see above is the crop factor. The DX sensor is physically smaller, so it can't capture as much of the image as the FX can. Most of the lenses (especially prime or fixed length lenses) were made for the FX or full frame format. This means that they can take advantage of the entire field of view that the lens has to offer. For example, the image above was taken with a 50mm prime Nikkor lens on a film camera. If I had placed that same lens on my Nikon D300 and taken the same picture, the most I could have gotten in the photo would be what is inside the white box. THE FOCAL LENGTH DIDN'T CHANGE, but the field of view did. I could see less of the image because my digital camera's sensor is smaller and couldn't take advantage of the entire field of view being offered by the lens. Some people mistake this field of view change as a change in the focal length, it is not. Just because you have a DX(smaller) sensor attached to a lens that is made for film or full frame digital sensors, doesn't mean that the focal length has changed. A 50mm is still a 50mm no matter what.

When you are out at the camera store shopping for a new lens, the sales person may start talking about the 1.5 crop factor, and what your effective focal length is. What they are doing is this, the FX sensor, and 35mm film is roughly 1.5 times the size of the smaller DX sensor. So what they do is multiply whatever focal length lens you are looking at, by 1.5. Lets use a 200mm lens as an example if you multiply the 200mm lens by 1.5 you get 300mm. This means that with that 200mm lens, you are seeing the same amount of the picture that you would if you had a 300mm lens on a full frame(FX) or film camera. This DOES NOT MEAN THAT YOU GET A 300mm LENS FOR THE PRICE OF THE 200mm. It simply means that you have a different amount of viewable area with a DX camera than you do with a FX camera. Don't let them fool you.

If you have any questions about this, or need some more examples of how the crop factor works, please email me, or leave comments on here. Sometimes this can be a hard concept to understand. Read on to hear about Nikon's awesome new lens. Jason Read more on this article...

New Nikkor Lens


Nikon just announced the release of its first DX only prime lens. When I say DX only, that means that it is not meant for film cameras, or full frame digital cameras like the D700,D3,or D3X. It will work with them, but only in DX crop mode which cuts the megapixels in half. It's a 35mm f/1.8 "prime" lens. I obviously don't have any experience with it yet seeing as how it was just released two days ago, but I would imagine that the quality is Just as good as all of the other prime lenses produced by Nikon. At the moment I can't find this lens listed anywhere for sale yet, however Nikon is listing an estimated price of $199.95. For that cheap, I'll pick one up to try out. There isn't anything in this focal range available outside of a zoom for the DX or cropped format, so it may make a nice addition to the gear bag. If you want to check out the lens for yourself click here . Read more on this article...

Tuesday, February 10, 2009

Launch Party

Hey everyone I know I said something about it in an earlier post, but as a reminder, the Pink Productions launch party is happening February 27th at the Havana Martini Club downtown Cincinnati. This is going to be a party to remember. There will be all sorts of services in the VIP section for the ladies, and a few that the men might enjoy as well. Also Guys, there will be beautiful women running around everywhere. The party starts at 8pm women get in for free before 10. $5 cover after that. I will be there photographing the whole event, so don't miss it! For more info click on the Pink Productions link on the top right corner of the blog. Read more on this article...

Depth Of Field


This is a quick shot that I took the other night while I was preparing dinner. The cutting board was not setup, it's just how it happened to look when I was done cutting the green onions. All I did was setup a couple of flashes to light it. Not going to hang it on my wall, but not a bad shot either. I think this image is a great example of DOF control. What I mean by DOF or Depth Of Field, is the area in focus. In this example there is a very shallow DOF because the cutting board is the only thing in focus. Everything behind it is a nice soft blurred mesh of colors and shapes. This was the intention, it didn't happen by accident, or by luck. Today I'm going to explain how to achieve this DOF control, and examples of when to use it.

The first thing to say about DOF is that it is controlled by the aperture. The wider the aperture (the lower the number), the more precise your focus will be. Meaning if you have an aperture of say f/1.8 the area that you are focusing on will be in focus, but the foreground and the background will be out of focus. Your lens doesn't go to f/1.8, not to worry. You might have a lens that only goes down to f/3.5, this is ok. You will still be able to get the same effect, the background just won't be as blurred as it would be with a wider aperture. Remember from an earlier post, I said that the minimum aperture obtainable is dictated by the lens, not the camera. I can get the same wide open f/1.4 with my 50mm lens on a D40 as I can on a D3. It's not your camera it's your lens.

Now how to control the DOF. In the example above, I shot the scene with a 17-50mm 2.8 made by Tamron. I my aperture was set at f/2.8 and I was zoomed all of the way out. I selected single point auto focus because I wanted to be very specific on where I was focusing. It worked out pretty well. The knife is in focus, but the tea pot and stove in the background are out of focus. If I had gone the other direction, say to f/22, the entire scene from front to back would have been in focus. For example, I took this photo last year at Zoo Blooms here in Cincinnati. I wanted it to be sharp from front to rear of the photo, so I set my aperture to f/22.

Photobucket

As you can see it is in focus from front to back, and side to side. DOF is also important when doing portraits of people. Most times you want to blur the background into a nice soft swirl of colors, but you don't want to go too wide with the aperture because if you do, places on the face and body will start to get blurred. Most times the "sweet spot" on a lens is around f/8. Any wider of an aperture and the body starts to loose focus, and smaller of an aperture, and the background will begin to come into focus. These are just some rough settings for the aperture. Of course like everything else, you need to play around and see what works out best for you. As always if you have any trouble or questions, feel free to email me. Jason Read more on this article...

Monday, February 9, 2009

Black and White


This is a shot I did of my Friends son for him to use on his model card. He is using the color version, but I really liked the black and white version and I thought I would share it with all of you. It is also a nice lead up to the tutorial today. I am going to cover every way that I know of to covert an image to black and white using photoshop. We'll also cover how to give an image the sepia look.

Lots of people like the black and white look. I know I do,that's what I started shooting when I first got into photography, and I can't get enough of it. But now that we are in the digital age there's really no reason why you can't have both the color version and the black and white version. To be honest I've never used the black and white feature on my camera because I want to be in total control of the overall quality of the picture and I don't want to leave the black and white conversion up to the camera. Photoshop has enough ways that you can convert to a black and white that allow you to keep complete control of the image tones, and contrasts, that I can't believe anyone would want to do it any other way, unless they don't know how to take advantage of the tools that Photoshop has to offer. So let's start with the easiest. First though we need to get a little info out of the way. A "black&white image" really isn't just black and white. It is black, white, and grey. A true black and white doesn't have any mid tones, and looks more like an abstract than an image. So from here on out when I say black and white, I mean the black,white,grey tone images.

The most basic, down and dirty way to make a color image black and white is with saturation. So start by opening up your image in photoshop. You will then click Image-Adjustments-Desaturate. That's it! You have a black and white image. Pretty easy huh. Not the best tones in the image, not the best contrast, but hey it'll work in a pinch. From here you can do a number of things. First lets talk about how to add that sepia look. After you have desaturated, you will go back into Image-Adjustments-Color Balance. This brings up a dialog box that looks something like this:

Photobucket

You have sliders that move in different directions to either add or subtract color. For this purpose we're going to be using the RED slider and the YELLOW slider. What you want to do is move the RED slider towards the red side, and move the YELLOW slider towards the yellow side. How much is a personal preference, and to be honest I don't do the same amount for every photo. It just depends on what I think looks good. Once you have it the way you like, click OK, and you're done. You have a Sepia image. Now like I said, this is the most basic down and dirty way I know of to create a black and white.

Next up we have my favorite way of creating a black and white with photoshop CS2. I say CS2 because in CS3 they add a black and white option, but we'll get to that in a little bit. So you have your original color image open in photoshop. You first have to go to the WINDOWS tab at the very top of your screen. Under this tab make sure that CHANNELS is selected. You will need them for the next step. Look in your boxes on the right of your screen. Look at the box that has layers in it. There should be a tab marked CHANNELS, select it. Once you have this tab selected you will see four boxes, RGB, RED,GREEN,BLUE. Skip over the RGB channel and start with RED. Click the RED box and see what it does to your image. It converts it to black and white and shows the areas that had the most red in them, highlighted. Do this for all of the channels until you decide which one you like best. For me I tend to use the GREEN channel more than any other one. Once you have selected the channel you are going to use, click on IMAGE-MODE-GREYSCALE. You will get a warning box that says "Discard other channels?". Click OK. Now you have gotten rid of all of the other channels and are now keeping just the channel that you selected. You're not done yet though. Go back to IMAGE-MODE then click on RGB again. Now you're done with the conversion. You can click on the Layers tab to get away from the channels tab. Now on to that Sepia. You could do it the same way that you did earlier, but there is a much much better way to go about it. I know we haven't talked about layers yet, but even if you don't quite understand what a layer is, just follow these instructions and you'll be much happier. Go to LAYER-NEW ADJUSTMENT LAYER-COLOR BALANCE. You will get a new layer box pop up that will name it "color balance 1". Click ok. You will now get the same box that we got earlier. You do the same adjustment that you did earlier. The difference is, now you aren't changing anything on the actual image, you are making a "layer" over top of the image that you can erase or change at any point you want to. If you do the Sepia and you decide that you don't like it, you can just drag that layer to the trash can and it will delete the layer leaving only the black and white image. Also if in the course of adjusting your image you decide that you want a little more red tones in your image, all you have to do is double click the little icon that has the circle and triangle inside of it in the layers box. This will bring the color balance box back open for you and allow you to tweak it some more. There are lots of other effects and things you can do to layers that are outside of the scope of this tutorial, but we will get into them on a later date.

Now lets talk about my current way of converting to black and white. I am using Photoshop CS3, and new to CS3 is an adjustment layer called "Black and White". Simple enough right? So in Photoshop CS3 open the picture that you want to convert, got to LAYER-NEW ADJUSTMENT LAYER-BLACK & WHITE. This will open a box that looks something like this:

Photobucket

You can adjust the sliders on here to boost the Red, Green,or Blue highlights. Once again there is no correct setting for every photograph. You will have to adjust until you are happy with the photo. Once you are done with this, you click OK, and you're done. You can now go and do a color balance layer like described above to add a sepia tone. I think that Adobe hit a home run with this layer option when they added it to CS3. I think it does a good job of converting the image without having to make any adjustments to the slider box. I usually just leave it the way it is. There are also many plugins that do an exceptional job of converting to Black&White, but I don't have any experience with any of them to tell you good, bad or indifferent. If any of you have used a plugin for this let me know how it works, and what you like about it. I'm always open to new ideas.

That's about it for me today, I have to get back to editing. See everyone tomorrow. Jason Read more on this article...

Saturday, February 7, 2009

Controlling Flash


This is my Wife Dawn on her Birthday last year. The combination of the day at the spa, and having her makeup done professionally made it a whole lot easier to photograph her. I really love the way her skin looks so smooth, and the beautiful wood background that allows for good separation from her hair.

Today we're going to talk a little about flash control. It took me a long time to get my head wrapped around this concept. We are taught that shutter speed, aperture, and ISO are all parts of exposure. The setting of one, effects the setting of the other. If you lower your aperture, you raise your shutter speed and vice verse. Now throw all of that out the window when you talk about flash. The only thing that controls the flash is aperture. When you are trying to get the exposure right when using flash, you have to decide first what your cameras flash sync speed is. This is the highest shutter speed that the camera can sync with the flash. Most modern digital cameras sync at 1/250 of a sec. This is important because this is the shutter speed that you want to set if you want to use strictly flash for your image, and no ambient light. So to go about this you would set your camera to manual. Set your shutter speed to 1/250 of a second. Start your aperture at f/5.6 and take a test shot. Look at your histogram and see if the exposure is correct. With your flash set to TTL the flash will adjust the output to compensate to make the exposure correct. If by chance the ambient light is too bright for the flash to compensate, the highlights will be blown and you will see it on the histogram. If this happens, you will have to adjust your aperture. The higher the aperture, the less flash that is allowed in. Using the example talked about above, if the image is overexposed with the aperture set to f/5.6 you will have to move your aperture up to f/8. The higher the aperture, the less light allowed in.

Ok, so now you have the aperture set right, the image is exposed correctly, but the background just falls to black past the subject. What to do now? You have to let more ambient light in. The way to do this is to lower the shutter speed. You would go from 1/250 to 1/200. The slower the shutter speed, the more ambient light that will be allowed in. The best way to figure this all out is to try it. Set the shutter speed, set the aperture, and take a picture. Look at your histogram to see if the exposure is correct. Play with the settings, until you get the look you're after. I hope this helps you understand what goes into flash exposure. Have a good weekend. See you all Monday. Jason Read more on this article...

Thursday, February 5, 2009

CLS-Beyond


Welcome back everyone. I hope everybody enjoys the comic strip WTD. I have to tell you that It's one of my favorite comics. Today I want to do a little more on the Nikon CLS system. We've already talked about how to get the flash off of the camera. We talked about the beauty of the Radio poppers, we talked about a little technique. What we haven't talked about are those times when we need more light than one unit will provide. Say for example you are lighting a large group of people, and you have them standing in 4 seperate rows, what now? I'm going to cover that today, as well as some of the other settings availible in the wireless mode besides TTL. So lets jump right in.


In the example I gave above, you want to light a large group of people but you still want to be mobile, meaning you don't want to have to carry a heavy stobe setup on location. When you have a large group like this(more than two rows deep) you start to have problems with light falloff past the second row. This happens because of something called the inverse square law. Without getting too technical the math end of it, what you get is every time you double the distance of your subject from the light source(the flash) the light hitting the furthest subject will be 1/4 of the intensity of the light coming from the flash. So what this means to you is, the light hitting the people in the 4th row, will be 1/4 the amount of light hitting the people in the 1st row. This will result in very poorly exposed subjects in the rear. The way to combat this is increasing the amount of light you are putting out. Nikon CLS is great for accomplishing this. With the aid of a bracket similar to the one shown in the photo above, you can effectively mount two flash units with one umbrella/softbox. The really nice thing is that since the Nikon flashes are fired wirelessly you don't have to add any additional hookups or cords. All you have to do is mount it and shoot. The TTL will take care of the rest. Remember that TTL is Through The Lens metering. The meter in the camera says what the light output has to be to light the entire scene, the camera will adjust the flashes accordingly. This takes the pressure off of you as a photographer to be creative and not have to worry so much about the technical aspects. You can focus on the more important things like composition, and subject rapport.

What if you find that because of a particular color on the background, or becuase of a particular color that the model/subject is wearing TTL isn't adjusting the flash output properly? What to do then? There is a setting labeled M in the CLS controls on the master flash/camera. In this setting you can manually adjust the output of the flash from 1/1 down to 1/128. This is a lot of range for a flash. This is especially useful if the background is black/white. I ran into this very problem two weeks ago shooting the awards for gymnastics in Covington. The trick was to set the flash to M(manual) mode and adjust it accordingly. I can and will do posts on how to get the proper exposure when adjusting your flash in manual mode, but the BEST online resource I have found for this is over at the Strobist . David Hobby does the best job I have ever seen when it comes to off camera flash. There is more information on that site than I will ever know. So if you want to know how to adjust for the proper exposure and can't wait for my post on it, check that site out. There are a couple of other options on the menu of the flash, but we'll talk more about them next week. See ya tomorrow. Jason Read more on this article...

Wednesday, February 4, 2009

WTD


How's it going everyone. It's been another cold couple of days around here, but still plenty of exciting things going on. We have been actively looking for studio space in the area and we found two places at the same time. We looked at one yesterday in Bellevue, and we're looking at another one today in liberty township. We're going to keep our fingers crossed that one of them will work out for us. If anyone knows of available space please let us know. Hopefully our next workshop will be located in a studio. I also wanted to tell you all about a funny little comic strip put on by Aaron Johnson. It's called WTD or What the Duck? I have posted a link on the right(just click the picture). It's all about photographers and the funny things that we go through. I hope you all enjoy it.

On to some technical stuff. Lots of people have expressed interest in learning photoshop lately, so I thought I would give a little basics on the program. First of all The full version of Photoshop is expensive. Right at $1000.00 is a lot to spend if you aren't a professional who needs all of the power that photoshop has to offer. There is a cheaper option called photoshop elements. This is a toned down version that still has most of the tools the average ameteur needs to properly adjust images. For most of what I will be talking about here, I will be giving you the exact steps as done in Photoshop, but the steps are similar for Elements.

I'm going to go ahead and assume that you already have the program installed. If you are having trouble with that, please feel free to email me and I can walk you through the installation, or if you're having particular trouble, we can do it over the phone. So you have it installed, but before we start editing any photos, lets do a couple of tweaks to make sure we have our workspace setup correctly. The first thing you want to do is go to Edit-preferences-performance. A box will come up that says memory usage. By default it should be set to around 50%, I move this up to around 70%. This is the amount of RAM that the computer devotes to photoshop while you are running it. This is important when you start to do heavy editing with lots of layers. Also in this box in the upper right hand corner you will see a control marked history states. The default here is 20, move that to 70. I will explain what this does in a little bit. Click OK in the upper right of the box. Now on the top of the screen you will see your menu bar. Select Window, make sure that History, Layers, and Navigator all have check marks next to them. If they don't, select them. Alright, these are the basic things that needed to be changed before we started. Lets move on to editing a photo.

You can get an image into photoshop a number of ways. With photoshop open, you can select file, open, then select the image location from there. If you don't already have photoshop open you can go to the picture location on your computer and right click the image, then select open with, photoshop.

Ok now we have an image open in photoshop. What now? Well The first thing to do is decide what your goal is for the image. Does it need to be cropped, does it have red eye issues, do you just want to sharpen it a little bit. These are the things you need to think about before you start jumping in and making changes. The first thing I usually do is Cropping. I want to get rid of the excess "stuff" if there is any. the way to do this is to grab the crop tool shown below.

Photobucket

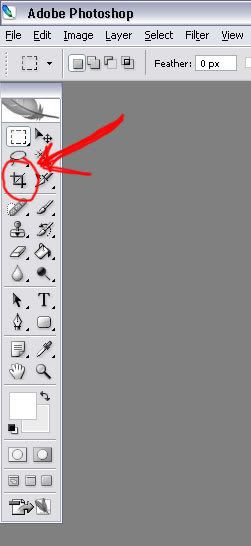
Once you have selected the crop tool, you will move to one of the corners of the image left click the mouse and drag to the opposite corner. This will increase your crop evenly horizontally as well as vertically. When you have gotten to the point you want, release the mouse button. You will see 6 small boxes outlining the "marching ants". These are your adjustment points. If you want to adjust your crop in any direction just grab any box by left clicking it, and you can adjust the crop. When you are satisfied with your selection, you can right click anywhere within the image and select crop. Two things will happen. Your image will crop, AND you will get a history point in the history box on the right side of the screen. This is important to note because as you make any adjustment to your image, a history point will be created. If at any point you make an adjustment that you want to undo, you can select that adjustment in the history box, and click the trash can in the bottom right corner of the history box.

Now you're done cropping, what to do next? I tend to adjust with levels, but for this tutorial we're keeping it basic. You have to determine what you want to adjust next. Do you need a color adjustment? If so go to image-adjustments-color balance. From here you will get a small box that pops up and allows you to adjust the colors. click ok when done with that. Next click on Image-adjustments-shadow and highlights. This will bring up another small box that will allow you to do some tweaking to the shadow and highlight areas of your photograph. Once again click OK when finished. Before we move onto sharpening, lets talk about converting to black and white. Like with everything in photoshop there are multiple ways of converting an image to black and white. The way I prefer is beyond the scope of this tutorial so we'll talk about the most basic way that I know. Once again click on Image-Adjustments then click De saturate. This will take all color out of your photograph and make it a black and white. If you have photoshop CS3 or CS4 you have an option under Image-Adjustments called "black&white". If you have one of these versions, this is the best way to accomplish the transition.

The final step in the Basic Photoshop post processing workflow is sharpening. The best way I have found to do this is by going to Filter-Sharpen-Smart Sharpen. Once you click on this you will get a dialog box that has two sliders. The top slider is the Amount, and the bottom slider is the Radius. There are a few quick rules when sharpening an image. First less is better. We've all seen images that are oversharpened. They have a "halo" effect. They seem to be glowing. Don't use a percentage above 75 on the amount slider. In the Radius slider don't go above 2. Those are some general rules to go by, but you can play around to tweak it to your liking.

Now you've adjusted your image, and you're ready to save it. Before you do that, let me tell you what I like to do. I go to the folder that the file is originally from, make a new folder inside of it and name that folder "Reworked". I do this so I can save my file in a separate place from the original and so that I can easily tell the difference between the two. So now, go to Photoshop, click File-Save As, then select the folder that is marked "Reworked". Make sure that in the bottom of your save as box you have the file type set to JPEG. Depending on what changes you make to the image, Photoshop will change that file type. Just make sure it's on JPEG and you will be fine. Click OK and you're done. Now all that really only takes a few seconds once you get good at it. On average I spend about 70 seconds on an image. I do this by practicing and getting to know Photoshop.

So there you have it. Photoshop basics. This should get you started, and on your way to being comfortable with photoshop. Of course there are a lot more things that can be done in photoshop. I'll start to work more advanced posts in here to help you use those features. If you have any questions, feel free to email me and I will do my best to help you. Jason Read more on this article...

Monday, February 2, 2009

Advanced Class


Hey everyone, we're planning on doing our next class on March 7th. It's going to be an advanced class, picking up where we left off before. If you didn't make the first class however don't worry. We're going to do a recap from what we talked about last time and see how everyone is doing with what we talked about. Also this time around, if you register early and prepay, we'll knock $10 off. If you bring a friend, we'll knock another $5 off of yours and $5 off of theirs. Let me know if this is going to be a schedule conflict for anyone. Also we're not sure if we're going to be doing it at the same community center as before because we have a studio that we're looking at leasing so we may be in our brand new studio! Keep your fingers crossed on that. Anyway, Let me know what you guys think. Jason Read more on this article...

MAC VS. PC


SO, you have the newest camera, the baddest lens, 32 gig cards and awesome shots of whatever... Now what do you do with them? You edit them right. You upload them to your computer and you open them in photoshop and attempt to make them better. A little crop here, some dodging and burning there... But what kind of computer should you be editing on? A PC or a MAC? Laptop or Desktop? Dual core, single core, 64 bit, 32 bit, it's kind of confusing. Well lets break it down for you so you can decide for yourself.

First lets debunk this popular myth that is floating around out there. A Mac is a PC. I know that's not what those two pictured above want you to believe, but I assure you, that they are one in the same. The Mac is just a brand of PC, similar to the difference between Toshiba and Dell. The only difference is that the Mac uses it's own proprietary operation system instead of using Windows. Mac's use the same Core 2 processors that all of the others use. Now that we have that out of the way, lets talk about why so many people love Mac's for image editing. The just work. The Operating system on a Macintosh is as nice as they come. It is sleek, it isn't loaded with a bunch of extra fluff like you get with Windows, and it is geared towards the art community. The Mac OS is also made to work pretty seamlessly with most peripheral devices. You plug in your printer, or your camera, or your Wacom Tablet and they just work. No special drivers. No downloading patches, it just works. Now, don't get me wrong they do have their downsides. They don't play too well with PC's. This means that if you have a home network, you'll have to have a 3rd party software like Network Magic to connect them properly. Also if you are using it (the Mac) to connect to a VPN at your work or access company emails over the Internet, you may have some compatibility issues. The biggest downside of the Mac is price. For the very basic Macbook you will pay no less than $999.00. That is for the BASIC laptop. You won't get much done using the basic model. Not very good for heavy editing. To get a laptop from Mac with enough horsepower to run photoshop well, you will have to step up to the Macbook Pro($1999.00 minimum). The desktops aren't much better, for example the IMac(the most basic desktop offered by Mac) will set you back $1199.00 and the Mac Pro will set you back 2799.00 minimum. I say minimum because that is where they start, without upgrading anything. Now lets take a look at the Windows PC...

First of all, Windows it just the operating system. Microsoft doesn't produce any hardware so they can't control what prices are. (Apple sets a minimum price that it's retailers can sell their computers for) This is great for consumers because as new computers come out (roughly every month) retailers will place the "old" units on sale. You can pick up a Windows based PC for half the price of the minimum level Mac, with twice the hardware of the Pro level Mac. I'm not joking when I say that either. I was in the market for a new laptop and I kept my eyes open for deals at Best Buy. I picked up a 17inch Toshiba laptop with a full keyboard(including the numbers section on the right) with Three GIGS of RAM(for those who don't know the more RAM the better for $600.00. This is a steal compared to the Macs. Another example is with a desktop. I just built a desktop for a coworker a few months ago. He spent $1500.00 on everything, but he got the equivalent of a $5000.00 Mac... I won't bore you with the specs, but trust me it was loaded. Now are there downsides to the Windows PC's? Yes. I have been lucky and haven't had any problems with Vista on the Toshiba that I bought, but I know a lot of people that have had issues. The reason I haven't had many issues is probably because of my background with computers. I have a good working knowledge of the "PC". I have tweaked Vista to my liking, and made it more friendly. Since there are so many different manufacturers of Windows based computers there are literally millions if not billions of hardware configurations available. This is important to note because most problems that arise with Windows is because of compatibility issues with hardware. When you make the software and hardware like Mac does, you control everything from start to finish, making sure that everything works well together. As far as running photo editing programs, a Windows unit can do it just as well as a Mac. They run just as fast, and Photoshop preforms just as well no matter what system you use.

As far as which version to choose(laptop vs desktop), it's a toss up. You have to go with what works for you. Do you want to be stuck editing in one spot all of the time? I don't so I chose a laptop. The laptops have come a long way in the past few years and can keep up with their desktop counterparts.

When it comes to the hardware stuff, it gets a little tricky. Most of the time you can't go wrong with more Ram. So if it says that this computer has 2 or 3 or 4 Gigs of memory, you're good to go. You don't get any advantage out of going above 4 Gigs of RAM with the standard version of Windows. Processors are a whole different animal. With the processor the main thing to remember is Dual core. Dual core processors are plenty fast enough to handle the most taxing photo editing software without a problem. The only other real piece of hardware that is important when it comes to photo editing is the Video card. Video cards come in all shapes and sizes but the key for most photographers is to be sure that the computer you are buying has a separate video card. This means that the video isn't being handled by the motherboard. On the specs of the computer it should say somewhere GPU or discrete graphics card. If you don't know, ask a salesman if it has a separate graphics card, if it doesn't pass it up no matter how cheap it is. You can't process images without one.

So the choice is really yours. Do you want a computer that is more expensive but less likely to have problems? Or do you want a computer that isn't as expensive but may have a few more compatibility issues. For me it's a no brainer. I enjoy tweaking, upgrading, and working my system, so I prefer a Windows PC. Tell me what you like. Read more on this article...