Tuesday, September 21, 2010

So you want Low Noise at High ISO


Hey Gang! Glad to see you're back. I'm not entirely sure what the image above has to do with high ISO and low noise... It was shot with a D300 in studio conditions at ISO200. I wanted to share this shot with you all though. It's my friend Heather, who after a horrific traffic accident used Yoga to regain mobility. She's an inspiration to anyone who has to overcome an obstacle.

On to some high ISO low noise goodness! I had a friend on twitter(by the way if you're not following on twitter, why not? it's @reddoorphoto)ask me about the noise capabilities of the D700 because he was considering buying a new camera and wanted better noise reduction/capabilities. I asked him if he had thought about a D300s instead. At half the price, it comes really close to the quality of the D700 in the noise department, plus it shoots video! To prove this to him I set out to do a little experiment... More on that after the jump:


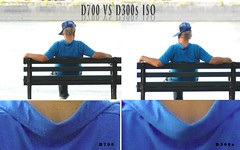
We had an engagement session last night, so I took the opportunity to grab Shad's D300s and his D700 and do a quick, unscientific test. Same lens, same ISO(3200)spot metered off of the guys back in the shadows. Take a look at the results:

ISO comparison

To view it larger click HERE

The D700 is on the left, D300s on the right. I Spot metered for the back of his shirt that was in the shadows, so the background is blown, but that's ok. You can see the noise(what little there is) on the zoomed in section. I think the D300s file looks as good, or better than the D700 file. I'm pretty sure that both are perfectly acceptable. Is there a $1300 difference between the D300s and the D700? I don't think so. Unless you need the full frame for an ultra wide lens like the Sigma 10-24 FX, I can't see a justification to go with the D700 instead of the D300s. This was of course a real world test, not a scientific laboratory test, but the proof is in the image above. What do you think? Let me know in the comments below.

Thanks for stopping by, see you next time! Jason

Read more on this article...

Saturday, September 18, 2010

Content aware Fill and when to use it!


Hey everyone! Glad to see you made it back. Today I want to show you one of my favorite features of the New Photoshop CS5 and when I would use it. Content aware fill was introduced in the latest version of Photoshop (CS5). Basically you select an area, select fill, or press backspace (on the background layer) and Photoshop does it's best to fill in the selected area with what it thinks should be there. I was skeptical about how well it would work when I heard about this feature, but I have to tell you, it does a wonderful job. Above is an image from a recent wedding. Beautiful image, but what you don't realize is there was one of those big Rainbow playsets in the background that had to be removed. It literally took 20 seconds to remove, start to finish. Hit the jump to see how...


image1

So that's the original. You see in the upper left hand corner there is a bright, ugly playset sticking out like a sore thumb. In the past I would have added a layer, selected my clone stamp tool and gone to work. It would have taken at least 5 minutes or more depending on how difficult the background was, and how precise I needed to be(dependent on how large of an image I thought they might make). Here's how we roll in CS5.

First we're going to select the area we want to remove. In this case I used the Elliptical marquee tool. You don't have to be really exact. As a matter of fact in this case, I wasn't precise at all.

image3

There are two things to note in this image. First, I have the background layer selected, so all I had to do was press Backspace on my keyboard to bring up the fill dialog box. If you have any other layer selected you would go to EDIT-FILL and when the dialog box came up, you would select CONTENT AWARE FILL. Once you have the selection, and the content aware fill box up, press OK. This will fill the selected area with what CS5 thinks should be there. It does this by looking at the pixels around the selection and using a special algorithm it recreates the area.

After you press ok, it will take a few(varies depending on the size of area being filled) seconds and as you can see in the image below it fills it. I didn't go back and do any touching up of the area. This is exactly how it came out of Photoshop.

SR1_3588-2

Use content aware fill to your advantage. Reduce your editing time, and do a better job with this great improvement. Thanks for stopping by, see you next time. Jason

Read more on this article...