Saturday, January 31, 2009

Even when it's cold outside


It's been so nasty outside lately that most people haven't wanted to get out for much of anything. I have to tell you that I haven't felt like being out in this weather either, but yesterday I decided that I should get out and go see the new exhibits at the Art museum. I love to spend time there. It's interesting to see how painters organized their subjects, and how they interpreted the light that fell on them. It's often said that to become a better photographer, you should study painters. Painters have long paid special attention to light, and shadow. After all it's not just the light that makes a photo beautiful, it's the shadow as well. The difference between the shadow areas and the highlight areas are what gives the photograph depth. While I was at the Museum I decided to stop by the Krohn Conservatory. It's one of my favorite places to visit in the winter. No matter what it's like outside, it's always beautiful inside of the conservatory. The first image is of the current setup in the west room. The second photo is of a flower that caught my eye while I was walking around. I shot it at f/2.8 with single area focus selected so that I could focus specifically on the center of the flower. Hope you guys like it. So no matter what the weather is like outside, there's always somewhere nice to photograph in winter. Jason Read more on this article...

Friday, January 30, 2009

CLS in Action and Filters


So this is what we use CLS for. Also in this photo you can see the use of the Radio Poppers . We set these flash units up then crossed the street to shoot through the window. We wanted to see the lettering on the windows, as well as the table through the window. Overall it worked out well, but I don't have any of the finished images to show you. Shad is working on them and then they're going to the Jr. League people for their cookbook. Shad will have them up on his site soon. Speaking of Shad's website. He had enough of my constant torment so he broke down and built a website. Ok well he bought all of the software to do it. Either way, it's almost ready to go, when it is I'll post up the link for everyone to check out.

Today down and dirty on filters. Which ones do I need? Which brand do I go with? The first and most basic filter that I have on every lens that I own is a UV filter. UV filters,(sometimes referred to as Haze filters) are really nothing more than a clear piece of glass on the front of your lens. So why would you want one? One word PROTECTION. A "good" UV filter only costs between $40-$60. Much less than replacing or repairing your lens. If you drop your lens, if you drop something on your lens, or if you accidental get something like salt water on the front of your lens you'll wish you had one on there. I really like Hoya Filters. Hoya filters are good quality filters. They have essentially two different versions. They have single coated filters which us just a clear protective coating to prevent scratching. They also have Multi Coated lenses. These lenses are coated with multiple thin layers of metal that prevent glare, and ghosting. I prefer the multi coated filters because of the decrease in glare. The multi coated filters are about twice the price of the single coated filters. I have mentioned that I like Hoya, and Hoya is what I use, but there are other quality filters out there as well. Tiffin makes a nice filter, as well as Cokin. The main advantage of a Tiffin Filter is thickness. They are much thinner than most other filters.

So by now we know that we should all have a UV filter on our lenses at all times. No matter day or night. The next filter that I have found particularly useful is the circular Polarizer. Again I prefer the multi coated versions. The Circular polarizer is a filter that reduces glare caused by the sun, and cuts through the haze. They should have been named the haze filters, but that name was already taken... Anyway these filters aren't cheap. Expect to pay $100+ dollars for a good version. This is an essential filter for anyone wanting to do any kind of landscape photography. It will make a night and day difference in your photos.

Next we're going to talk a little about Neutral Density filters. There are many versions of the filter, but before I talk about all of them, I want to talk about what it actually is, and what it's used for. Neutral Density filters are filters that have a dark tint to them. They darken the light coming into the lens, much like a pair of sunglasses darkens the light that comes into your eyes. This is useful for two things, number one, if it's a bright sunny day and you want to use a large aperture like f/2.8 you may need something to reduce the amount of light coming in so you can get the proper exposure. This would allow you to have a very shallow depth of field when it's very bright out. The second reason to use a neutral density filter is to darken overly bright areas of the photo. This is the job of the split neutral density filter. They are only tinted on half of the glass. This allows you to turn the filter to cover either the top half of the scene, or the bottom half of the scene. Also there are varying levels of "tint" on the filters making some darker than others. Everywhere from 1/4 of a stop up to 4 or 6 stop difference.

These are the main filters that I use. There are other filters out there. They make warming filters, cooling filters, etc... These filters are mostly used for film because with film you don't have the ability to change white balance. Hope this helps some of you make a decision on which filters you need and want. See everyone tomorrow. Read more on this article...

Thursday, January 29, 2009

Nikon CLS part 2


Wow, what a busy few days. Between the inches of snow and working on a business plan for this upcoming year, I have been burning it at both ends. I hope everyone made it through the snow storm ok, luckily I have 4wheel drive so I didn't get stuck anywhere. On to some more CLS. So we ended the last segment with enabling the wireless on your flash units. Today we're going to talk about what to do with them now that you have them wireless.

The first thing that we should note about the CLS wireless capabilities are the limitations. The limitations for the units are theses. The units have to be within line of sight of each other. This means that the small IR (infrared) eye on the side of the "remote" flash has to be pointed at the camera. Sometimes you can get away with them being pointed not directly at the camera but that's only when you are in a tight enough space that the remote flash can pick up light that is being bounced off of the ceiling/walls. If however you are using the SU-800 wireless controller, there isn't any preflash to bounce off of the walls, or ceilings so you HAVE to be within line of sight. (Shad and I found this out last weekend the hard way)

So now you have your flash off camera, what are you going to do with it? Well there are a lot of things that you can do with it. Lots of different lighting scenarios that are now an option because your light source is movable. Now instead of your light source being trapped on top of your camera, you are free to move it anywhere within line of sight that you want, and you can attach any kind of light modifier that you want. My favorite modifier is a simple light stand and shoot through umbrella. The reason I prefer a shoot through umbrella when working with hot shoe strobes is because of power. Hot shoe mounted flash units don't have a lot of power so you have to make use of every little bit that they have. The shoot through umbrellas work at closer distances, and in my opinion they have less harsh light output. When you use an umbrella, or softbox, or shoot through panel, you are taking your light source from a small concentrated point and making it a much larger, softer diffused light. Also with the addition of two flash units and two light stands, you can light a large group of people, something that is not possible with an on camera flash. The really great thing is that the flashes auto adjust in TTL. This means that you don't have to go to each flash when you add a new unit, they automatically adjust output to compensate. This is a huge time saver, and it also keeps you from having to buy a flash meter to get the exposure just right. But what about when you want to place a flash out of the line of sight, then what do you do? Read on...


Here's the scenario. You have a Model setup and posed. You have two flash units on stands with umbrella's. One high on the camera right and one lower on camera left. You take your shot, and it looks ok, but you don't have much separation of the background. It's hard to tell where the models dark brown hair stops and the background begins. You need a background light. So, you want to place a speedlight on a small stand behind your model facing the background. But wait How are you going to do this? There isn't a strait line of sight, and yes you may be able to pick up some of the bouncing flash to trigger it, but for this example lets assume that you can't. What do we do now? We hook up a set of these:

Photobucket


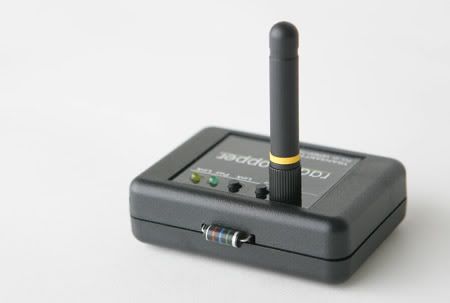
This is a Radio Popper . These little beauties are gods gift to CLS users. What it does is, it mounts on top of your master flash unit attached to your camera(or the SU-800) and reads the flash trigger signal from the master unit. It then transmits that signal via RF(remote frequency) to the receiver units attached to your remote flashes. This allows you to place your flash unit outside of the line of sight and still fire it wirelessly, while still keeping the total control of your system on your camera. You can shoot through walls, This is an amazing add on to the Nikon CLS system, and to be honest, I don't know why they didn't have the units communicate through RF to begin with. There would then be no need for this aftermarket unit. I don't work for Nikon but if there is anyone reading this that does, please lets have some RF on the next version of CLS...

That's if for me today. I have a shoot tonight where we're going to be using between 6 and 8 speed lights all working in CLS so I'll take some setup shots to show you. Jason Read more on this article...

Tuesday, January 27, 2009

White Snow, and Black Cats

In light of the wonderful white stuff we have all over the ground outside, I thought I would talk about How to get proper exposure when photographing things that are solid white(like snow) and things that are solid black(like black cats).

Digital SLR's have this need to set a neutral point. This need to set a neutral point isn't usually a big deal, because like we talked about yesterday they have thousands of images loaded into their software to which they compare your scene and attempt to adjust the exposure to compensate. Here's where it gets tricky. If you are shooting at something pure white(like snow) the camera has no way of setting a neutral point in the scene. What you end up with is a muddy grayish looking snow. The same thing applies when it comes to black cats. The camera doesn't know where to put the neutral point, so it just looks muddy grey instead of black. The way to fix this, is by using that awesome $5 grey card. When you're confronted with a scene that you know is going to cause a problem like this, you're going to want to shoot in manual mode. Then place your grey card in the scene where you want to take the photograph. Zoom in and spot meter off of the grey card to set your exposure. This will give you the proper exposure for the scene instead of the muddy grey. Another trick I have found that works well if you're trying to shoot a scene like this on the fly without a grey card or in manual mode. If you are shooting the scene with an all white object, you will want to use your exposure compensation and put it to the +2 side. This may not be the perfect exposure but it'll get you pretty close. For the second subject, you want to do just the opposite. Dial the exposure compensation down to -2. Again this might not be perfect, but it will get you pretty close and you can tweak it if you need to. Read more on this article...

Monday, January 26, 2009

Photographing Gymnastics Sucks


Man what a long weekend. Gymnastics Friday, work and a workshop on Saturday, then Gymnastics for 14 hours on Sunday. I'm beat... The workshop went great! Very small intimate class(matter of fact only two people plus Shads wife). Thanks to JJ and Cathy. I hope you guys had a good time and learned a lot. To those who didn't make it, don't worry we're going to do another basics class as well as an advanced class and a photoshop class. not sure on the dates yet but I'll keep you posted. Also I want to send a big thank to K&R photo for sponsoring the workshop. They provided some great stuff to give away. I promised Cathy and JJ some links on Saturday so here we go. For the stock photo stuff that we were talking about I use IStock Photo. For the lenses we were talking about for Cathy's Sony, I found them Here. Also we talked about a lot, and like we said you're sure to forget a bunch. Don't hesitate to call Shad or me, or send us an email. We're here to help. Also if you guys have any suggestions on how we can make the class better, please let us know. We already talked about having more handouts, and possibly having more time for the room. We love feedback, it just makes us better. Another thing we were talking about was having some shooting workshops this spring when it gets warmer out. Actually meeting somewhere and doing some shooting instead of the classroom environment. What do you guys think about that? We'll go with what everyone wants, so give your opinions. Alright, enough about workshops. On to something a little more interesting, well I think it's interesting. Lets talk about white balance.

We talked about white balance on Saturday. We talked about how to change your settings, what they meant and why you would want to change them. We also talked about custom white balances, and how to set them. But just as a refresher, and for those who weren't able to come, lets go over it all again. Light color is measured on the Kelvin scale. They use a very specific scientific process to determine the "temperature" of color. The science behind determining color temperature values starts with the theoretical black body radiator, a block of black metal through which electric current is passed (performed as a computer model). As the metal is heated, it turns red-yellow, then white, then blue; as the temperature of the metal is measured at any given color produced, we then match the color to that temperature and a color temperature value is determined. At the low end you have a color temperature of 1500. This represents the color of light that you would expect to have from a candle. Moving up the scale, the next major color/temperature we come to is 3500. This is tungsten, which is the light omitted from most normal 60watt light bulbs found in the home. Again moving up we see the 5500daylight range. This is the white light that we get at noontime when the sun is the highest in the sky. On up we have the 6500 florescent range. This is the green color that comes from our standard florescent bulbs. Above 7500 we see blue tones. These are the tones that you will get when viewing the sky at twilight, or just before sunrise and just after sunset. Why do you need to know this information? Because the color of the light will determine the feel of your photograph. You wouldn't want to take a cheerful family photograph under 6500Kelvin lighting. It would give everyone a sick green look, not very flattering at all. We as photographers have to determine what the color of our lighting is, and adjust our cameras to compensate.

When looking at the white balance menu on your camera, you will see a number of options. The first is most likely Auto. Auto WB looks at the scene and compares it with thousands of known lighting situations built right into your camera. It compares it and makes a guess on what it thinks you should be set at. This is fine most of the time. Most of the time the camera makes an accurate determination on what the color balance should be, and adjusts accordingly. This choice is Indicated with an upper case A. The next setting that you will see is the florescent setting. This is indicated with a picture of a rectangle (supposed to look like a florescent light) and squigglys around it. This is the setting you would put your camera on if you were in a building with florescent lights overhead. Next you will see a picture of a light bulb. This picture is the tungsten setting. Used for shooting indoors lit with regular household bulbs. Moving along you will see a Sun. This selection is for shooting in daylight. Between the hours of 10am and 5pm. Then you might see a cloud icon. This is the cloudy function, and... you guessed it, used on cloudy days. Some of you have the actual color temperature numbers to choose from. This is controlled just how it sounds. You select what color temperature you're at, and it adjusts for you. Last but not least, custom white balance, or PRE. This is used to set your white balance instead of using a pre saved one. Why would you want to use a custom white balance? Maybe you're in a room with florescent, and window light. The two different colors mixing wouldn't be able to be handled by the auto. What you need to do is set your camera to pre(Nikon Users). hold the two PRE buttons down for 3 seconds. Release the buttons and press them again. Once you've done that, you need to zoom in on a
Grey Card, fill your frame with the grey, and press the shutter release. If it read the card correctly you will get a message that says "GOOD" on the screen. If not you will have to re-do it. This will allow your camera to adjust for the color of the light at hand. For serious photographers, custom white balances are mandatory. When you have to get the right color, and you don't want to have to mess with it in photoshop, custom white balance. We ran into this problem over the weekend while shooting the gymnastics. They had clusters of lights lighting the convention center where the gymnastics were. Three of the lights were a daylight 5500 color, but the fourth was tungsten colored. It was like this for each color, so we know they did it on purpose for some reason. Anyway, none of the "normal" WB options would have worked, so custom white balance was the answer. Here is a quick image I shot of some of the practice stuff:
Photobucket

The shot at the top is of Shad doing his beam shooting. Check out the proper camera camera technique and everything. True professional. ;~) That's it for me today. I'm exhausted. Time for some sleep. See you tomorrow. Jason Read more on this article...

Saturday, January 24, 2009

Missed a day!


Sorry everyone. I did intend on posting yesterday but Two nights ago I got a phone call around 8pm from my friends over at CO Photography desperately needing some help covering a gymnastics event in Covington. Sue is such a sweetheart I couldn't say no, so I spent my day at the Northern Kentucky Convention center yesterday. Places like that are the reason we need Nikon D3's, D700's, and ultra fast glass. I was shooting my D300 at ISO1600, f/2.8 and the BEST I was getting was 1/120th of a second. The best!! And to top it all off, I was shooting the level 9 girls which MOVE across that floor. Anyway there were lots of blurred photos, lots of good ones too, but man was it hard work. I'll be back there tomorrow shooting all day, so probably nothing from me tomorrow either. For those of you coming to the workshop here in a few hours, be prepared for a fun learning experience. Shad and I have come up with some really good material, and examples, plus we'll be doing a lot of hands on stuff too. If you're not coming, WHY NOT? Everyone can learn something! Just kidding guys, but seriously for those of you not attending we will be doing another basic class in about a month, as well as an advanced class. I'll have more details about the advanced class in a week or two.

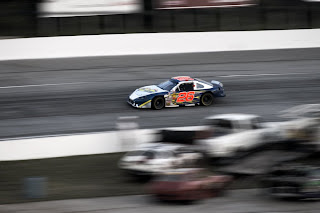
On to today's post. I thought we'd talk a little about some techniques today. Specifically panning. Panning is a technique that you see a lot in motorsports, or marathons. It produces the feeling of motion. The idea is to use a slow shutter speed and move the camera with the subject. This keeps the subject in focus, but blurs the background. Above you see an example of panning. This was from a stock car race that I photographed when I was in Atlanta on a business trip. There are some general rules when It comes to panning. First you have to have a background that will produce a visible blur. Someone walking down the street with a solid color wall behind them won't look good panned because there is nothing to give the blurred lines. Second, manual focus is key. You can track the moving subject with continuous autofocus but it's easier to pre focus on the spot that you plan on actually pressing the shutter release button. This focus should stay the same because usually the subject will be moving from left to right in front of you so they will be staying in the same focus plane. Start "tracking" the subject before you intend on pressing the shutter release, and keep tracking the subject for a few seconds after the shutter has closed. I have found this to be very helpful in getting a sharp subject and really blurred background. Also Don't get discouraged. You will trash a lot of your shots. Lots will come out with the entire image blurry. Don't worry about it, this happens to us all.

The technique works like this. You start by setting your camera to Shutter Priority mode. Set a base shutter speed of 1/30 to 1/60 of a second. This may very but I have found that these are a good starting point. In shutter priority the camera will select the aperture to produce a correct exposure for the shutter speed that you have set. If you point your camera at the subject, and it says HI in the display, you will have to change something. You will either have to lower the ISO or you will need a neutral density filter to block a little light. Otherwise if is says HI and you take the photograph anyway, you will get an overexposed image. Now, you have the shutter set, the aperture is good, and you start to follow the subject through the scene. Press the shutter release button and wait for it to close and keep panning like discussed earlier. Now "chimp" it. Take a look at the shot you just took. How does it look? Is the subject blurred, or is it in focus? If it is blurred, why is it blurred? Did you track the subject at the same speed that it was going? Maybe you're shutter is set too slow, bump the shutter speed up a stop. Is the background not burred enough? Take the shutter speed down a stop. The key here is patience and practice. Before you know it, you'll be taking all sorts of photos that convey motion. There's nothing better than to have a person viewing the photograph feel what you felt when you were there. With a pan, they can feel the motion, they know what it was like to have that mountain bike whiz past you, they know what it looked like to have the Indy car flying down the strait away at 250mph. This is what I strive for, and hopefully what all of you strive for, to have the person looking at your photo feel how you felt when taking the shot.

Alright enough from me today. Get out there and shoot some photos! that's the best way to learn. Hands on take a photo and see what works and what doesn't. I'll see you all on Monday. Jason Read more on this article...

Thursday, January 22, 2009

CLS part 1 Setup

Ok so everyone probably already read the quick overview of the CLS system yesterday. You should know by now that it is a wireless system that works with any current Nikon camera above the D60. The older Nikon D70 and D70s also had the built in wireless capability to work with the CLS system so if you have one of those you’re wireless ready as well. For you guys and gals with a Nikon D40, D40x, D50, or D60 you’re not out of luck when it comes to wireless. You will be able to go wireless with the addition of the Nikon SB800, or SB900 speed lights, or with the Nikon SU800 wireless controller. I prefer the Nikon speed lights over the controller because the SU800 costs about the same as the SB800, but the SB800 can be used as a regular hot shoe flash when not working in the wireless environment. Also the SB800, and the SB900 can be used as part of the exposure when working wirelessly, but we’ll get into that later.

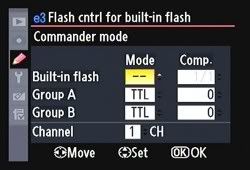
So lets start with settings. This will vary from camera to camera so refer to your camera manual to find the exact menu selection to get to your wireless control. For reference purposes I’m going to be using my Nikon D300 because that’s what I have in front of me. One quick note to the D80 and D90 users, to be able to access your wireless controls you have to first enable view all controls. To do this, go to the setup menu and select the full menu option. After you do this you will be able to select your wireless mode. Ok so the first thing we need to do to get into wireless mode is to go into the menu for flash. This is usually the custom settings menu. On the D300 you enter the custom settings menu and then go into the E selection which is Bracketing and Flash. For those of you shooting the D70, D80, and D90 it will probably look a little different. Once you get into the menu, scroll down to where it says “Flash cntrl for built-in flash”. Press your selection button to the right to enter the flash control menu. Once inside this menu you see 4 options, TTL, Manual, Repeating Flash, and the one we want COMMANDER. Scroll down to commander and press the right selection button again this will get you into the commander menu. In here you will see a menu that looks like this:
Photobucket
Before I can explain where to set all of these settings let me tell you what they are. Starting from the top, Built in flash has three options, TTL, Manual(represented with a M) and ---. TTL works just like it does normally. The camera will take a light reading and adjust the flash output accordingly. The only difference here is that it will also fire the wireless flash. The Manual or M mode allows you to adjust your output specifically. There are applications for this, but usually I adjust the flash output with the ev compensation and it does the trick. The --- setting means that the on camera flash does not add anything to the exposure. Instead it just does what's called a pre flash and triggers the wireless units. I never use anything but the --- setting for the on camera flash. On camera flash is too harsh and doesn't have enough control for me so I don't bother with it. Now the next menu to the right is the compensation for the flash. If you were using the built in flash to add to the exposure, and lets say you took a test photo and there wasn't enough light coming from the front, you could go to the compensation menu and move it to +0.3 or +0.7 to boost the output from the flash. Back on the left, the next menu down we see is Group A. With the Nikon CLS system you can have up to 3 groups. Group A, group B, and group c. Each group is independent of each other. Lets say you have two groups. Group A we are going to place high on a stand behind an umbrella on the camera right. Group B we are going to place low on a stand behind an umbrella to the camera left. Now you take a test shot and decide that you want to have less flash from the camera left. You go into your menu and select group B. Go to the compensation and move it to -0.3. Now you have dialed down the output from the left, but kept the output from the right the same. This is the reason for having multiple groups. The settings inside of these groups are the same as they were for on camera flash, TTL,M,and ---. The --- for the groups though turns that particular group off. The final menu at the bottom is channel. There are 4 channels available to you. 1-4. These are here in case that you are somewhere that has more than one photographer and they are using the CLS system as well. This allows you to have your own channel, and prevents you from firing someones elses flash by accident. That's it, those are all of the settings that you have to deal with on camera. Pretty easy huh?. I usually keep my stuff on channel 1, group A unless I'm using multiple flashes. I always keep my on camera flash to --- because of the reasons stated earlier. Now lets move on to the flash units.

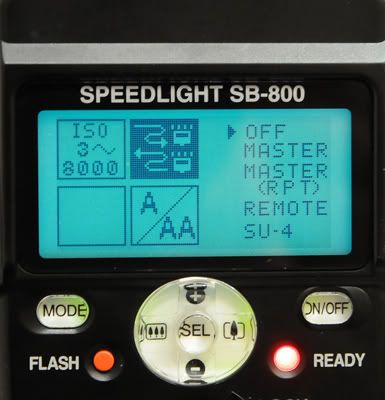
There are four different flash units that work wirelessly with the Nikon CLS system. They are the SB900, the SB800, the SB600, and the SB-R200. The SB900 is Nikons newest flash unit out and I have only had my hands on one for a few minutes. I can tell you that once you set your channel and group with it, there is just a switch on the back to quickly flip to wireless. Very easy, very fast. The unit I'm going to start with is the SB800. Setup for it is very simple and intuitive. First you have to press the power button (obviously) and turn it on. Then press and hold the center SEL button for three seconds. You will get a screen that looks like this:
Photobucket
Press the right button on the middle toggle button to highlight the upper right box. Press the SEL button once to move the highlighted selection to the OFF selection in the upper right side of the screen. The first selection available here is OFF. This means that the flash will not be used for wireless, rather it is just for on camera "normal" use. The next option down is MASTER. This is makes the SB800 a master transmitter for use with the CLS system. You would use this setting if you are going to use the SB800 on the camera to trigger other speed lights wirelessly. Users of the D40, D40x, D50, and D70 will use this setting as you don't have wireless built into your cameras. The third selection is MASTER(RPT). This is the selection used when the SB800 is acting as the master flash triggering the other units wirelessly, but also doing repeating flash or high speed sync at the same time. Next we have the REMOTE setting. This is the setting used when the SB800 is the "slave" or is being triggered wirelessly. This requires that you have another SB800, SB900, or camera that has wireless built in triggering the flash. The 5th and final menu is SU-4. This is used when using the SB800 as a MASTER on an older camera not equipped with iTTL. The obvious choice here is going to be REMOTE. highlight the REMOTE option and tap the on/off button quickly. This takes us back to the main screen. We are now able to use this flash wirelessly.

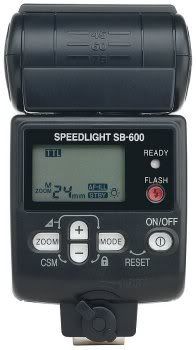
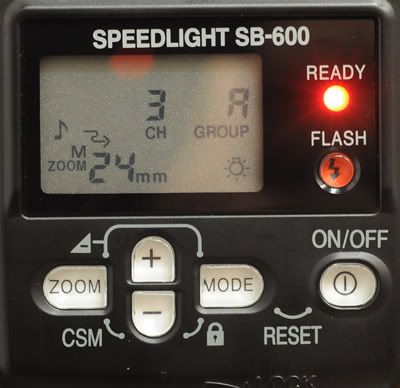
Next lets take a look at the SB600. The setup for the SB600 is slightly different but still not complicated. First we need to turn the unit on by pressing the on/off button for approximately 0.3 seconds. It should look something like this:

Photobucket

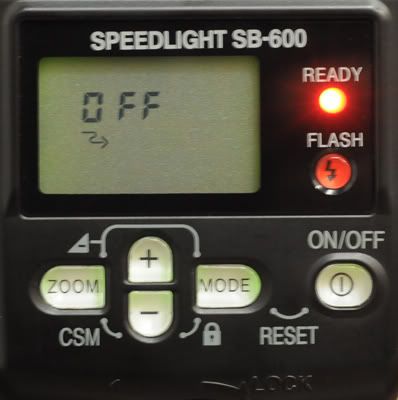
Now, press the zoom and - buttons together for roughly 3 seconds. The screen should look like this:
Photobucket
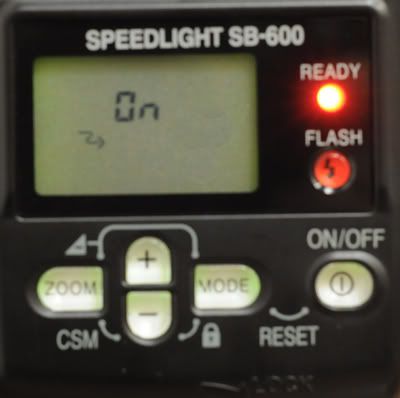
If it doesn't look like that, if instead of the squiggly line it has a picture of a sun or a chime, you just press the + or - button until the squiggly line is showing. Then you press the mode button to change it to ON and it will look like this:

Photobucket
Now from here you press the on/off button once to get back to the main menu. It should look like so:
Photobucket


Now that you have done this you can change your channels or groups. The SB600 can only be used as a SLAVE. It cannot be used as a master, even if you have a camera that has built in wireless. And that's it, you're free to move your flash units around as you see fit.

The SB-R200 is purely a wireless Speed light. It has small switches on the outside that makes it very easy to select channel, and group. There isn't really a whole lot to say about this little flash except that it makes a great little "kicker" light to fill in small pockets of shadow.

There you have it. The basics of getting started on the CLS system. Of course like I said earlier we will be going into much greater detail starting next week when we dive into the SB800's advanced settings. Hope this has helped those of you who didn't know how to set your units for wireless. See you all tomorrow. Jason
Read more on this article...

Nikon CLS Series

So I have a confession to make. last night when I sat down and started to type I realized that the post would have to be really, really long to be able to accurately cover all of the CLS system. There are entire books, and DVD's devoted to this system so I know I couldn't do it justice in one post. Here's what I'm going to do. Starting today I will do a post every Thursday (until we cover everything) on the CLS system. I will start with the basics, menus, settings, and how to make it work with just one speed light and your camera. I'm in the process of typing that up now, but to be honest it probably won't make it on here until this evening. This system is so important that I want to make sure I cover everything, and the only way I can do that is over a series of posts. I hope you continue to follow, and I also hope you learn some things. Check back later tonight for the first post on the CLS system. Jason Read more on this article...

Wednesday, January 21, 2009

Child Photography


Child Photography, especially baby's is rough. They move, wiggle, squirm, and just plain don't cooperate. I photographed Christian (the little boy you see above) last night. He is only a week old in the photos, and can barely hold his head up. You can see the evidence of this in the tea cup photo. In retrospect I think I would have done better to fill the cup with a towel or two and laid him more on his back. Anyway, this shoot was especially tough because he had just woke up and was cranky. The key here was to shoot fast and get the exposure right the first time. My setup was a SB-600 on a stand with a shoot through umbrella to the camera left, as well as a SB-800 on the floor to camera right for a little fill. I shot at 1/120th of a second at f/4.0. All in all it was a fun little shoot, Eric(Christians father) has been my friend since we were infants(our mothers were friends since high school). I was really happy to be able to do the first shots of the little guy.

I know many of you have signed up for our workshop on Saturday but we have two slots left. I'm going to put this offer out there to you, if you bring another person that wants to learn to the workshop, we'll cut your cost from $50 down to $30. If any of you know anyone that wants to learn about photography, and the workings of a SLR, bring them along.

So on to some lighting. Today lets talk a little about off camera lighting. Specifically The Nikon CLS system. The Nikon CLS system is the wireless system made by Nikon that incorporates Nikon speed lights, and Nikon camera's (above the D60). All camera's above the D60 have built in wireless "commander" capability built in, meaning that you can place your camera in commander mode and set your flash to remote and trigger it wireless up to 30feet away. They have to be within line of sight of each other to work because the use infrared to trigger. For the guys and gals shooting with the D40,D40x or the D60 don't worry you too can use the CLS system. The way for you to do it is with the use of the SB800 speed light. This unit can be set as the "master" and send the wireless trigger to the other flash units. There is a unit called the SU800 that will work as a master for you guys, but I prefer the SB800 because of it's addition of the use of flash when not doing off camera flash. The big advantage of being able to get the light off of camera is to control shadows. To get beautiful side light, or a wonderful butterfly shadow, you have to place the light at a significant distance and angle away from the lens. There are whole DVD's on this topic including Nikon's newest DVD "A hands on guide to Creative Lighting put on by Joe McNally, one of the most renowned photographers in America. He goes into extreme description on how to set, use, and push your speed lights to the limit.

The other really nice thing about the Nikon CLS system is the ability to control all flash units from the master unit or on the camera itself. This allows you to quickly and accurately adjust your light output without going to each individual flash. There are many many other things that are great about this system. We're going to go really in depth about all of this in our advanced workshop next month. Stay tuned for more info on that coming up. Until then I'm off to get some dinner, but I'll try to have a follow up post sometime this week about the more advanced settings. Jason Read more on this article...

Tuesday, January 20, 2009

Product Photography


Sorry for the late post today. I spent the morning down at Ron Wood Photography talking with Vinnie about some wedding shooting. Seems as though I'm going to be giving them a hand when they need it. Made a quick stop at Provident Camera, then it was off to do some product shots with Shad. What you see above is some quick setup shots. These shots were for People Working Cooperatively's Oscar night, which is an auction where the proceeds go to a great cause. Check them out, they're a great organization.

The key to product shots is setup. The correct color background, proper lighting, and the right lens makes the shot. For lots of products, the idea is to get in tight and focus close. Macro lenses work really well for this. We were shooting with a Tokina 100mm Macro but we were shooting with a D700 full frame. For you guys shooting a cropped sensor, the Nikon 60mm is a great choice. These lenses will allow you to get nice tight correctly focused shots very easily.

When it comes to lighting, I almost always prefer studio strobes or Nikon speed lights. Flash really just gives you so much more versatility than continuous lighting. Product photography would be the exception. We setup a continuous 3 light kit that had color balanced bulbs that come in at 5500 Kelvin. This allows us to quickly move from shot to shot and still get a nice clean look. It is important to note here that we set a custom white balance and spot checked for accuracy.

The last part to the equation of product photography is the product presentation. As you can see in the image above we took time to make sure that every piece of the "gift basket" of dog toys was displayed in a manner that the viewer would be able to see them. Placing the largest items in back, and standing items on end to allow for viewing is very critical when taking this type of shot. Get these three things right, and the shoot will come together nicely. Jason Read more on this article...

Monday, January 19, 2009

Sisterly Love


I absolutely love this image from Somer and Ty's wedding. The opposing colors and the fun of the shot are what make this photo special to me. I really enjoyed shooting this wedding, and I'm glad to have gotten so many wonderful shots for the bride. Read more on this article...

Raw VS. Jpeg


It had to come at some point. I thought I could hold off for a while but here we are talking about it. That digital age old question of Raw vs. Jpeg. People have been arguing about this since the birth of the digital camera age. Peoples loyalties to one format or the other are so strong that it reminds some of us of the classic debate of Nikon vs. Canon. With the Raw people screaming versatility and the Jpeg people screaming file size, it's enough to make you wonder which one is right for you. Lets explore the options and see if we can get to the bottom of it...

First lets talk about what the formats are. The RAW file format is digital photography's equivalent of a negative in film photography: it contains untouched, "raw" pixel information straight from the digital camera's sensor. The RAW file format has yet to undergo demosaicing, and so it contains just one red, green, or blue value at each pixel location. Digital cameras normally process this RAW file by converting it into a full color JPEG, and then store the converted file in your memory card. Digital cameras have to make several interpretive decisions when they develop a RAW file, and so the RAW file format offers you more control over how the final JPEG image is generated. You cannot change the raw data with an image editing software, rather you just add metadata. Metadata is a file stored alongside of a Raw image that saves the "adjustments" you make to the file instead of saving them to the actual Raw file. Raw files are known to be up to twice the size of a JPEG file because of the increased information that is collected with Raw files, and because of the Compression of the JPEG files. Because Raw files are not compressed, they are considered "lossless".

For the JPEG definition I went to Wikipedia, here's what they have to say: JPEG (pronounced JAY-peg; IPA: /ˈdʒeɪpɛg/) is a commonly used method of compression for photographic images. The degree of compression can be adjusted, allowing a selectable trade off between storage size and image quality. JPEG typically achieves 10:1 compression with little perceptible loss in image quality.

JPEG compression is used in a number of image file formats. JPEG/Exif is the most common image format used by digital cameras and other photographic image capture devices; along with JPEG/JFIF, it is the most common format for storing and transmitting photographic images on the World Wide Web. These format variations are often not distinguished, and are simply called JPEG.

What this is saying is that JPEG's are lossy. This means that every time you open and close a JPEG with an IMAGE EDITOR (not a viewing program) the JPEG is compressed and some data gets lost. So that's the trade off, you get more compressed smaller images with JPEGS but when you open and close them multiple times, they begin to look degraded, and pixelated. This is where the file arguments begin. Many photographers say that they shoot JPEG but that before they do anything to the image they save it as a TIFF and this protects the image from becoming degraded. A TIFF file is similar to a RAW file because it is lossless.

So what do I do? BOTH! Let me explain. I think there is a time and place for both file formats. I like to have the advantages of Raw sometimes, but other times the advantages of JPEG appeal to me a little more. The reason a lot of photographers shoot RAW is because of white balance. If your white balance is off, you can adjust it with a RAW file. I like to have this versatility for wedding formal images. For images that HAVE to be perfect, I shoot RAW. I still adjust my white balance for the lighting available, but if I don't like what I see when I get the image on the computer, I have some latitude, to adjust it. The downside though is Raw files take up a lot of room. If I were to shoot an entire wedding in RAW, it would be upwards of 20gigs worth of space. This in my opinion is just too much. Plus I feel that I have enough control of my camera that I can get the white balance "right" 99% of the time. For these reasons, I shoot JPEG for the rest of the event. The pre-ceremony (bridal party getting dressed and ready to go)and the ceremony, as well as the reception are all shot in JPEG. If for some reason I get some sort of weird color cast that I just don't like I can adjust my overall color on a JPEG in Lightroom, but I have to be honest, this doesn't happen very often.

When I shoot anything outside of a wedding, I shoot JPEG. In the studio, no problem getting the color right, it's controlled lighting. If I'm shooting family stuff, again not critical and I tend to nail the white balance most of the time anyway, so it's JPEG. JPEG files are smaller, and for me this is helpful. I shoot with Sandisk 8gig compact flash cards, and when I'm shooting in raw I only get roughly 300 images per card. With JPEG I get double that amount. Yes I have multiple cards, but the more time you spend changing cards, the more shots you are missing. Also effected is the FPS(frames per second) that your camera can shoot. With JPEG I can get 8FPS out of my D300, with RAW I'm looking at about half of that because the files are so much larger the buffer fills up quicker. So this is what I think about the debate. I agree with both sides.

So lets recap, Wedding formals-RAW, Everything else-JPEG. These are just my settings, and you may have a different opinion about it, but many people asks what I shot, and this is it.

Just a quick reminder, Shad and I are having a DSLR workshop this coming weekend January 24th at 1pm. Anyone who hasn't signed up yet, the cost is only $50 but we only have a few seats left. If you plan on attending please RSVP with me at jlykins@jlykinsphotos.com Thanks! Jason Read more on this article...

Saturday, January 17, 2009

Ultimate in Backup


So any of you who have ever seen Photoshopusertv.com have heard the term DROBO. This is a fully automated backup system that works like a RAID system but better. This unit uses multiple hard drives to create mirrored images of each across all of the drives. The thing that separates this drive from a traditional RAID is that it doesn't require that you have the same size drives in each spot. Also unlike MOST RAIDs it rebuilds itself when a drive fails and you install a new one. This unit isn't cheap though. The cost without any drives is $499.99, but I have to tell you that it's worth it. I will be getting one in the very near future myself so I will be able to give you a first hand review. If you'd like to see it in action, you can check it out here and after watching the video you can enter to win a free one. Check it out. Jason Read more on this article...
Friday, January 16, 2009

Why I Love Film


This is an image of Dawn and the twins from the Krohn Conservatory right before Christmas. Notice the soft beautiful grain? There is something about that and the sound of the film advance that I love. You can have your film developed and scanned from Cord Camera for $11 and 35mm comes out to roughly 24 mega pixels. Make sure you opt for the High Res scans when you drop it off though. Otherwise the low res scans will be half of the mega pixels. Before we get to today's post, tomorrow is the meet up on photoshop layers put on by Ohio Valley Camera Club. Click the meet up link to the right to get more information. See you all there. Jason Read more on this article...

Almost forgotten but oh so important


Sorry for the late post today everyone. I have a cold and I don't really feel all that good. I went to the doc earlier and then slept the rest of the day. Anyway enough about boring stuff, on to important stuff. There are a few things that often get overlooked by many people when it comes to digital photography. In my opinion next to the photographer, the camera, and photoshop, these are two of the most important things that determine the final quality of your image. Everyone that uses them will go on and on about how much they changed the quality of their finished photos. They are the Monitor calibrator and the digital tablet.

Lets talk about the tablet first. The one you see above is made by Wacom . They're not the only makers of tablets, but they are definitely the largest maker. They also have the most inexpensive version that I have found, the Bamboo . It is the one shown above, and the one that use. I could have spent $1000.00 plus on a 12X12 version but seriously, this one does the job just fine. I'm not a graphic artist and while I do use it pretty much on every image that I process, I don't digitally "draw" enough to justify the larger version.

Let me tell you why it's such an important piece of equipment for photo editing. First and foremost the Bamboo has 512 levels of pressure. What this means is when you are editing in photoshop with any tool, it will be as if you are actually drawing with that brush, or erasing with that eraser. A little bit at a time. Press harder the tip of the brush gets larger, press softer it gets softer. Not the bluntness of the mouse click. This tablet gives you the freedom to draw on your document, something that you couldn't even think about doing with a mouse. Want to use the lasso tool? I don't know about you, but I could never keep it steady when I was using a mouse. With the Bamboo I never have to worry about that. It really is a much better way to edit photos.

I'm not going to lie to you, it takes some getting used to. At first it's a weird feeling drawing and seeing it on your screen, but with a little practice you will wonder how you ever edited photos without it. A word of caution though, once you do get one and fall in love with it don't let your photo buddies barrow it. I made that mistake about a month and a half ago, and she still hasn't given it back. I think I'm going to just go buy another one... ;~)


The next thing that I want to talk about it monitor calibration. For those of you who haven't heard about it, take note. A monitor calibration unit like the
Spyder 3 is an ESSENTIAL piece of equipment if you want to get correct colors on final prints. Basically the monitor calibrator attaches to your monitor and is shown a pattern of colors. The unit determines what the colors are "supposed" to look like and adjust your monitor to make them correct. I will tell you the truth, this product is awesome. When it is done doing it's calibration, it will show you the before and after and it is an amazing difference. You will instantly see a difference in your final printed image. For those of you that do your printing on an ink jet at home, they have a printer calibration unit as well, but I don't do any printing at home, so I can't tell you how that product works. If I had to guess from the quality of the Spyder 3, I would say that it works as advertised. There are other manufacturers of calibrators, but the Spyder is the one that I have experience with so that's the one I focused on. The cheapest place I have found to buy one is Amazon.com . That's it for me today. I'm going to get some orange juice and go back to sleep. Have a good night everyone. Jason Read more on this article...
Thursday, January 15, 2009

Grey Cards and Custom White Balance


Today's post is two fold. It's to show you a product, but also show you how to use it. Many of you may or may not have heard of a grey card. They are usually made of a thick cardboard like material and are 18% grey in color. The one that I carry in my bag is roughly 12X12 inches, but they come in all different sizes and configurations. They can be picked up here for about 5 dollars, or you can run down to the local Cord Camera and pick one up. Either way, get one. Here's why...

The first and most important reason (at least in my mind) is for white balance. I know I haven't covered what white balance is yet(it's on my list of topics for future posts), but if you read your owners manual on your camera, it will tell you exactly how to set a custom white balance. This is important for so many reasons. If you are shooting in an environment that has mixed lighting, maybe a room lit mostly by incandescent bulbs(normal light bulbs) as well as some outside sunlight, your cameras automatic setting might not be able to get just the right temperature setting for the photo. This is where the custom white balance comes in. You set the custom white balance by placing the grey card in front of your subject or whatever you plan on shooting, and following the instructions in your manual. Once you have set your custom WB you don't have to worry about getting funny orange or green color casts in your photos. I know what some of you are saying, "but Jason, if I shoot RAW files can't I adjust it in Photoshop?". Yes you can, but how much time does it take to go in and adjust each and every photo for the correct WB? If we get it RIGHT in the camera when we take the photo, we don't have to go back and "fix" it in post processing. The better you are at getting everything correct in camera, the better photographer you will become. Also if you ever want to shoot film, you need to know how to do things the right way in camera anyway, because there is no manipulation after the fact.

The second reason to keep a grey card is for exposure. The cameras meter works by trying to set a neutral grey in the photo. If you are shooting something that is pure white, or pure black like snow, or say a black cat, they will come out grey if you don't adjust your camera accordingly. How you do this is simple. You place the grey card in front of whatever subject you will be shooting, set your camera on MANUAL mode, fill the frame of the viewfinder with the grey card. Do this either by zooming in, or if you are using a prime, walk closer. set your exposure accordingly. This means that you set your aperture, and shutter speed so that the meter in the camera shows a proper exposure. Now you can shoot away at your subject and the blacks will be blacks, and the whites will be whites. Not some muddy grey like they would have been. Now let me tell you a trick that learned. Set your exposure with your grey card, then point your camera at your hand. What is the difference in the exposure? Is your hand two stops darker than the grey card? Whatever the difference is, now you know how to set your exposure without a grey card. Just place your hand in front of your subject, point your camera at your hand, and then adjust your camera accordingly. If your hand was one stop darker than the grey card, you would "bump" your exposure up one stop from what your hand reads in front of your subject... Just a little trick if you don't have a grey card with you. There isn't a way to cheat on the white balance though so I would just suggest keeping a grey card with you. You can buy a 12X12 sheet of it and cut it down so that it will fit in your bad. This will have no effect on its performance. Hope this helped you guys grasp what a grey card is and how to use it. Thanks for reading! Read more on this article...

Understanding Exposure


I do my best to explain what aperture, shutter speed, and ISO are on here. I'm glad that I can do anything that I can do to help everyone with these things. I have found a great book that should be even more of a help. It's by world famous photographer and author Bryan Peterson. The book is titled "Understanding Exposure", and it can be found here . I have read it, and it breaks down the basics of photography with wonderful large photos, and descriptions that include the settings that he used. I just did a check of the local library and they only have three copies total throughout the tri-state area and they're all checked out. If you want to read it, your best bet is the link I provided or Borders/Barnes & Noble. Read more on this article...

Wednesday, January 14, 2009

Pink Productions


I am happy to announce that JLykinsPhotography is going to be the exclusive photographer for PinkProductions . We're very excited about this partnership. Click on the link on the right side of the page where it says Pink Productions to check out their site. These girls are the THE premier event planners for women in Cincinnati. Great things to come! Read more on this article...

More Adobe Training

Adobe is doing all sorts of training these days. From online to in classs. Click here to see what's new for this month. Read more on this article...

David Hobby

Hey everyone I wanted to get you a link to a great article on sports photography that I just read. David Hobby from The Strobist is doing a guest blog for Scott Kelby from Photoshopusertv.com . Anyway check it out Here. Read more on this article...

Tripods


I borrowed this image from Adorama because quite frankly I don't have any photographs of just my tripod. I've never thought to take any. Here is the tripod and ball head that I have. With the invention of Vibration Reduction and extremely high ISO cameras, tripods are becoming less and less common for photographers. Sure you will have the macro photographers, or the landscape photographers that still use them religiously but for everyday shooting such as news, sports, and weddings, they're just not needed as much any more. Even with all of these reasons to not have a tripod, there are still times when we need, or want them. Lets talk about how to choose a good quality tripod to hold your equipment.

The first thing you need to determine is what you are going to be using the tripod for. You wouldn't want the tripod I have shown above if you plan on taking it hiking through the Smokey's. If you are going to be doing anything that requires you to walk for any distance with it, you should get a carbon fiber tripod. Yes they cost a bit more than the aluminum versions, but you will be thanking yourself after that 6 hour hike when you can still stand up. Conversely if you are doing mostly studio work and you rarely carry the tripod anywhere you can get away with a large bulky more sturdy tripod similar to what is shown above.

The next thing you need to consider is your equipment weight. How heavy is your body,lens, and other attachments (flash,battery pack,etc..). Some tripods are only good up to 7 or 8 pounds. This is fine for a D40 with the kit lens, but if you have a D3 with a 600mm super telephoto on there, it may get a little dicey if the wind blows. Just make sure when you are researching to buy a tripod, you look at the weight rating.

Height is another important factor. How tall are you? Will a 55inch tripod put the camera at your eye level without extending the center section? This is important. The further up you extend the center section, the less rigid it becomes. If you have to extend the center section all of the way out just to get it to your eye level, then that's probably not the tripod for you. My tripod (shown above) is a 74" max height tripod. It is 54" closed and with the ball head on top, it puts it right at my eye level, just right for me.

Ball heads are like opinions, everyone has one, and they're all different in some way. We could go on for days talking about all of the different styles, uses, designs of ball heads. Do your research before you buy. Go into your local camera store and actually hold the ball head in your hands and see how it will feel to use. These things are usually around $100 so you don't want to get the wrong one.

Good quality tripods like the Bogan, or the Gitzo are very expensive. They cost so much though because they are sturdy, and can stand the test of time. Instead of going to your local Walmart or Bestbuy and picking up a $30 tripod that may or may not be sturdy enough for your heavy DSLR, and it's lens, save your money and buy a nice one like we've talked about above. Buy it once and never have to buy another one ever again. They are completely re-buildable and worth the money.

That's it for todays "technical" post. Keep checking back to read more articles as I post them. Jason Read more on this article...
First Camera


I was digging through some images from earlier this year and I stubled upon this one of my daughter playing with my old Minolta MC-II. Except for the light meter(which was revolutionary for its day) this thing is fully manual. You have to load the film manually, you have to set the film speed manually, you have to do everything manually. This got me to thinking about those times when I was shooting black and white film and developing it myself. Those are the days that really got me into photography. When you never knew exactly what you were going to get when you got the negatives out of the canister. I'll tell you there were many times that I was plesently surprised, and there were plenty of times when I was dissapointed. I can remember one time in particular that I had a close up shot of a deer from the golf course out in front of my grandparents summer home, and I was so excited when I got into the dark room that I mis-measured some of the developer and ended up screwing the whole roll up. It was heart breaking, but yet a lesson learned. Anyway on to todays post. Read more on this article...

What do you think?

I want to know what you guys as readers want to hear about. Do you want to hear more about Photoshop tips, or camera adjustments and settings? I can go in depth for days about layers,curves,blurs,filters and more. Or I can talk about different lenses, tripods, and cameras that I've had, or have. You tell me. I am here for you, so I want to know what you want. Jason Read more on this article...
Photoshop & Lightroom


Anyone that hasn't been living under a rock for the past 10 years has heard of Photoshop. As a matter of fact the term "photoshopped" is the phrase that is now linked with any image that has been digitally altered no matter what software was used. This is all a given. The product that a lot of people don't know about though is Lightroom. This program is also from Adobe . Lightroom is a great image editing program that does a lot of the things that Photoshop does, but does them faster. It also does a great job of importing, and organizing photos. It also does a whole lot more, but to be honest I don't know all of it's functions yet. This is the reason for my post, to tell you about a great workshop coming up. Matt Kloskowski from Photoshopusertv.com is going to be in Covington, KY on January 23rd. Here is the link to the workshop. I will be there learning everything that there is to know about the program, and its benefits, and I hope to see you all there too. Read more on this article...

Tuesday, January 13, 2009

Poor Mans Lighting

Hey everyone I wanted to tell you about a great video tutorial I just watched over at Digital Pro Talk . Its about how to take a very cheap inexpensive flash and make really nice quality photos with it. Anyway check it out Here Read more on this article...

Stained Beauty


This is an image from a recent wedding. It was at the Bell Center in Downtown Cincinnati. This is one of the many beautiful full length stained glass windows in the place. I really enjoyed the decor of this church, and hope to shoot there again soon. Read more on this article...

What group are you in?


I was reading an interesting article this morning in the latest Shutterbug magazine about the urge to run out and get the newest greatest camera. The article talked about how sometimes the newest high mega pixel camera is in some ways inferior to the older cameras. This got me thinking about how we as photographers buy things. There are really 5 categories of photographer that we have to look at here. Where you fall in these categories doesn't say anything about you as a photographer or a person. I'm not going to bash on you like ken does over at kenrockwell.com . Instead I'm going to try to define who buys what and why, in general terms.

The first category that comes to mind is the professional photographer. This is the person that is shooting all day every day for a living. They don't have another day job. They aren't walking around taking snapshots of what they feel like. They are working hard every day to be faster, more efficient, and more productive. After all this is how you grow the bottom line. These people buy the equipment they need no matter what. They have two or three backups of the same or similar body. Usually backups of their lenses and every other piece of gear that they own. They can't afford to have a piece of equipment fail on them in the field, or studio so they have extra. These people don't think twice about buying two or three D3's. The price gets written off at the end of the year anyway so it really doesn't matter to them. Guys like David Ziser over at Digital Protalk that buy two Canon 5DmarkII's at one time. These are the people that are in this category. Buying this equipment isn't a second thought because their lively hood depends on it.

The second set of photographers buying equipment is what I think of as the aspiring pros. These are the people that may have a day job, but shoot 30+ weddings a year. My good friend Jason Dunaway is just such a photographer. Check out his site here. These are the photographers that will still buy good equipment, but may not shoot for the top of the line stuff. Jason, as well as myself don't really have a need for a Nikon D3 or the 5DmarkII. Would they be nice to have? Sure but we're looking at reality here. We have to balance the cost of what we're buying against what we're making. If we spend more than we bring in, it's not being very responsible business people. We choose the equipment that gets the job done for the least amount possible. Our photography business is second to our full time jobs that actually make us our living, thus it doesn't make sense to overbuy.

Third we have The amateurs. These are people that have more money than they know what to do with, and buy whatever is the latest and greatest. Not trying to stereotype, but usually these are dentists, or doctors, or someone else that makes an equal amount of money... These people buy whatever the latest greatest thing that Canon or Nikon puts out and tells everyone that they "have to have" otherwise they're not a good photographer. Equipment does play a part in the ease of producing an image, but the photographer plays a larger role. There's nothing wrong with this group of people. We should all be so lucky as to have more money than we know what to do with.

Next we have what I call the pure hobbyists. These are the people that take pictures for fun. They don't plan on making any money off of their photos, and they don't try to. They are out just for themselves. These people usually don't buy anything more than they can afford out of their own pockets because that's where the money is coming from. They're not going to be able to write the equipment off as a business expense at the end of the year. These people are more likely to do a lot of research into what they're buying, and search for the best deal possible. They're not concerned with getting it "now" because they're not on a deadline. These are very knowledgeable people about photography, yet they don't want to use it for monetary gain.

This last group of buyers is the group that our workshops are geared towards. These are the people that know they want a DSLR, but don't know why. They know they take better photographs than regular point and shoots but couldn't tell you anything about the settings on the camera. This group of buyers either got their camera as a present, or bought the entry level camera thinking that even it was really too expensive. These people definitely can't write it off at the end of the year, and they aren't going to be out shooting weddings anytime soon. Most of the time these people just want to take good photos of their kids, or friends and family. Congratulations to these people for taking the first step to taking better photographs. Congratulations on your purchase. Now skip down here and read about how to use that beautiful new camera.

Thanks to everyone that reads this blog on a daily basis. If there is anything you want me to write about, or anything that you have a question about don't hesitate to email me, or leave a comment with a suggestion. That's it for now. I'm going to start trying to post on a daily basis so check back often. Jason Read more on this article...
Monday, January 12, 2009

Update on the DSLR workshop


I just wanted to give a quick update on the workshop. They called today with the room assignment for us. We're going to be in Room C. We'll more than likely have someone out there Directing you to the proper room, but just in case, I thought I would let you know. Also please try to get there by 12:45 so we can begin promptly at 1:00. Thanks! See you there. Read more on this article...
Holiday Cheer


I know it's a little past the Christmas season, but I wanted to share this photo with you all. These are three kids that I photographed before Christmas with my good friend Carrie. They were the most adorable children you would ever want to meet, and I think their expressions remind us what fun Christmas was when we were kids. The look of enjoyment and wonder as the gaze up at the beautiful tree. Read more on this article...
At the Long End


We've talked about the 17-50 2.8, we talked about the 50mm 1.8, but we haven't talked about anything in the Telephoto range. Today we're going to talk about the 70-200 2.8. Specifically the Tamron 70-200 2.8. Some of you may be wondering, why doesn't he use more Nikon lenses? Well to be honest, price. I have had the Nikkor 70-200 2.8. I have had the Nikkor 18-200 vr, as well as various other Nikkor lenes, but to be honest they were very expensive and not any better than the Tamron lenses in quality. I personally think that the Tamron 70-200 is a bit sharper than the Nikkor... Anyway on to why you need one of these lenses.

The 70-200 2.8 focal length is THE sports lens. I've never shot a sporting event where the other photographers weren't all using this focal length. Some were using Canon, some were using Nikon, some were using Sigma and Tamron, but they were all shooting this length. Why is it so popular? With the exception of baseline in basketball, most sporting events only allow you to get within a few feet of the field/mat/court so the 70mm is plenty wide enough when the action is right in front of you. On the opposite end, 200mm is long enough to single out an individual player or competitor. When it comes to Football, the photographers will get a longer lens. Usually a 400mm 2.8 on a separate body for when the action is at the other end of the field, but for most shots the 200mm is plenty long. The length is not enough though. You have to have wide apertures to be able to shoot in most indoor events where the lighting may seem good, but it is really not. That is where the aperture of 2.8 is so important. There are plenty of lenses out there that go from 55-200, or 70-300 but they are all 5.6 or more at the long end. To be able to shoot in low light you need 2.8. If you plan on shooting any kind of sports, this lens is for you.

Is this lens only for a sports photographer? No! I can't tell you how many times I use this lens for shooting portraits. The idea when shooting portraits is to make your subject look flattering right? Well why on earth would you want to be close to them shooting at some wide angle like 18 or 35mm? When you move farther away from your subject, and move your telephoto lens out to say 130mm you get more compressed features. The ears, nose, and eyes all look more proportional. The 70-200 is great for this situation. Want to move a little further away, and still keep a nice f/4 aperture? Can't do it with the 55-200, but with the 70-200 you can keep the aperture wherever you want throughout the focal length. On top of all of the above mentioned reasons, the optical quality of these lenses is usually better than that of the less expensive lenses. These are pro grade lenses so they have pro grade quality.

Pro grade, that must mean they're expensive! Well yes, they are expensive. However you don't have to break the bank. This my friends is why I shoot the Tamron 70-200 2.8. With a multi coated Hoya Filter I paid $800.00 out the door for it. That is way cheaper than the Nikkor equivalent. The Nikkor version I had cost me $1600.00 plus another $100 for the filter, plus tax! I had almost $2000 in this thing by the time is was all said and done, and to be honest it wasn't all that much better. OK yes the Nikkor has Vibration Reduction, and it has a clutch on the AF system which the Tamron lacks, but optically they're identical. The Tamron has a quick release system that allows you to adjust the focus quickly and efficiently, almost as fast as the Nikkor. The AF system on the Nikkor is a tad bit faster, but not by much. Is the Nikkor worth the extra $1200.00? I don't think so, that's why I'm shooting Tamron. There are some "lens snobs" out there that won't shoot with anything but the lenses that come from their camera manufacturer. They will tell you that the Nikkor, and Canon lenses are much better in quality. I'm not disputing their quality, but go try out a Tamron or Sigma for yourself and tell me if you can see a difference, and if you do see a difference, is it worth the extra amount that is being charged? I bet you can't, and I bet if you do, it won't be worth the extra amount. So what am I saying? Well if you want a great quality lens, that will allow you to shoot low light, get a Tamron 70-200 2.8. If you want a lens that is great quality, will allow you to shoot in low light, and costs twice as much, get the name brand. That's all from me today. See you again tomorrow. Jason Read more on this article...
Saturday, January 10, 2009

Cavalcade of Customs


I went to the Cavalcade of Customs today. Lots of beautiful cars, beutiful models, and nice people. This is an image that I took last year at Cavalcade. I got there early on Sunday and took a few before a bunch of people crowded around. I didn't even take the camera this year. I knew there would be way too many people to get anything good, so I didn't bother. Anyway, enjoy.

Today we'll be talking about levels, and why it's such and important controll. Read on... Read more on this article...
Levels in Photoshop


I talked earlier about my workflow in photoshop. I told you that the first thing I do when I get an image into photoshop is a levels adjustment but I didn't go into how to make that adjustment, or what it does. So lets talk about levels.

The reason that I make a levels adjustment is simple, before you can make any other decisions about colors or contrasts, you have to have your blacks and whites correct. This is what the levels adjustment does. So in my mind, levels is the most important adjustment you can make.

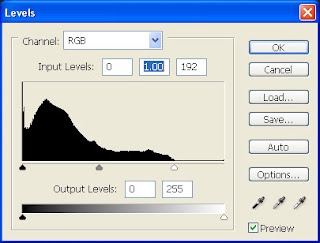
So you've opened a photo in photoshop and now you want to do a levels adjustment, here's how you do it. The first step is to go to layer, then new adjustment layer, then levels. Once you click OK, this will open up a new dialog box in you photo that looks similar to the image above. Looking at this box, you see lots of different things. You see a histogram represented with a black slider on the left, a grey slider in the middle, and a white slider on the right. You also see the output levels with a black and white slider. You also see the buttons OK,cancel,load,save,auto, and options. Below those you see three dropper tools. When using this box I have found that the most efficient way to adjust a photo is to use the histogram box. Here's what I do. While holding the ALT key take your mouse and click on the white slider in the histogram section. While still holding the ALT slider, start to drag the slider to the left. When you do this the entire image goes black. As you slide the slider to the left, you will see areas start to turn colors and eventually go to all white. The areas that go to all white, are "clipped" areas. Meaning they have lost all detail and are entirely white now. Generally you don't want any areas to be totally clipped. What I have found works best for me is to drag the slider (while holding ALT) until you start to see clipping or white areas appear, then take it back to the right slightly. When you release the ALT key, you see the image again, and you can see what effect it has had on your image. If it looks a little too bright, or blown out take click ALT and the slider again and drag it back to the right a little more. The key here is to slide it until it looks good to you. You are going to repeat the process with the black slider. Hold ALT and drag the black slider to the right. This time the entire image goes white and starts to work it's way toward totally black as you drag the slider to the right. Again totally black areas are completely without detail, and clipped. Clipping is bad, so I do the same as with my highlights. I drag until clipping occurs then drag the slider back to the left a little. Once you do this a few times, you will get a feel for it, and it will be like second nature. You will also be amazed at how this will increase the quality of the finished product of your images.

This is it for me for the day. See you again tomorrow. Jason Read more on this article...

Thursday, January 8, 2009

Gymnastics Photography


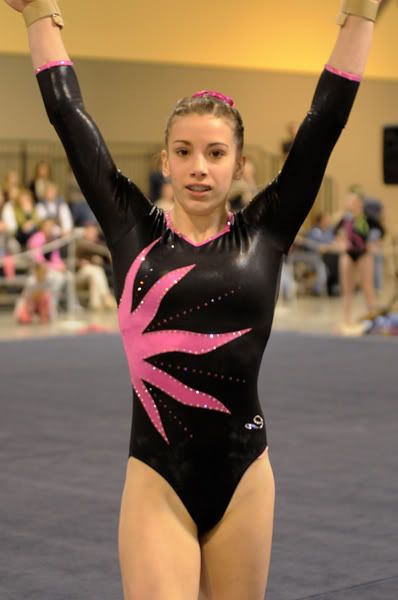
Good evening everyone. I know it's a late post today, but I had a really busy day. Enough about my day, lets get to some photography. I want to talk a little about sports photography, specifically, Gymnastics. The shot you see above was from a Three day event held here in Cincinnati at the Duke Energy Center. I literally took thousands of shots during this event. This being one of my favorites. This girl was a level 10 which is the last step before trying out for the Olympics. Anyway on to the technicals. This shot was done at ISO1600 f/2.8 1/350 of a second. I really like the freezing effect. All of my gymnastics work is done with the fastest glass possible. Usually my 70-200 2.8 or my 17-50 2.8.

The key to photographing the "beam" is timing. I always follow the competitor from start to finish with the camera to my eye. I start with a tight head shot when they "salute" the judges. I then have a few seconds to get to the opposite end of the beam from where they start. I find that this is the best place to get a good angle of the entire beam and they always dismount at the opposite end from where they mount so you want to be on this end to get the finish. The key shots to make sure you get are the splits in the air like in this image, and the back flip on the beam. These are the "money shots" that the parents want to see and buy.

Shooting the floor is a whole different ball game. You have to be all over the sides of the floor. Make sure to know where you are standing in respect to the judge. You never want to go in front of them. There are lots of possibilities for great shots when shooting the floor. I have found the best way to get good shots is to watch one or two routines and figure out where they will be. I use my 70-200 2.8 so that I have the focal length to get the close ups. You will undoubtedly want to try to catch them in mid air when they do their running tumbling routine. Don't bother. You won't get any usable images, and you'll waste space on your card.

The other events don't offer enough "good" shots to sell to parents so I don't bother. Stick to these two events, and my tips and you'll do well and sell plenty.

Again, that's it for me today. I'll see you tomorrow. We're going to talk about some specific photoshop tips. See ya then! Jason Read more on this article...