Tuesday, October 26, 2010

Change in Direction


Today marks a turning point in this blog's life... Up until this point this blog has been geared at Photographers. Photoshop tutorials, photo tips etc. After spending some time with commercial photographer Don Giannatti and talking about the direction of my photography etc. the aim of this blog is going to focus more on my images, and why I did what I did with them. So without further adieu... I present to you Tarah.

Tarah is one of my favorite models to work with in this area. She's naturally beautiful, fun to work with and is fearless. I setup this shot for my commercial book. The goal was to tell a story, or show something different than just a pretty face. I wanted to highlight not only the model, but the vehicle as well. Lighting the two planes separately did a good job of accomplishing my goal.

Hit the Jump to see an outtake and hear about the lighting setup...


JRL_8874-Edit
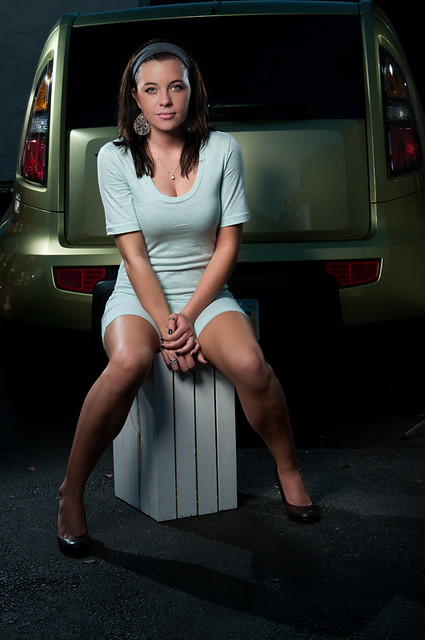
I didn't like this shot as well because the posting and the look on her face just didn't nail what I was looking for. Another beautiful picture to be sure, but just not quite as good as the first one.

For this setup I used a White lighting 1600 with a gridded beauty dish for a main. The kickers were sb800's on either side of the car. For The light on the car, it was just a touch from another sb800.

So a big thanks to Don Giannatti for pointing me in the right direction, and a big thanks to those of you reading. If you want to see more work from myself or my studio please visit http://www.rdphotos.com and look at the portfolio section. See you next time, Jason

Read more on this article...

Thursday, October 7, 2010

Shooting for Social Media


Hey everyone. Glad to see you back! The image you see above is of my brother Garrett. He's a producer for Clear Channel radio here in Cincinnati, specifically the AM sports side. As such he tries to have a pretty good social media presence. He has a blog, a couple of twitter accounts, Facebook etc. His problem was that he didn't have a consistent picture across the accounts, and branding is all about that, consistency. So the other day he was over to watch some football and I grabbed him for 5 minutes to do some quick shots for his profiles. Hit the jump for the rest of the shots, as well as a lighting diagram


This is what I did for lighting. I had a single SB900 camera left shooting through a shoot through umbrella on manual 1/8 power. The umbrella was roughly 2 feet from the subject and feathered to the left so that just the edge of the light was hitting his face. On camera right, I had a tri-grip white reflector held by an assistant. The settings on the camera were ISO1600 112mm on my 70-200 2.8 f/5.6 1/80th of a second. Here's a diagram:


Simple enough setup but highly effective. In the diagram you'll notice that the subject is a good distance away from the background. This is important. It's the inverse square law at work here. The further away the subject(and the main light source) the darker the background gets. In this case we wanted totally black, so we moved him as far away as was practical. Here are a few more from the shoot:

JRL_8372-Edit


JRL_8366-Edit

I took 12 shots total and these are the keepers. Social media is a huge part of every business now, take advantage of the need that has been created by and for this market. Thanks for stopping by, See you next time!

Read more on this article...

Friday, October 1, 2010

The best camera is the camera that you have with you


Hey everyone! Glad to see you back. We've been a little busy as of late with model portfolio's, senior pictures, and of course wrapping up wedding season. I've been away for a little while. There have been a few interesting things that I wanted to let you know about though. First, this blog has been accepted by Alltop.com which is a popular service allowing you to follow all of your favorite blogs in one spot. You can find this blog by clicking HERE. It's a great way to follow your favorite content. If you want to see what/who I follow, click here: WHO I FOLLOW. Also, we at RedDoor Photography have been busy updating our website to allow for iDevice viewing. If you haven't checked it out recently, head on over now to see the site. On that note, I have been doing a lot of guest blogging for Adobe Evangelist Terry White over at his application website BestAppsite.com. If you have an iPad, iPhone, or iPod touch, be sure to head over there for some great reviews including all of the photography apps you could possibly want.

Speaking of photography apps and iPhones, I want to say a quick word today about something that has become really important to my creative process. When I see something that inspires me, I use whatever camera I have with me. Usually that's my iPhone which admittedly has a pretty nice camera built into it, but the point is it doesn't matter. It doesn't matter what camera you have, it doesn't matter if it's a point and shoot, a film camera, a DSLR, etc. It's all about capturing the moment. There are entire Website dedicated to using cell phone camera's. Most of that revolution was brought on by commercial photographer Chase Jarvis. The point is, you don't need a special camera, or a special lens to capture great images. Hit the jump to see some of my favorites that I've captured, and edited right inside of the phone.


IMG_0415

IMG_0149

IMG_0461

IMG_0417

IMG_0093


Thanks for stopping by. See you all soon! Jason
Read more on this article...

Tuesday, September 21, 2010

So you want Low Noise at High ISO


Hey Gang! Glad to see you're back. I'm not entirely sure what the image above has to do with high ISO and low noise... It was shot with a D300 in studio conditions at ISO200. I wanted to share this shot with you all though. It's my friend Heather, who after a horrific traffic accident used Yoga to regain mobility. She's an inspiration to anyone who has to overcome an obstacle.

On to some high ISO low noise goodness! I had a friend on twitter(by the way if you're not following on twitter, why not? it's @reddoorphoto)ask me about the noise capabilities of the D700 because he was considering buying a new camera and wanted better noise reduction/capabilities. I asked him if he had thought about a D300s instead. At half the price, it comes really close to the quality of the D700 in the noise department, plus it shoots video! To prove this to him I set out to do a little experiment... More on that after the jump:


We had an engagement session last night, so I took the opportunity to grab Shad's D300s and his D700 and do a quick, unscientific test. Same lens, same ISO(3200)spot metered off of the guys back in the shadows. Take a look at the results:

ISO comparison

To view it larger click HERE

The D700 is on the left, D300s on the right. I Spot metered for the back of his shirt that was in the shadows, so the background is blown, but that's ok. You can see the noise(what little there is) on the zoomed in section. I think the D300s file looks as good, or better than the D700 file. I'm pretty sure that both are perfectly acceptable. Is there a $1300 difference between the D300s and the D700? I don't think so. Unless you need the full frame for an ultra wide lens like the Sigma 10-24 FX, I can't see a justification to go with the D700 instead of the D300s. This was of course a real world test, not a scientific laboratory test, but the proof is in the image above. What do you think? Let me know in the comments below.

Thanks for stopping by, see you next time! Jason

Read more on this article...

Saturday, September 18, 2010

Content aware Fill and when to use it!


Hey everyone! Glad to see you made it back. Today I want to show you one of my favorite features of the New Photoshop CS5 and when I would use it. Content aware fill was introduced in the latest version of Photoshop (CS5). Basically you select an area, select fill, or press backspace (on the background layer) and Photoshop does it's best to fill in the selected area with what it thinks should be there. I was skeptical about how well it would work when I heard about this feature, but I have to tell you, it does a wonderful job. Above is an image from a recent wedding. Beautiful image, but what you don't realize is there was one of those big Rainbow playsets in the background that had to be removed. It literally took 20 seconds to remove, start to finish. Hit the jump to see how...


image1

So that's the original. You see in the upper left hand corner there is a bright, ugly playset sticking out like a sore thumb. In the past I would have added a layer, selected my clone stamp tool and gone to work. It would have taken at least 5 minutes or more depending on how difficult the background was, and how precise I needed to be(dependent on how large of an image I thought they might make). Here's how we roll in CS5.

First we're going to select the area we want to remove. In this case I used the Elliptical marquee tool. You don't have to be really exact. As a matter of fact in this case, I wasn't precise at all.

image3

There are two things to note in this image. First, I have the background layer selected, so all I had to do was press Backspace on my keyboard to bring up the fill dialog box. If you have any other layer selected you would go to EDIT-FILL and when the dialog box came up, you would select CONTENT AWARE FILL. Once you have the selection, and the content aware fill box up, press OK. This will fill the selected area with what CS5 thinks should be there. It does this by looking at the pixels around the selection and using a special algorithm it recreates the area.

After you press ok, it will take a few(varies depending on the size of area being filled) seconds and as you can see in the image below it fills it. I didn't go back and do any touching up of the area. This is exactly how it came out of Photoshop.

SR1_3588-2

Use content aware fill to your advantage. Reduce your editing time, and do a better job with this great improvement. Thanks for stopping by, see you next time. Jason

Read more on this article...

Monday, August 30, 2010

Creating a Panoramic With Photoshop CS5


Hey everyone! Glad to see you made it back. Today I want to show you my method for taking a standard image and creating a panoramic using Photoshop CS5's Content Aware Fill feature. It's a pretty simple process that will have you creating panoramas in no time flat! So watch the video, and let me know what you think! Jason

Read more on this article...

Friday, August 20, 2010

Learn to Sharpen in CS5


Hey everyone, thanks for stopping by! Today I wanted to show you a brief tutorial on the Sharpen Tool in Photoshop. The sharpen tool has been around for quite a few versions, but finally in CS5 Adobe has made it usable. They've added what they call the protect detail control. This is a control that preserves the details, and limits the artifacts when sharpening. This improvement has made a tool that was previously unusable, one of my go to sharpening methods. So watch the short video, try the tool out, and tell me what you think! Jason
Read more on this article...