Wednesday, December 31, 2008

Digital Workflow


Today I want to talk a little bit about my digital work flow. I can do an entire post on each step(which I will do in the future) but today I just want to lay out the work flow as a reference for you. What is a digital work flow? Well it's the entire process from start to finish of the image. We went through what I do when I get done with the shoot yesterday(backing up) but we didn't talk much about camera settings or what format I shoot, or what I do with the images when I get them into the computer. Today we'll cover that.

Getting it right in the camera is the first thing that has to be done. The old saying garbage in, garbage out is very true. You first have to make sure that your exposure is correct, your composition is good, and the lighting is right. If you do this, you will have a pleasing photo before any post processing, and it will also make editing the photo faster.

What format do I shoot? Raw. We could sit here and talk all day about the pros, and the cons of Raw and Jpeg, but for me Raw gives the most versatility room for adjustment. With the cost of hard drives going down the way they have, it's silly to not shoot Raw. For those who don't know Raw is considered the digital "negative". This means you will have more information in the raw file than in a regular Jpeg file to work with. Also Raw files are "lossless". What is lossless? Lossless means that every time you open and close the photo, you will not be compressing it. That means that your picture quality will not fade with time. With Jpeg each time you open and close the file, it gets compressed and a few bits get chopped off. If you open and close the file enough times, you will start to see the photo quality degrade. This doesn't happen with Raw files.

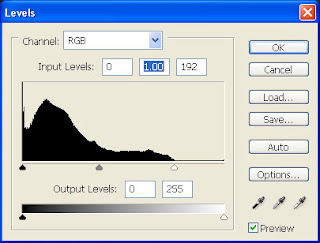
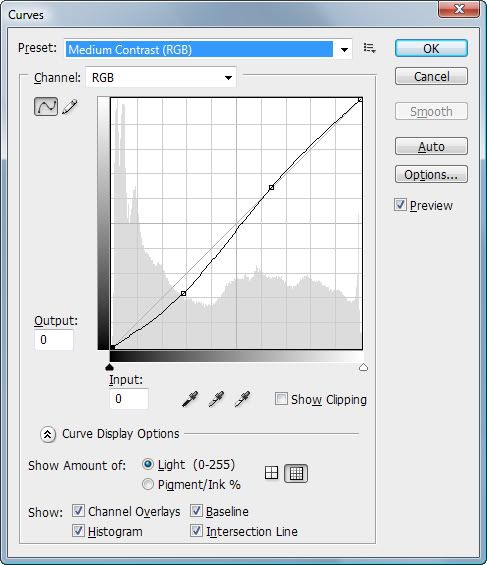
OK, so now we're shooting Raw. We get done at the end of the day, do our backup(as discussed yesterday). Now what? well I start out in Adobe Bridge. Photoshop Bridge allows you to view your Raw files quickly and select which ones to edit. So now I've selected an image that I like, I double click and it opens in Photoshop. The very first thing I do is a levels adjustment(as seen in the photo at the top of this post). This adjustment sets your whites and your blacks in your image. I think that before you can make any more adjustments in your photos, you have to have a solid starting point which means correct blacks and whites.(I'll do a post later all about levels, and how to make this adjustment). Once we have the levels done, I like to take a look at the contrast in the photo. The contrast is the difference between darks and lights. To do this I open a new curves adjustment layer. The box will look something like this:
Photobucket

I make my adjustments in curves(again I will do an entire post on adjusting curves later) until I'm happy and save it.

After I've made my adjustments above, I generally scan the image for any areas that may need specific touch ups. I may remove a blemish, or adjust a color cast but for the most part I'm done except for sharpening. Always do your sharpening last.

Once all adjustments are done, I save the file as a Jpeg, and as a TIFF in two separate folders, and move on to the next photo. All of these things take me roughly 60 to 80 seconds to do. The more you practice these techniques the faster you will become at doing them. The addition of "actions" will make this process even faster. I will go into more detail about actions tomorrow. In fact that's what tomorrows entire post will be about. See you then. Jason Read more on this article...

Tuesday, December 30, 2008

Backups


Today's post is dedicated to something that most people don't think about until it's too late, backups. A backup means having two copies of all of your data in two separate places. I say two separate places because you have to prepare for the worst to happen. If your house or business were to burn down, and you had your backup drive as well as your primary drive in one place, you would loose them both. Here's what I do.

When I am done shooting either a job or for myself, I bring my cards back to the house (or laptop when I'm on the road), and immediately upload them to the hard drive. I then make a copy to my portable hard drive that I am currently using for this years backups, as well as send a copy to my Western Digital external hard drive attached to my desktop computer. If I'm shooting for someone, say a wedding or whatever I also make a copy to DVD which I take to an off site location usually the next day. After I have done all of this, then I will reformat my memory cards. This is my procedure, yours may differ, but the important thing is that you backup frequently, and that you have the backup in a separate place from your main drive.

Be sure to check back tomorrow, I'm going to have some really useful work flow tips for photoshop. Jason Read more on this article...

Monday, December 29, 2008

Hot Shoe Flash


Good morning everyone, It's 5:06AM and I've been up and at it since 2:30AM. Many of you know that I'm an Electrical Engineer full time during the day, and since we have a holiday this week we have to get certain things done by Wednesday so I'm here early. Anyway, that's not why you read JLykinsphotos blog so lets get to it. Today I want to talk about hot shoe mounted flash units, or speed lights as they're sometimes referred to. Basically this is any flash that is mounted on the hot shoe of your camera, which for those who don't know is the little metal piece on top of the camera that has tiny contact points to connect the flash with the camera. They come in many sizes and shapes, but since I shoot Nikon I will be talking mostly about them because they are what I know the most about.

What are the advantages of a speed light? Well there are many. First they are larger, more powerful flashes than the pop up flash that comes standard on most consumer level cameras these days. This matters because the more powerful your flash, the more area you can illuminate with it. This is especially important when trying to light a group of people, or a single person at a distance of more than 5 or 10 feet. These flashes are rated by Guide number. The guide number is essentially a distance rating. There is a mathematical formula to convert the guide number into feet of illumination, and it states f-number = GN / Distance. I know this may seem like Greek to some of you so let me break it down a little bit. lets say that your flash has a Guide Number (GN) of 98feet at ISO100 (like the SB600 flash pictured above). To determine your proper fstop you would need to determine how far away you wanted to illuminate. For our example lets say 28 feet. You would take 98/28 which would leave you with 3.5. This would be your aperture setting. You can find more information here if you want to read more about Guide numbers. Just remember that they are more powerful than your on camera flash, and can illuminate more.

The second reason you want to get a speedlight is redeye. Because the flash source is elevated above the lens, you virtually eliminate red eye. No more retouching in photoshop! This may not seem like a big deal, but on average I shoot close to 1500 photos at a wedding. If I have to go into each individual photo and fix red eye, it eats up valuable time that could be spent doing "special" enhancements to photos to sell more. Trust me on this, it's a life saver.

The third and probably the most important reason (closely followed by #1) is the ability to turn the head of the flash to "bounce" the light off of the ceiling or wall. Direct flash sucks. It is way too harsh, and produces blown out features. When you turn your flash unit at a ceiling or wall you turn that surface into a huge softbox that will produce soft beautiful light to illuminate your subject. The difference can be tremendous. You will be amazed at the difference it makes. I will be showing these techniques at our upcoming workshop, but more on that later. Remember that whatever color the surface you are bouncing the light off will be the color that falls on your subject. Try to bounce off of white when possible, because it provides the softest, most realistic light. That's not to say that you can't get some wonderful color casts off of say a red or orange wall. You need to play around with it and see what works best for you. Listen that's it for me for the moment. Check back later for some more info on the upcoming workshops. Have a good day! Jason Read more on this article...

Sunday, December 28, 2008

Photo workshop

After some talk with Shad today at the CLS workshop, I think we're going to put on a workshop for people that are new to SLR cameras. Most people that are new to SLR cameras are using digital so that's where we plan to start, but we will also cover film. We're looking at the first or second week of January depending on the availability of the location. Please email me at Jlykins@jylkinsphotos.com for more information. Jason Read more on this article...

Saturday, December 27, 2008

Essentials

An interesting question has come up on a web forum that I frequent, and I thought that it warranted enough thought for a whole post. Lots of people want to know what the "essentials" are for someones first DSLR. There are a few things that are essential, and a few that are nice to have. Lets talk about the essentials first.

Memory cards: this may sound ridiculous, but some people don't realize that you get a very small (if any) card with the camera. Card capacity ranges from 128MB to 32gigs. What card you should get really depends on how much you shoot, and how comfortable you feel leaving all of your images on one disk. There are two schools of thought here. The first school of thought is get the biggest card your camera can handle so you don't have to switch cards and possibly miss a shot. The second school of thought is have multiple smaller cards in case something happens to one of the disks, you don't loose all of your photos. Personally I follow the first school. I have had very little trouble out of any of my cards, and I am very careful to not misplace them. Which way you go is up to you, but I recommend having at least two or more cards.

UV filters: Sometimes referred to as "haze filters" this is a clear filter that goes on the end of your lens. It has no real optical value, but these filters can save your lens if you drop it, or if something hits it. It it much cheaper to replace a $60 UV filter than it is to replace, or repair a lens.

Extra Battery: I get roughly 1000 photos out of one battery charge in my D300 if I don't use flash a whole lot. Even with 1000 shots out of a fully charged battery, it is a really good idea to have a spare. You don't want to miss that perfect sunset on vacation because you forgot to charge your battery the night before and you've been shooting all day.

A good bag: You have to have a good place to put your camera when you're not using it. A good bag from Lowepro will hold your camera safely and allow you to carry, and store it without fears of damage.


Lens Cleaning kit: These kits can be had for under $10 from stores like Cord Camera, or adorama.com . These kits include some sort of cleaning solution and a microfiber cloth. It is important to keep your lens free from smudges and dirt.

Lets talk about some of the things that it's nice to have.

Tripod: Tripods are one of those things that you don't have to have every day, but it's really nice to have them when you are shooting in low light. With today's modern cameras, and vibration reduction lenses, tripods aren't as needed as they used to be, but still nice to have. You can spend anywhere from $20 all the way to $2500.00 on tripods. You really should go to your local camera store and hold some in your hand and see which one works best for you.

Battery grips: These are attachments for the bottom of your camera that add an extra battery to help take more photos between battery changes. They usually add a vertical release button that helps a lot when shooting multiple vertical shots. They range anywhere from $80 to $300 depending on your camera model. These are nice to have.

Hot Shoe Flash: This is one of the things that I think is really an essential addition to any camera. A hot shoe mounted flash, or "speed light" will improve your photos by giving you a larger light source for flash, allow you to "bounce" the flash off of a wall or ceiling, and they get the flash source away from the lens almost completely removing red eye. If there is one thing that you add to your gear out of the "nice to have list" this should be it.


That's it for tonight, I'll see you tomorrow for some more in depth information on off camera lighting. Jason Read more on this article...

Friday, December 26, 2008

Equipment isn't as important as you think


Here is a great example of what todays post is all about. This was taken with a 40 year old camera using run of the mill kodak 400 film and it is still beautiful. People, it's all about the light. Read more on this article...

Lighting

Lets talk about lighting for a minute. Most people that are just getting into photography don't realize it but the MOST important thing in photography is light. Light is what photos are made of. It is light, and lack of light (shadows) that makes a photo what it is. Artists know this, painters have been paying attention to light, and working with it for centuries. Without light, we wouldn't be able to have photos. It is after all the light that is reflected off of our subjects and lands on our film, or digital sensor that produces the photos that we have.


There are whole series of books and entire college courses that deal with light so I will not be able to cover everything that you need to know in one post. I can however tell you that before anything. Before you research what camera to get, or what certain settings mean, research light, and how it effects your subjects.


Anyone who knows anything about photography knows the basics. The golden hours are the hour after sunrise and the hour before sunset. Unfortunately great photo opportunities don't wait for those "golden hours". They happen all of the time. This is where the use of the available light, and artificial flash come into play. Anytime outside of those two or three hours of "great photo light" a day, you have to use other techniques. You have to use the edge of your shadows. You have to use your flash, and you have to do it all quickly because the light is always changing. I plan on getting more in depth in future articles about each individual subject such as off camera flash, use of reflectors, subject placement in high contrast light, etc. This is a foundation for me to build on. I plan to start on Monday with the first article entitled "why off camera flash is for you". Until then you can check out http://strobist.blogspot.com/2006/03/lighting-101.html for some great off camera flash information. That site is the bible to off camera flash on a budget. It's supposed to be almost 70 degrees tomorrow so I plan on spending all day shooting until the Ohio Valley Camera Club meet up which can be found here
That's it for me tonight. Everyone have a lovely evening and I'll see you next time. Jason Read more on this article...
Thursday, December 25, 2008


I just thought I would throw this up here for you guys to see. This is a quick shot I took of Carrie, the photographer I was talking about below. She is wonderful at getting the composition right. She is great with children photography, and has an eye for quality. Read more on this article...

New to photography...

So you're new to photography. You have been interested in photos for a long time, but you don't know where to start... Don't worry we're here for you. If you have never used a SLR (single lens reflex camera) don't worry, they're not as bad as they look. Man can they be intimidating looking though. All of the buttons, dials, levers, lenses that come off, film or digital? These are all things that you may think about, or have questions about. Let me try to help you.

First of all, don't worry we all had the same fears and uncertainties at one point or another. We all thought, "how will I ever figure that all out" when we started. The first thing you need to know is that no matter what brand you choose, and what format you choose(film or digital), the camera can't do anything without you. The camera is just a tool for you the photographer to capture what you see. Much like a paintbrush allows the painter to transfer an image to canvas. The worst photographer in the world with the best, and most expensive camera system in the world will still make crappy photos. I hear all of the time when someone sees my images "wow you must have a nice camera". Well yes I do have a nice camera, but the camera didn't do anything without me, and my vision. This is easy to see when looking at the work of the better photographers around you. Shad Ramsey, a local wedding photographer can make prints to hang on a museum wall with a disposable camera. Another good friend of mine Carrie, surprises me every time she shows me a new image fresh out of post processing, she's one of the most talented up and coming photographers that I know. The point is, pay attention to the content of the photo more than the technical aspect and you will produce better photos. I have been shooting film as of late on most of my personal projects, and people can't believe the quality of the images that I get out of my $15 film SLR. Just food for thought.

You keep hearing me talk about "camera systems" not "cameras". There is a very good reason for this. When making your choice what brand to go with, you have to not only consider the camera's, you have to look at their lenses. Do they have a large variety of lenses? Do they have good quality, both in build and in image quality? Can you attach some of the older lenses and use them with the current cameras? These are really important questions that you have to research and find out before you can make an informed decision on what to buy.

That's it for me for now, I'll be back later to talk a little about third party support for the camera systems, and what effect this should have on your purchase decision. See ya then! Jason Read more on this article...

Merry Christmas

Hey everyone, I just wanted to make a quick post to say Merry Christmas. I hope everyone has a wonderful day. I'll be back tomorrow for the first JLykins Photos tutorial. See ya then! Read more on this article...

Wednesday, December 24, 2008

Helpfull information

I thought I would ad some helpful stuff right off the bat. Here are some links to some of the most helpful sites/blogs that I know.

http://www.digitalprotalk.blogspot.com/ This is David Ziser's blog Digital Protalk. David is one of the premier wedding and event photographers in the world. He is based right here in the Cincinnati area, and he has great content on his blog.

http://strobist.blogspot.com/ This is the Strobist blog. If you are looking for great content about light, lighting, light ratios, pretty much anything that has to do with lighting, this is the spot for you. The guys over there do a great job at breaking things down in easy to understand terms. Be sure to check out lighting 101.

http://www.kenrockwell.com/ Ken Rockwell has been a photographer for years. He started shooting SLR's when he was 11. Ken provides reviews for tons of gear. He has a following that rivals Hanna Montana. Check his site out, lots of helpful info there.

That's it for me today. It's Christmas eve and I have some family events to get to. Merry Christmas and see you tomorrow. Read more on this article...

First Post

Hi everyone. This is the beginning of a good thing. The first post of my new blog. As most of you know, I am a photographer from the wonderful City of Cincinnati. I have lived here all of my life and I can't think of a better place to live. I appreciate you taking the time to visit and hopefully you find some content that either advances your own photography, or leads you to an idea that betters us all as photographers.

A little about me as a photographer. I started in photography in high school. I took the normal photography class that most schools offer. We learned about black and white developing, f stops, shutter speed, and film speed. I have since then graduated to digital photography. I am an avid Nikon shooter, however I think that there are some other great camera systems out there as well. I'll get into that a little more in a future post. I am a very versatile photographer, or at least I like to think so. I do portraiture, events, sports, pets, etc. I have experience with all sorts of lighting. I have strobes, speed lights, soft boxes, and umbrellas. There is lots of equipment that I am forgetting of leaving out, but just know that I am experienced.

A little about what this blog is going to be about. I hope to share with you all of the things that I know as a photographer. I also plan on sharing lots of resources with you, as well as anything new that I may learn along the way. If you like photography, you will like this blog. Thanks again for looking. See you again soon. Read more on this article...