Thursday, July 30, 2009

Nikon News


Here's another shot of Matt and Tomi. They were so much fun to work with that I can't resist sharing them with everyone a little more. For this shot I use an 85mm f/1.8 Nikon prime lens. Keep the aperture wide open and blur the background. Great stuff. Speaking of Nikon, as predicted(by not just me) They released the new camera's and lenses today. You can read about them HERE. All of the things that I predicted a couple of days ago came true. D300s with video, extra card slot, and not much else. D3000, 70-200VRII, and 18-200VRII. Nothing earth shattering out of any of them. Look for a D700s soon that will add the benefits of the D300s. It will have an extra card slot just like the 300... Pre order them from places like ADORAMA or B&H. It'll be mid August before they're shipping.

The specs on the D3000 look kind of blah. It's basically the same specs as the D40x. It adds 11point AF, dust removal system, SLOWER flash sync speed... Get a D40 you'll be happier.

The D300s adds a SD slot, 1 extra FPS, video, 1 button live view(because we all shoot in live view sooooo often right...), it does add the Virtual horizon that is standard in the D700 which is nice. That's really it on the D300s. Nothing that's going to make me run out and sell my D300 to buy one.


Ok, that's all I've got today. I have to get to some editing. See you all tomorrow. Jason Read more on this article...

Wednesday, July 29, 2009

The Kelby Three Step Portrait finishing made easy


Hey everyone, hope you all had a great day yesterday. We presented the umbrella photo to the client yesterday. She didn't like the dark sky, or the size of the logo. Made the changes right there for her, she was happy. We are licensing the image to her for use in advertising but for prints, customers have to come to us. So if you live in Bellevue and would like a photo/poster etc. of the umbrella shoot, let me know. We are printing them with and without the logo. The shot you see above was taken last Sunday during an engagement session with a bride and groom for one of our upcoming weddings. I didn't take the photo, Shad did. I only took a hand full of photos that day as I was playing reflector boy(we alternate who does the reflector/light holding from shoot to shoot). Anyway, I have been reading Scott Kelby's book on Photoshop CS4 and in there he discusses his Three Step Portrait Finishing technique that I thought would work well for this particular portrait. Any of you that know me though, know that I'm not one to leave well enough alone, so I did a little automation and made this process into an action that I am going to share with you today. To start here is the beginning image:

DSC_8340

Open the image in Photoshop. Then before you do anything else select your actions panel and click on create a new action at the bottom of the panel. The create new action icon looks like the small post it note and is the second from the right at the bottom.

Threestep1


The first thing you want to do is go to IMAGE-MODE-LAB COLOR. This will convert your image to LAB COLOR mode. Once you have done that, click on your CHANNELS tab in the CHANNELS TOOL BOX(if you don't see CHANNELS in your tool boxes selection go to the top menu bar and select WINDOW then click on channels). Once in the CHANNELS tool bar select the LIGHTNESS channel. When you click on LIGHTNESS it will change your image to black and white(don't worry the color isn't gone). Now click at the top of the screen on FILTER-SHARPEN-UNSHARPEN MASK. A dialog box will pop up. Here are the settings you want:

threestep2

When you are done, click OK. Now go back to IMAGE-MODE-RGB. Now duplicate your background layer by pressing CTRL+J. Now select your copied layer which should say LAYER 1 in the layers box(again if you don't see the layers box, click on WINDOW and select LAYERS). Go to your top menu and select FILTER, then GAUSSIAN BLUR. Set your radius to 20.5 then click OK. Now in the LAYERS dialog box, select the OPACITY and reduce it to 20%. The next thing you're going to do is merge your layers. You do this by pressing CTRL+E. This will merge your visible layers.

Now duplicate the layer that you have by pressing CTRL+J. Click directly above the new layer in blending mode. It will say NORMAL. Change this to MULTIPLY. This will make your image appear dark. Don't worry, we're going to fix that. This is something that isn't in Scott's book, but is very important when making the action. The next step in the process is to select the rectangle Marquee tool and draw a box in the image. Every image is different so you will want to change the size of this box depending on the image. To do this in an action, you have to insert a STOP. To do this you right click on the small box in the upper right hand corner of the ACTIONS box. Under that menu, you will see the command INSERT STOP. Click on it.

Threestep3

When you do you will get a small box that pops up and allows you to insert some text. Here is what I put in my text box: "Press stop and use the Rectangle Marquee tool to select a box roughly 1/2 to 1 inch in from canvas edge. Once you have completed the selection Press the action button again to continue". Do not click on the little box that says Allow continue. This would allow you to bypass this step, and you don't want to do that. Now, since you are making the action currently, you will have to go to the bottom of the actions box and press the stop button so that you can actually make your selection. The stop button is the little square box on the far left of the actions menu at the bottom.

Once you have pressed that stop button, select your rectangle marquee tool(like the text in your box says) and draw a box inside of your image. This box should be roughly 1/2 inch to 1 inch from all of the sides but it doesn't have to be perfect. Now go back to the bottom of your ACTIONS box and press the record button. It is the second button from the left and is a small circle. Once you have done this click the small box above your image in the tool bar that says REFINE EDGE. When you do, you will get a pop up that looks like this:

Threestep4

Use the settings shown here. Make sure that you have the blue box at the far left of the pop up selected. Once you have done this, click ok. Now press the DELETE OR BACKSPACE button on your keyboard. This will delete part of the MULTIPLIED LAYER. Once you have done this, press CTRL+D to deselect. Now all that is left is to press CTRL+E to merge the final layers and you're done. Press stop once again at the bottom of your actions box. You are done.

When you run this action on a photograph, a pop up will appear when it gets to the point in the action where you placed the STOP and the dialog box. When it does, there will be a button that says STOP on it. Press that button, then make your selection with the marquee tool. Once you have made your selection, press either the play button again at the bottom of your ACTIONS box, or if you are in BUTTON MODE for your actions, just press the action again(it will be colored in red until you press it again). That's it. Simple, automated portrait finishing. Puts a nice vignette around your image, as well as gives the image a dreamy look while still keeping thing sharp. Great stuff!

Enough from me. I have some editing to do. I'll see you all tomorrow! Jason
Read more on this article...

Tuesday, July 28, 2009

Sneak Peek


Good morning all. I thought I would give my blog readers a sneak peek at the image being delivered to the City Of Bellevue today. This is the final version of an image that was taken by Shad. Here is the original:

DSC_8318

As you can see I spent hours duplicating the umbrellas, adding cloudy sky, and pumping up the colors. There are over 60 layers in this composit! Look for this on your local news channel in the next couple of days(if you live in Cincy) as they will be sending out a press release to all of the news agencies.

New Nikon Gear! Thursday Nikon is going to be releasing some new gear. I have a "contact" per-se at Nikon that confirmed for me this morning via email that this Thursday Nikon is going to release two new bodies as well as two new lenses. We will have the new D300s, D3000, 18-200 VRII, and 70-200 2.8 VRII.

The improvements on the D300s over the original D300 will be the addition of video capability, added SD card slot along side the CF card slot, and a few other minor upgrades. To me it's not Earth shattering. Not enough to make me dump my D300's and go buy these...

The D3000 is going to be a replacement for the D40. Entry level SLR. I look for it to have one of the key features of the D40 missing. I expect that the flash sync speed will be 1/250 instead of 1/500 which is one of the great features of the D40. Also I expect that it will have no AF motor like the other Consumer SLR's offered by Nikon.

As for the New lenses, we'll just have to wait and see. The AF motors will probably be faster. The lens elements will most likely be coated with the Nano Crystal Coat that all of the new Pro lenses have been shipping with. The real question is going to be whether or not the price of the used 70-200 2.8's goes down or not. It is such a great lens, that I am expecting the price to stay the same for a used model. Somewhere in the neighborhood of $1400 to $1600. So there you have it. My expectations and predictions for Thursday.

Ok that's all I've got for today. I have an awesome photoshop tutorial lined up for tomorrow as well as how to create the action to automate it so make sure you stop by tomorrow to check that out. See you then! Jason
Read more on this article...

Friday, July 24, 2009

Wide is the Way to go


Hey everyone. I'm glad you made it back to read a little more from me. Lots has been happening in the past few days of the photo world. Mpix has a new service aimed specifically at professionals. They have all sorts of added products and offerings that professionals will appreciate. To apply for their pro services click Mpix Pro.
Nikon has had some issues with the D5000. If you have one read their latest press release Here. They are recalling some D5000's with specific serial numbers. Hopefully you read my post all about this camera and didn't buy one anyway. They're not worth the money.

You know what is worth the money? This great little lens right here:

tokina12-24

This is the Tokina 12-24 4. Now I have raved all about their 11-16 2.8 for over a year now, but I have just had a chance to test, and subsequently purchase this wonderful lens. So what's so special about this lens? Read on...

The Tokina 12-24 f/4.0 is one of the sharpest, well made third party lenses that I have had a chance to use. This thing is awesome. It is has great build quality, and an affordable price. Just under $500 HERE. Ok so we know it has good a good build, and a cheap price, but why do you need a 12-24mm range? Because wide is gooood. Who doesn't like to see a nice wide shot, with no distortion... I love it. I love getting close to people and getting them, as well as a nice background in the image. I like getting My son from feet all the way to head as well as the clouds in the background in this shot:

JRL_2001

I love the fact that I was only a couple of feet away, so that meant that my SB800 on the stand, camera left was only a few feet away. This made the power required to light him very minimal. This is great for recycle times, as well as strain on flash. Less power usage equals less strain on the flash.

So what about the numbers... This beautiful little lens has 13 elements in 11 groups. Internal AF motor so it will work on for you guys with the D40's and the D60's. It has a "Pro" 77mm filter thread as well as a nice supplied lens hood. It has 9 diaphragm blades so there will be a nice bokah on those small DOF shots. Great lens! Sharp from side to side, and minimal distortion. I'm happy to have it as an addition to my lens selection. Get one. Rent it or barrow it to try it out. I promise you'll be hooked on the wide angle stuff. Your significant other will be cursing me for turning you on to it. : )

That's it for me today. I have to get back out to the pool. Have a good weekend. See you all Monday!

Jason
Read more on this article...

Thursday, July 23, 2009

Taking your settings with you


Hey everyone. Glad you made your way back. If you read yesterdays post I told you that I just upgraded to Photoshop CS4 a few days ago. It's better than I could have ever expected. Over the next couple of weeks I'm going to cover some of the new features included in this new version, but first we have to get all of our settings, actions, and brushes converted over from CS3. If you haven't been using Actions, keyboard shortcuts, and specialized brushes, why not? These are all things that make life a whole lot easier when working in Photoshop.


As a side note, even if you aren't upgrading at this point, you may want to read about how to do this stuff and do a backup of all of these settings, just in case something happens to your computer.

Open photoshop. Got to EDIT-KEYBOARD SHORTCUTS this is what will pop up:

SS1

Now if you don't have any specific keyboard shortcuts, then you don't have to worry about this step because the same "default" shortcuts already come pre-loaded in CS4. I have changed my shortcuts to make my life easier. So once in shortcuts, click on the small "disk" icon in the upper right hand side of the box. I have my cursor pointed directly over it in this photo. By default it will open up the Keyboard shortcuts file under the Photoshop folder in your program files section of your hard drive. I have a folder that I keep all of my external photoshop files in under the My Documents tab. So I selected that folder and named my file Jason's Keyboard shortcuts. Click ok to save and you're done with that. Now in your Actions panel click the drop down menu in the upper right hand corner of the box. If you are in button mode, uncheck that selection and then move down to your actions set. (if you haven't made a custom actions set to save your files in, you need to do that first by clicking on "create set" in the ACTIONS drop down menu) Click on the drop down for the ACTIONS box again and click "save actions". It will look like this:

SS2

Again I have the folder in "My Documents" where I keep all of my photoshop external files. I saved the actions set there.

Last but not least for me was to save my brushes to transfer to CS4. I have acquired a pretty good collection of different brushes and I wanted to take those with me to CS4. So click on the brush tool over on the left hand side of your screen. When you do a dropdown box will appear on the menu bar at the top of the screen. Click on this dropdown where it says BRUSH. Now on the right hand side of the screen you will see a small arrow inside of a circle. Click this. It will bring up a menu similar to the Actions menu we saw earlier. It should look like this:

SS3

Click on save brushes. At this point you should know where I'm going to save the file for this(in my documents). Save the file there and close CS3..

Once you have CS4 installed, you will repeat the above process, except instead of clicking on save brushes, you click on load brushes. Easy and simple.

I'm done for the day. I need a nap so I'll see you all tomorrow! Jason
Read more on this article...

Wednesday, July 22, 2009

Bellevue Umbrellas


Hey everyone! This is a setup shot from our photoshoot on Sunday. We arrived around 6AM to the city of Bellevue to start preparing for the morning. Bellevue decided to change up some of their promotional materials and wanted to get the word out. Since our studio is located in Bellevue, naturally we wanted to be part of it. They printed their new logo on a bunch of bright yellow umbrellas to pass out to people during the "Shop Bellevue" event. Shad had the great idea to get a bunch of people out there in the street with the umbrellas and get some shots from up high. The city arranged a "cherry picker" and we got to work. We got some great stuff that morning including this shot of the people that showed up to hold umbrellas:

DSC_8318

Now this is a fine shot. It shows the umbrellas, the shops, etc... But we were hoping for about double the turnout of people to hold umbrellas. I went to work...
Using photoshop CS3, and the magnetic lasso tool I selected different "umbrella groups" and copied them to new layers(50 in all). I then used the free transform(CTRL+T) to rotate, resize, and position the umbrellas where I wanted them. Here is what the shot should have looked like from the start:

DSC_8318-2

Unfortunately since we didn't have enough people to hold umbrellas I had to spend 4+ hours in photoshop adding content. Worth it in the long run because that image along with the shot below and an HDR image got us on channel 12 news Sunday evening. Always love free advertising!

JRL_1866

So I just upgraded to Photoshop CS4 last night. Not that there was anything wrong with CS3, but there are some added features in CS4 that I could just not pass up. I'm not ready to give any tutorials on these features yet, but I would like to give you a quick summary of what they are, as well as what they do.

Content Aware-Scaling This feature is HUGE. It allows you to "stretch" your image to fit whatever proportions you need, without distorting the image. If you have ever taken a digital photo, and said wow, that would look great as an 8X10 but when you tried to print it as an 8x10 things got cropped off, you'll love this feature.

Clone stamp preview This feature allows you to see what your clone stamp is going to look like before you stamp it. This is especially helpful if you are trying to clone along a strait line. You can now match up your lines before you actually stamp it.

Tabbed documents This allows you to have multiple open documents and keep them organized like never before.

Camera Raw improvements This is almost more like a complete overhaul of camera raw. It's interface now opens every type of photo file not just RAW files(similar to Lightroom) with white balance, clarity, as well as tone curves adjustment and a whole lot more. If you are familiar with working in lightroom's develop panel, you'll feel right at home here.

3D capabilities I don't really know exactly what they are, but I know that RC over at Photoshop User TV goes on and on about them. When I learn more about this feature, I'll pass along the info.

I'm sure there are some that I'm forgetting/don't know about, but these features alone are enough to justify the upgrade. Tomorrow I'm going to talk about how to transfer all of your preferences, brushes, actions, etc. over from CS3 to CS4. See you all then! Jason Read more on this article...

Monday, July 20, 2009

Monday, July 20th


Good morning everyone! Let me Start by Saying that if you attended last Saturdays Photowalk, Thank you! I had a great time, and met a lot of cool new people. If you haven't already checked out the Flickr group you can view it HERE. I can't wait to see what everyone got! I didn't take a whole lot of images because I wanted to spend my time conversing with everyone and thanking them for attending. What I did get was a couple of really cool HDR shots. Here is my favorite:

West Bridge

I'm not normally a big fan of HDR. I feel like it's kind of cheating, but then again some say the same thing about photoshop. For those who don't know, HDR stands for High Dynamic Range. Basically you are taking a group of shots, some over exposed, and some under exposed, and combining them to make one photograph. So here's how you do it...

First you have to take the images. Many cameras these days have what's called a bracket function on them. This is a setting that will tell the camera to take a series of photographs and make each one a different exposure. The way to set the camera to do this varies from model to model so refer to your user manual to set the camera to do this. What you get will be a series of images that look something like this:

JRL_1684

JRL_1688

JRL_1687

JRL_1686

JRL_1685

JRL_1690

JRL_1689

What this does is it captures the entire image from the darkest darks, to the lightest lights. Once you have these images you need to open them into an HDR program. Photoshop does have an HDR feature. You can access this by going to FILE-AUTOMATE-MERGE TO HDR. This works... but not very well. I have found that the best program on the market for creating HDR's is Photomatix Pro. I have photomatix pro 3.0 and I love it. The program is really simple to use, and it does a wonderful job. You can download a free trial of it HERE Here's a quick rundown of how to use it. When you first open the program it will look like this:

photomatix

Click on "Generate HDR" in the upper left hand side of the screen. A box will come us that tells you to select your images. Click browse, and then find the images you want to use for the HDR. Click ok, then click ok again when the pop up asks you if you want to create an HDR. At this point a small box will pop up that gives you the option of changing some settings around, I don't, I just click OK. Then it begins to create the HDR. It usually takes a few minutes then it pops up a photograph. That photo doesn't look that great. You have to click on Tone Mapping on the left hand side of the screen and you should get something like this pop up:

Photomatix2

On the left hand side you will see an option called "Light Smoothing". This is basically the level of "HDR" you want. The further left you click, the more it looks like a cartoon. The further right you click, the closer it gets to reality. Once you select your amount, click "Process" at the bottom of the page. This will get you back to the main screen. Once there you can click FILE-SAVE AS to save the newly compiled image.

That's it! That's all there is to an HDR. I hope this helped some of you who had some questions about HDR, and how to shoot, and process it. I have a ton of editing from the weekend to get to, so I'll see you here tomorrow! Jason Read more on this article...

Thursday, July 16, 2009

Thursday, July 16th


Hey everyone! Good morning to all. It's Thursday, and you know what that means... yeah I don't know what it means either. :~) There is however only one day left until the photowalk. 29,000 people signed up to participate. We're going to be in the Guinness book of World Records. USA today had an article about it yesterday. You can read it HERE. Also for those of you attending, I will be sending out an email tomorrow with some pre-walk tips, and suggested things to bring along with you.

Holy Cow! Bogan Imaging has a new portable strobe system on the market. Well, it's on it's way to the market(probably in stock at B&H by the time you read this). Two flash heads that are small enough to fit in your pocket, with a battery pack that will give you a ton of flashes with almost instant recycle time. 400watts/second power and a super bright daylight balanced modeling light. These things rock! See them in action HERE. To place your pre-order click HERE. These things are perfect for anyone who wants to travel light, but pack a lot of power.

You all know I'm into Photoshop, and Lightroom. I have been following a blog about the disasters that get printed in magazines or in ads. It's a really funny showing of all of the stuff that just slips by. Read all about it here: Photoshop Disasters.

Ok. Short and sweet. That's if for today. I have some editing to do, as well as some of the less fun promotional side of things. See you tomorrow. Jason Read more on this article...

Wednesday, July 15, 2009

Wednesday, July 15th


Hey everyone! Glad you found your way back over here, or if this is your first time reading this blog, welcome. I've got a little news/info to give you before I get to today's tutorial.

Many people may already know about Flash Zebra, and honestly I had heard about them before last week too. I just never really paid that much attention to the site because I never needed anything that they had. 
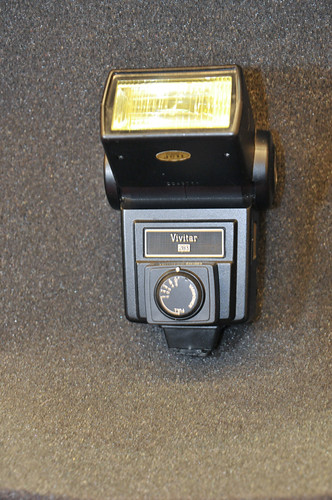
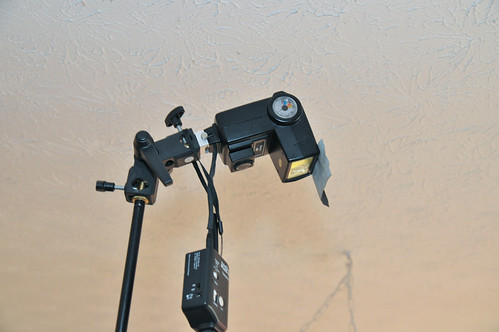
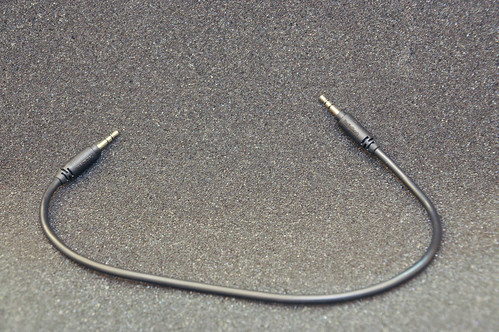
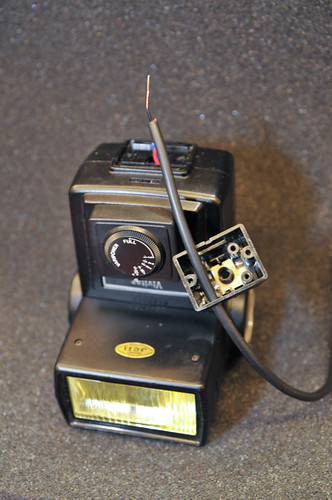
Flash Zebra is a website/wholesaler of camera components. They carry all of the odd ball cables, and connectors that you could want. The also carry the generic version of many popular cables like the motor drive cable to go from a Nikon to a Pocket Wizard. I went there searching for a cable to attach the Vivitar 283 flash I wrote about last week. I ended up making my own, but they had the best prices I found anywhere, so if you are looking for an odd ball cable, check them out.

Have you ever been on Flickr and saw an image that had some effect you liked? Ever said to yourself, "I wish I knew what they did to make it look like that." Well now there is a tool to extract the info from the metadata of the image. Mike Wiacek wrote a program that will extract the info for you and make a preset in lightroom to achieve the same effect.
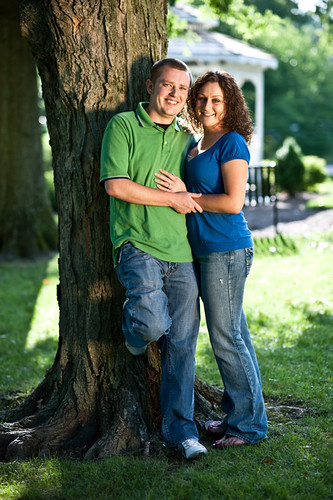
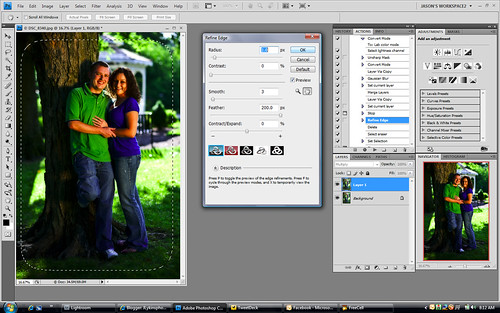
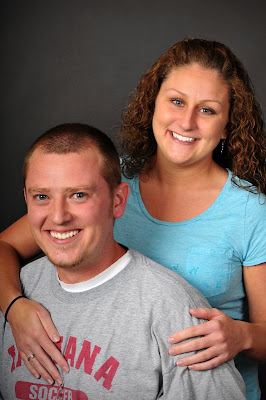
 Here's the link...

The shot you see above is of Tomi, and Matt. It was taken right after we finished showing them some of our wedding samples. This is something we like to do when a couple comes in to discuss wedding photography. We take a few shots of them together and burn them a disk to take with them. It not only gives them a little glimpse of how we work when posing, but it's a little something that separates us from the competition. Something that makes us stick in their mind. Anyway, the shot you see above is the finished product. Not that they needed any major touch up work, but every portrait we do gets a little treatment to make it "pop". Here's what I did..

The technique I'm about to describe was done in Photoshop CS3 but it could have just as easily been done in Elements. The first thing we need to do is open the image into photoshop. Here is what I started with:

Tomi1

Now like I said before, this isn't a bad photo. The both look nice, and the lighting is good. They probably would have been happy with it. I wanted to make it a little better.

Most people, whether they smoke or not don't have perfectly white teeth. From drinking dark colored pop/tea or whatever they just have a slight tint to their teeth. Tomi, and Matt actually have pretty white teeth but I still wanted to lighten them just a little. So get your DODGE tool from your tool bar on the left. It's the tool that looks like a black sucker. Adjust the size of your brush until it's as large as the mouth opening. You make it that large so that you apply the dodging evenly over all of the teeth and you don't end up with some areas lighter than others.

Tomi2

So I applied this lightening to both subjects being careful to not go too far making them look unnaturally white.

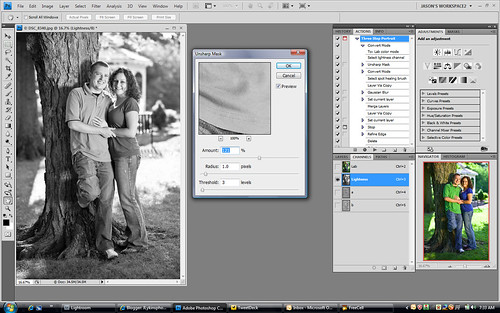
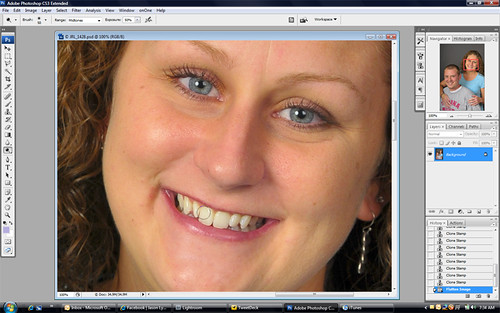
Next we want to make the eyes really stand out. Now Tomi has beautiful eyes, that truthfully don't need any enhancement, however I feel that I can always make them stand out just a little more with a few adjustments. Sometimes the whites of the eyes need to be lightened. Again you can do it with the dodge tool like you did with the teeth, but on this particular image I didn't have to do that because their eyes were very well lit. What we do want to do is sharpen them. Select your Elliptical Marquee tool by right clicking on the square tool at the top right of your tool bar on the left hand side of your screen. Now you want to select the eyes. To do this you need to make sure that you have the correct setting for your tool. Under the word image on the top of your screen there should be four small boxes. If not, then you haven't selected your Elliptical Marquee tool yet and you need to do that first. When you see the small boxes, make sure that the second box from the left is selected. That will allow you to make multiple selections with the tool instead of one at a time. Now when you have done that, zoom in so that you can see the persons eyes. If you have more than one person in the image, zoom in on one of them, we'll do the other ones in a minute. Now select just the eye. You may have to make a couple of selections to get the entire eye without going outside of the white. That's ok, just take your time and if you make a mistake and go to far press CTRL+Z to undo what you have done. Once you have both eyes selected go up to the FILTER menu, then to SHARPEN then SMART SHARPEN. You should have a screen that looks like this:

Tomi3

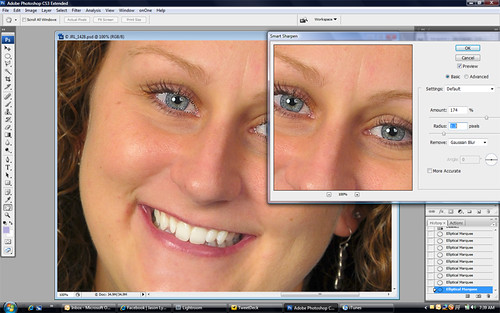
Set your Radius to 1.3 and your amount to 175%. Then click Ok. Now we need to go to the top and click on SELECT then down to DESELECT. We can now move over to the other subject in the photo and repeat the same process again. You can play with the amounts on the sliders because not all eyes will need the same amount of sharpening. This is why I do them separately instead of selecting both subjects eyes at the same time.

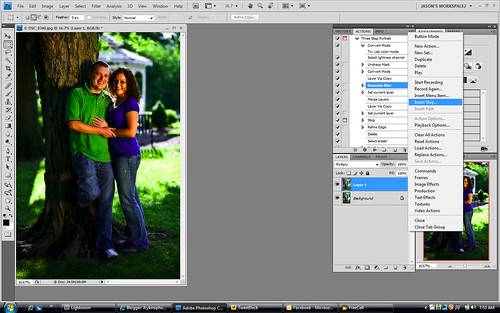
So now our image is looking pretty good, but we need to add a little something to make sure your attention is where it should be, on them. Go to FILTER-DISTORT-LENS CORRECTION. You will get a box that pops up like this:

Tomi4

Near the bottom of the screen there is a box that says SHOW GRID. Remove the check mark from that box. Now under Vignette drag the slider to the left until the image has some slight Vignetting, then click OK.

You're done. You have just spiced that image up to make it stand out. The eyes pop, the teeth are white. The customer should look at it and think/say wow you made me look good! That's the goal. To make them happy.


Alright, enough from me. Get out there and take some pictures. Before you do that though. Go back up your images. If you haven't done it in a few days, now is the time. Don't want to loose all of those great shots! See you tomorrow. Jason Read more on this article...

Tuesday, July 14, 2009

Tuesday, July 14th


Good morning everyone! What a weekend! I was covering the National championship AAU basketball tournament all weekend since we didn't have a wedding scheduled. I got to take lots of photos of some of the best female basketball players from around the country, and for the most part it went great. There were a couple of unfortunate accidents, and injuries but all in all it was a good tournament. Unfortunately, this type of photography doesn't lend itself to creativity very well. I mean, you're looking for an action stopping shot so that people can see the player and what's going on. With the lighting I had(which was pretty good) I was in the neighborhood of ISO 1250, 1/400th of a second, f/2.8. Positively blahhhh. I was bored. So I backed my lens all of the way out to 17mm, sitting right under the basket during a "free throw", and drug the shutter to make the shot above. Now normally to get anything in focus when you drag the shutter, you have to hit the subject with flash, but not here. This was a special circumstance because I knew that the shooter would stay still for slightly longer than the rest of the pack. As soon as the ball left the shooters hands the other girls attempted to "box out" each other in order to get the rebound, but the shooter was following through with her shot so that kept her in the same basic position for a fraction longer. This creates the illusion that she is frozen but that there is movement all around her. the exposure was this 17mm ISO 1250, 1/15th of a second shutter speed, f/11. So how you ask do you accomplish this look? read on....


First thing's first, you have to determine how you want to control your camera. You can use any setting(manual, shutter priority, or aperture priority) but the key is to get the shutter to be longer. My suggestion would be to use shutter priority if you don't have a solid grasp on the elements that go into an exposure yet. So in shutter priority you would set your shutter speed. The speed you want to choose is going to vary depending on how fast your subject is moving, and how much blur you want behind them. For the girls that were playing basketball, 1/15th was fast enough but they really weren't moving "that fast". If you were taking a picture of someone that was say dancing you could probably get the same effect with 1/30th of a second. You really need to play around with the shutter speeds to get down what speed works best for you. Next you have to be able to hold the camera still for that period of time. 1/30th isn't too hard, but if you're doing an exposure of 1 second or more, you may get some camera shake. Now the next part is simple, press the shutter... What'd you get? Too much blur, not enough in focus? Make the exposure a little faster. Too much in focus, not enough movement, or blur? Make the shutter longer. Now, how do you keep anything in focus but still get the blur to show movement? Flash.

The first thing that we need to talk about before we talk about anything else is your "curtain" setting. By this I mean the setting on your camera that places it in either Front, or Rear curtain sync. You want rear curtain. I live in rear curtain, here is why. When your camera is in front curtain, the flash goes off as soon as the shutter opens. At higher shutter speeds(say 1/250th) this is fine. You won't even notice a difference. When the shutter gets slower (say 1/30th) it is very noticeable. What happens with front curtain when your shutter gets that slow is trails of blur, but in the wrong direction. You "freeze" the person with flash at the first part of the exposure then in the rest of the frame they are moving out of that frozen spot and creating a blurred trail where they're walking to instead of where they're walking from. With Rear curtain, the exact opposite happens. The shutter opens, and right before it closes the flash "pops". This will create a blurred trail behind the person and then "freeze" them in their final position. This is what you want. It looks more natural, and it creates a sense of motion. This is why I live in rear curtain. I want the subject to look natural, and show movement in a natural way, not like they are in the Matrix.

So now, how do you do this. Well basically you set your shutter speed, make sure you're on rear curtain, get a firm "correct" hold on the camera, and snap away. This is a fun way to show the movement of a bride on the dance floor, or a flower girl coming down the isle. It's also something that you may want to play with doing when you've been shooting basketball for 6 hours solid and are bored with action stopping shots. :~)

Have a good day everyone. See you back here tomorrow for some industry news, and a photoshop tutorial. Jason Read more on this article...

Thursday, July 9, 2009

Thursday, July 9th


Good morning all. I spent the better half of the morning working on this and other shots for the contest that I talked about yesterday. I was then browsing everyone's submissions, and I realized that I was in trouble. Check them out HERE, but be warned that you'll suddenly feel very, very hungry. The beauty of my shot though is my setup. I shot this entire thing with about $50 worth of gear(minus the actual camera)that includes the flash! I have a small "light box" made out of PVC pipe that I made myself with a large sheet of construction paper as the background. Have a look:

JRL_2546

You can see the stand behind holding the vivitar flash(I plan on talking about that in a few minutes), the 5in1 reflector with the outside removed so that it is just a diffuser panel, and the piece of aluminum foil in front. The food was lit from slightly behind and on top(best way to light food) through the diffuser(white panel on top), and the front shadows were filled in slightly with a small piece of aluminum foil on the front. Nothing to it. The best part... We ate the prop! :~)

JRL_2484

This little beauty is a Vivitar 283. It was at one time the workhorse of every photojournalist... back in the late 70's early 80's. Because it was so popular, there are a ton of them out there. They can be had for as little as $20(which is what I paid for this one). What makes it ideal for someone like me though is the addition of the small dial on the front. You can see it in the picture. That is the variable power dial(which was sold separately so look for it if you buy one). This lets you set the power manually from Full, all the way down to 1/32. That is a lot of adjustment. Since this is an older flash you can't use it on the newer digital cameras without an adapter, but who cares? We have our new fancy flashes that do TTL metering and power adjustment on the fly to attach to the top of your camera. This flash is for just what I use it for, off camera Strobist style lighting. Notice that I have a pocket wizard attached to it to trigger it:

JRL_2548

You don't have to do that. You can run a cable to it for triggering, but I happen to have the pocket wizards, so that's what I use. This flash comes with a specific cable to trigger it off camera. The cable has a special end on it that is specific to Vivitar, and if lost they cost around $20 to replace. $20! That's all I paid for the flash. Nope, not me. You all know how I am by now, I took it apart and made my own. Here's how:

The first thing you have to do is determine if you are capable of soldiering. If not, find someone who is. If you don't know anyone, you know me... I can do it. The bottom of the flash(called the foot), is held on with two screws. Remove them. When you do this is what you'll see:

JRL_2491

The red wire is the triggering wire, or the "hot" wire. Remember that. The blue is the ground. Next you need to procure(buy, barrow, steal) a headphone cord. I happen to have one laying around:

JRL_2490

Now cut one of the tips of the cord off. Doesn't matter which one, just cut one. Strip back the outer insulation, and then separate the inner wires. Now if you have a wire from a pair of headphones there will be three wires. If you have a "mono" cable there will be only two. On the three wire headphone types the red is your tip or "hot". The black is the first ground in, and the silver uninsulated is the third ground. You won't need the black. Now on my flash I didn't care about keeping the function of the foot, so I just cut the wires off of it. If you want to retain use of the foot, just tap into them. Now you hook the red of the flash to the red of the headphone cable, and the blue of the flash to the silver uninsulated wire. Solider them together. Tape them off and you're done.

JRL_2492

Now you can trigger this flash off camera. easy as pie.

JRL_2501

That's it. That's all there is. Now you can set yourself up an external flash and bring light from a different direction for your portraits. If you want you can get a couple of these things and setup a mini studio in your house to do portraits and such.

That's all I've got today. Hope you all enjoyed looking at my dinner from last night, as well as my old flash. See you all tomorrow!

P.S. a word to my wife: Honey, I didn't just buy that flash, I've had it. I just now got around to messing with it.


Have a great day all! Jason Read more on this article...

Wednesday, July 8, 2009

Wednesday, July 8th 2009


This moment brought to you by the Helton Newly Weds, The Nikon D300, and Gary Fong Light Sphere. Congratulations to Nick and Lindsay(pictured above). We did their wedding two weeks ago, but I didn't want to share their images until they had their copies and a chance to view them. Lots to talk about today. So much going on in the world of photography.

First and for most if you have been following me for any amount of time you know that I am a huge fan of David Hobby and the The Strobist. That site will teach you everything you need to know about small flash units, and using them manually off camera to achieve beautiful light. Well David is doing a photo contest/assignment right now that is designed to get you shooting different subjects, and trying new techniques. The first assignment was shooting headshots. If you want to read more about exactly what was involved click HERE, but we are on to the second assignment now. It involves doing a food photo. Read about it HERE. The deadline is this coming Saturday, so if you want to get involved you better get to it.

Next is a little news that comes from Rumor sites. Nikon Rumors reported last week that the 70-200 2.8 that is the "go to lens" for just about every photographer that I know, is being discontinued. Read that report HERE. Nikon is supposedly replacing it with a newer 70-200 2.8 with the "N" classification. The rumor is that there will be added lens assphericals to help with softness encountered on full frame sensors. We shall see.

If you aren't following the Photoshop Insider, you should be. There is a special guest blog today by Deke McClelland about how to do a proper mask in photoshop. See it HERE. Learn to do a mask like a pro!

That's if for me today, but check back tomorrow. I have a great how to post along with a review on the classic Vivitar 283 flash. Great little flash. Cheap to buy, and great for Strobist style work. See you tomorrow! Read more on this article...

Monday, July 6, 2009

Monday July 6th


Good morning everyone. It's been a week since I last checked in, sorry about that. It's been a crazy week for us with a wedding, two sets of engagement pictures,and three sets of portraits to edit. 4000+ images to go through right there... The shot you see above is from the wedding. Just one of the pre-wedding shots of the dress. Used a Pocket Wizard attached to an SB800 sitting on a table behind the dress to light it up from behind. Converted it to black and white in Lightroom, and cloned out an extra hanger in photoshop. Beautiful dress, for a beautiful bride. Later this week I will show some of the images from the wedding, but I haven't delivered them to the bride and groom yet, so I want to wait until they see them first.

We were in Columbus last Thursday for some engagement photos and while we were there we had to stop at Midwest Photo Exchange just to say hi, and peruse the store for great stuff. We came upon a great little light modifier that just hit the market. It's a mini "beauty dish" made specifically for speed lights. it's manufactured by a company called Interfit, and branded under the name Strobies. If you follow The Strobist David Hobby, you may have seen this little beauty a while back when he first got to try them out at a trade show. They are basically a small beauty dish that fits on your hotshoe flash and creates a "high glamor" style lighting. Not to be used for every portrait for sure, but in certain situations it will work to create a look that is a little different than normal. Here's a picture of the unit that I got from their website:

Photobucket

As you can see it's a reflector ring with a small white center reflector in the middle. How it works is this; the flash fires, hits the small center reflector and is bounced back into the main "large" reflector ring where it is again reflected onto the subject. This essentially makes for a larger light source. The trade off seems to be around 1 stop of power so you'll have to play with it to get the feel for how much + or - you need on the flash compensation to get a proper exposure. Shad used it during the engagement session, but we haven't had a chance to use it in a controlled environment yet. I suspect that this will be best used on a boom directly over the face, or slightly off axis as a nice main light. I don't think this is an attachment do use directly on camera all of the time, but rather a nice addition to the modifying arsenal to make our lighting different. I can't wait to see what we get with it. Shad bought this one, but the next time we head up there (in August) I'll more than likely pick one up for me.

Some bad news about the Pocket Wizard Flex units for Nikon. Pocket Wizard has pushed the release date for the Nikon version of it's popular Flex units until the fall siting some re-engineering issues with the Canon units as reason. Apparently when they started developing the Flex units over at Pocket Wizard for the Canon's they were using "off the shelve" brand new units. The feedback they got from customers was that the many people were experiencing intermittent connectivity issues, as well as range problems. What they found the problem to be was IR interference. The older(pre 2009) flash units were emitting varying and sometimes powerful IR white noise. This wasn't happening in the newer models that they had used for design. They had to pull most of their engineering teem off of the Nikon project to fix this Canon Problem. This folks is why I shoot Nikon. When it comes to cameras, and lenses, you really can't go wrong with either manufacturer, but when it comes to the flash technology, specifically the wireless interface between them, Nikon wins every time hands down. I'll keep you posted as more information comes out, but as of right now, we have to wait till the Fall.

The second part of the Strobist BootcampII is going on now. This weeks contest is food. Visit his blog to get the info. There are already over 100+ submissions and it just started yesterday! They've got some great prizes over there, you should check it out.


That's it, that's all... All I got today. Hope you all have a great day! Jason Read more on this article...