How's it going everyone. It's been another cold couple of days around here, but still plenty of exciting things going on. We have been actively looking for studio space in the area and we found two places at the same time. We looked at one yesterday in Bellevue, and we're looking at another one today in liberty township. We're going to keep our fingers crossed that one of them will work out for us. If anyone knows of available space please let us know. Hopefully our next workshop will be located in a studio. I also wanted to tell you all about a funny little comic strip put on by Aaron Johnson. It's called WTD or What the Duck? I have posted a link on the right(just click the picture). It's all about photographers and the funny things that we go through. I hope you all enjoy it.
On to some technical stuff. Lots of people have expressed interest in learning photoshop lately, so I thought I would give a little basics on the program. First of all The full version of Photoshop is expensive. Right at $1000.00 is a lot to spend if you aren't a professional who needs all of the power that photoshop has to offer. There is a cheaper option called photoshop elements. This is a toned down version that still has most of the tools the average ameteur needs to properly adjust images. For most of what I will be talking about here, I will be giving you the exact steps as done in Photoshop, but the steps are similar for Elements.
I'm going to go ahead and assume that you already have the program installed. If you are having trouble with that, please feel free to email me and I can walk you through the installation, or if you're having particular trouble, we can do it over the phone. So you have it installed, but before we start editing any photos, lets do a couple of tweaks to make sure we have our workspace setup correctly. The first thing you want to do is go to Edit-preferences-performance. A box will come up that says memory usage. By default it should be set to around 50%, I move this up to around 70%. This is the amount of RAM that the computer devotes to photoshop while you are running it. This is important when you start to do heavy editing with lots of layers. Also in this box in the upper right hand corner you will see a control marked history states. The default here is 20, move that to 70. I will explain what this does in a little bit. Click OK in the upper right of the box. Now on the top of the screen you will see your menu bar. Select Window, make sure that History, Layers, and Navigator all have check marks next to them. If they don't, select them. Alright, these are the basic things that needed to be changed before we started. Lets move on to editing a photo.
You can get an image into photoshop a number of ways. With photoshop open, you can select file, open, then select the image location from there. If you don't already have photoshop open you can go to the picture location on your computer and right click the image, then select open with, photoshop.
Ok now we have an image open in photoshop. What now? Well The first thing to do is decide what your goal is for the image. Does it need to be cropped, does it have red eye issues, do you just want to sharpen it a little bit. These are the things you need to think about before you start jumping in and making changes. The first thing I usually do is Cropping. I want to get rid of the excess "stuff" if there is any. the way to do this is to grab the crop tool shown below.
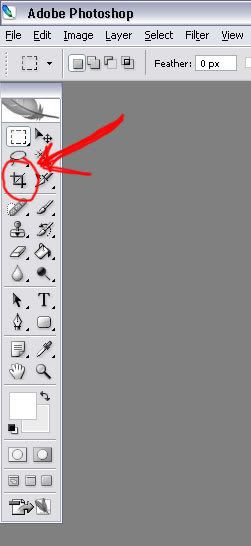
Once you have selected the crop tool, you will move to one of the corners of the image left click the mouse and drag to the opposite corner. This will increase your crop evenly horizontally as well as vertically. When you have gotten to the point you want, release the mouse button. You will see 6 small boxes outlining the "marching ants". These are your adjustment points. If you want to adjust your crop in any direction just grab any box by left clicking it, and you can adjust the crop. When you are satisfied with your selection, you can right click anywhere within the image and select crop. Two things will happen. Your image will crop, AND you will get a history point in the history box on the right side of the screen. This is important to note because as you make any adjustment to your image, a history point will be created. If at any point you make an adjustment that you want to undo, you can select that adjustment in the history box, and click the trash can in the bottom right corner of the history box.
Now you're done cropping, what to do next? I tend to adjust with levels, but for this tutorial we're keeping it basic. You have to determine what you want to adjust next. Do you need a color adjustment? If so go to image-adjustments-color balance. From here you will get a small box that pops up and allows you to adjust the colors. click ok when done with that. Next click on Image-adjustments-shadow and highlights. This will bring up another small box that will allow you to do some tweaking to the shadow and highlight areas of your photograph. Once again click OK when finished. Before we move onto sharpening, lets talk about converting to black and white. Like with everything in photoshop there are multiple ways of converting an image to black and white. The way I prefer is beyond the scope of this tutorial so we'll talk about the most basic way that I know. Once again click on Image-Adjustments then click De saturate. This will take all color out of your photograph and make it a black and white. If you have photoshop CS3 or CS4 you have an option under Image-Adjustments called "black&white". If you have one of these versions, this is the best way to accomplish the transition.
The final step in the Basic Photoshop post processing workflow is sharpening. The best way I have found to do this is by going to Filter-Sharpen-Smart Sharpen. Once you click on this you will get a dialog box that has two sliders. The top slider is the Amount, and the bottom slider is the Radius. There are a few quick rules when sharpening an image. First less is better. We've all seen images that are oversharpened. They have a "halo" effect. They seem to be glowing. Don't use a percentage above 75 on the amount slider. In the Radius slider don't go above 2. Those are some general rules to go by, but you can play around to tweak it to your liking.
Now you've adjusted your image, and you're ready to save it. Before you do that, let me tell you what I like to do. I go to the folder that the file is originally from, make a new folder inside of it and name that folder "Reworked". I do this so I can save my file in a separate place from the original and so that I can easily tell the difference between the two. So now, go to Photoshop, click File-Save As, then select the folder that is marked "Reworked". Make sure that in the bottom of your save as box you have the file type set to JPEG. Depending on what changes you make to the image, Photoshop will change that file type. Just make sure it's on JPEG and you will be fine. Click OK and you're done. Now all that really only takes a few seconds once you get good at it. On average I spend about 70 seconds on an image. I do this by practicing and getting to know Photoshop.
So there you have it. Photoshop basics. This should get you started, and on your way to being comfortable with photoshop. Of course there are a lot more things that can be done in photoshop. I'll start to work more advanced posts in here to help you use those features. If you have any questions, feel free to email me and I will do my best to help you. Jason



I must admit, you seem to know a lot about photography. It is simply intriguing to see that there is this much to learn on any given topic. Hope it warms up soon for you!
ReplyDeleteThank you for your compliment. I hope it does warm up soon as well.
ReplyDelete