This is a shot I did of my Friends son for him to use on his model card. He is using the color version, but I really liked the black and white version and I thought I would share it with all of you. It is also a nice lead up to the tutorial today. I am going to cover every way that I know of to covert an image to black and white using photoshop. We'll also cover how to give an image the sepia look.
Lots of people like the black and white look. I know I do,that's what I started shooting when I first got into photography, and I can't get enough of it. But now that we are in the digital age there's really no reason why you can't have both the color version and the black and white version. To be honest I've never used the black and white feature on my camera because I want to be in total control of the overall quality of the picture and I don't want to leave the black and white conversion up to the camera. Photoshop has enough ways that you can convert to a black and white that allow you to keep complete control of the image tones, and contrasts, that I can't believe anyone would want to do it any other way, unless they don't know how to take advantage of the tools that Photoshop has to offer. So let's start with the easiest. First though we need to get a little info out of the way. A "black&white image" really isn't just black and white. It is black, white, and grey. A true black and white doesn't have any mid tones, and looks more like an abstract than an image. So from here on out when I say black and white, I mean the black,white,grey tone images.
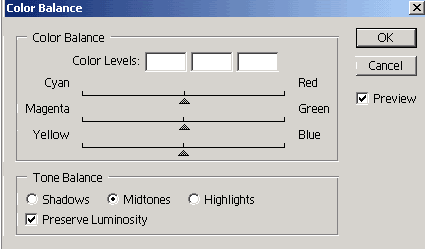
The most basic, down and dirty way to make a color image black and white is with saturation. So start by opening up your image in photoshop. You will then click Image-Adjustments-Desaturate. That's it! You have a black and white image. Pretty easy huh. Not the best tones in the image, not the best contrast, but hey it'll work in a pinch. From here you can do a number of things. First lets talk about how to add that sepia look. After you have desaturated, you will go back into Image-Adjustments-Color Balance. This brings up a dialog box that looks something like this:

You have sliders that move in different directions to either add or subtract color. For this purpose we're going to be using the RED slider and the YELLOW slider. What you want to do is move the RED slider towards the red side, and move the YELLOW slider towards the yellow side. How much is a personal preference, and to be honest I don't do the same amount for every photo. It just depends on what I think looks good. Once you have it the way you like, click OK, and you're done. You have a Sepia image. Now like I said, this is the most basic down and dirty way I know of to create a black and white.
Next up we have my favorite way of creating a black and white with photoshop CS2. I say CS2 because in CS3 they add a black and white option, but we'll get to that in a little bit. So you have your original color image open in photoshop. You first have to go to the WINDOWS tab at the very top of your screen. Under this tab make sure that CHANNELS is selected. You will need them for the next step. Look in your boxes on the right of your screen. Look at the box that has layers in it. There should be a tab marked CHANNELS, select it. Once you have this tab selected you will see four boxes, RGB, RED,GREEN,BLUE. Skip over the RGB channel and start with RED. Click the RED box and see what it does to your image. It converts it to black and white and shows the areas that had the most red in them, highlighted. Do this for all of the channels until you decide which one you like best. For me I tend to use the GREEN channel more than any other one. Once you have selected the channel you are going to use, click on IMAGE-MODE-GREYSCALE. You will get a warning box that says "Discard other channels?". Click OK. Now you have gotten rid of all of the other channels and are now keeping just the channel that you selected. You're not done yet though. Go back to IMAGE-MODE then click on RGB again. Now you're done with the conversion. You can click on the Layers tab to get away from the channels tab. Now on to that Sepia. You could do it the same way that you did earlier, but there is a much much better way to go about it. I know we haven't talked about layers yet, but even if you don't quite understand what a layer is, just follow these instructions and you'll be much happier. Go to LAYER-NEW ADJUSTMENT LAYER-COLOR BALANCE. You will get a new layer box pop up that will name it "color balance 1". Click ok. You will now get the same box that we got earlier. You do the same adjustment that you did earlier. The difference is, now you aren't changing anything on the actual image, you are making a "layer" over top of the image that you can erase or change at any point you want to. If you do the Sepia and you decide that you don't like it, you can just drag that layer to the trash can and it will delete the layer leaving only the black and white image. Also if in the course of adjusting your image you decide that you want a little more red tones in your image, all you have to do is double click the little icon that has the circle and triangle inside of it in the layers box. This will bring the color balance box back open for you and allow you to tweak it some more. There are lots of other effects and things you can do to layers that are outside of the scope of this tutorial, but we will get into them on a later date.
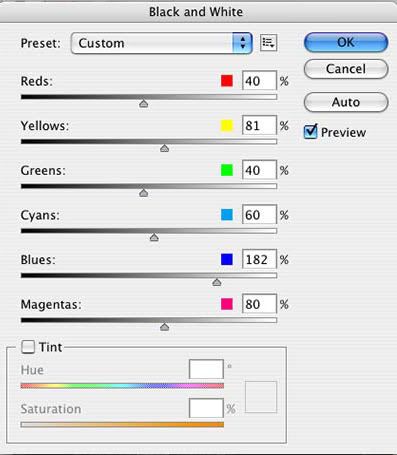
Now lets talk about my current way of converting to black and white. I am using Photoshop CS3, and new to CS3 is an adjustment layer called "Black and White". Simple enough right? So in Photoshop CS3 open the picture that you want to convert, got to LAYER-NEW ADJUSTMENT LAYER-BLACK & WHITE. This will open a box that looks something like this:

You can adjust the sliders on here to boost the Red, Green,or Blue highlights. Once again there is no correct setting for every photograph. You will have to adjust until you are happy with the photo. Once you are done with this, you click OK, and you're done. You can now go and do a color balance layer like described above to add a sepia tone. I think that Adobe hit a home run with this layer option when they added it to CS3. I think it does a good job of converting the image without having to make any adjustments to the slider box. I usually just leave it the way it is. There are also many plugins that do an exceptional job of converting to Black&White, but I don't have any experience with any of them to tell you good, bad or indifferent. If any of you have used a plugin for this let me know how it works, and what you like about it. I'm always open to new ideas.
That's about it for me today, I have to get back to editing. See everyone tomorrow. Jason


No comments:
Post a Comment