
As promised today I'm going to show you how to make a homemade snoot. Like I said yesterday, a snoot is a light modifier that limits the spread of light as it comes from your light source whether it be a speedlight, studio strobe, or constant light source. Basically it's a long tube attached to the end of your light source. I have seen them made from cereal boxes over at the Strobist , and really nice professionally made ones like they have over at HonL . I prefer something in the middle. After all i don't want to show up at someones wedding with a frosted flakes box wrapped around my flash, not very professional looking. To make a snoot like shown above, you'll need to spend about 7 to 10 dollars at your local Micheals, or Hobby Lobby. Luckily for me, my wife was already going over there so I just added my materials to her list, and it didn't cost me anything! :~) Ok that's a lie, I'm sure it will cost me at some point, but for the moment I have a free snoot.
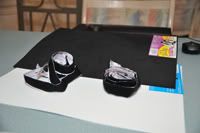
These are all of the products you need. You will need about 3 feet of hook and loop(Velcro) which can be found at Micheals or Walmart for 2 to 3 dollars. You will also need a sheet of the foam paper or foam board. The wife said that it cost .99. A pair of scissors, a strait edge or ruler, and possibly a razor blade. Here's the process:
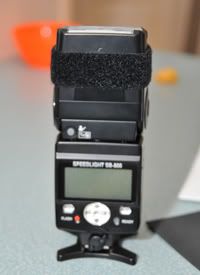
First you want to take your flash(in my case my SB800) and attach Velcro to it. Make sure that you install the little diffuser that goes on top and place the Velcro below it. You won't be able to get that diffuser on if you place the Velcro in the way. Pay attention to which side of the Velcro you attach to the flash(fuzzy side, or the rough side) you will want to remember this for later. Now lay your flash down on the piece of black foam paper and wrap it around your flash starting on the right side of the flash. Wrap it all of the way around and overlap the staring point by about 1/2 to 3/4 of an inch. Mark this point and remove the flash. Lay the piece of foam paper flat on the table and using a strait edge mark all of the way across the foam. Using either a razor blade, or a pair of scissors cut the foam. Now, take the opposite side of the Velcro that you placed on the flash, and attach it to the flash all of the way around. Leave the backing on the Velcro at this point because we're not ready to attach it yet. Once you have attached it to the flash all of the way around cut off the excess. Remove the Velcro that you just cut from the flash and set the flash aside. Now lay your piece of foam board on the table that you cut in the previous step. Remove the backing from the Velcro, and starting at one edge stick the Velcro to the foam paper. You should be about 1/2 inch to 3/4 of an inch short depending on how much you overlapped. Now attach your foam board to your flash like below:
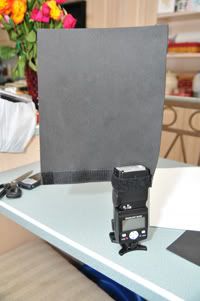
Wrap it all of the way around until you have an overlap at the end. once you get to this point you will place another piece of Velcro along the entire seam where the foam overlaps making a complete cylinder from top to bottom. It should look just like the image at the top of this page. Now let me show you what it does.
This is a picture without the snoot attached:
This is the same shot taken with the snoot attached:
Obvious difference. The times that I use a snoot or grid(which produces a similar effect) are when I want to keep everything else in the photograph dark and just illuminate a face or a certain feature. A snoot is great for that. Or, lets say you have your lights setup and any you find that there needs to be an additional amount of light in a very specific place on a subject, you would use a snoot. That's it for me today, see you tomorrow. Jason



No comments:
Post a Comment