
This is my good friend Eric. We were doing a shoot of his one week old son Christian, and in the middle of it Christian decided he was hungry. Newborns will wait for no one to eat. :~) This is a classic butterfly lighting setup however you don't get the butterfly shadow under the nose because of the angle that he was turned to feed the baby.
We talk about lighting as photographers all of the time. We say "oh, that's a Rembrandt look", or "we used a basic 3 light setup"; but do you really know what any of that means? If not, you'll find out today.
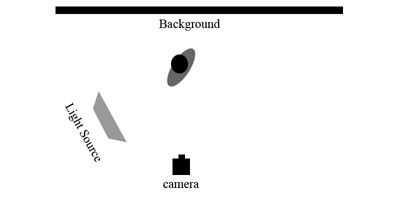
We're going to start with the Basic of the basics. The Rembandt light. What this consists of is a subject, a background, one light, and the camera. The key in Rembrandt lighting is creating the triangle or diamond shape of light underneath the non light side eye. This can be done with a reflector, or with proper placement of the light. The light should be roughly at a 45 degree angle from the camera. Also the light should be higher than the subject. This is important in creating the triangle of light. Here is an example of how the lights would be setup for a Rembrandt style photo:
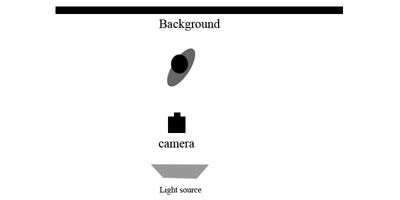
Next up is Butterfly Lighting. Butterfly lighting got its name from the small butterfly shadow that is placed under the nose of the subject. There is one light source in this setup high above the photographer pointed down on the subject. This style is used mostly in fashion shoots. Here is an example of the setup below:
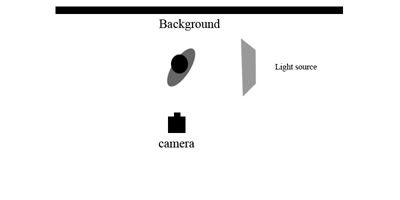
Moving on we have another very simple lighting setup called side lighting. This is when you light the subject from one side or the other with one light source. It causes one half of the face to be lit properly, and for the light to fall off very quickly to the non light side. This creates a very dramatic portrait. Here is an example of the light placement for this style of shot:
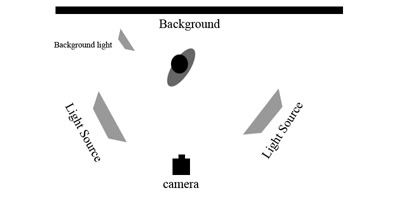
The last lighting technique we're going to talk about today is the most complex of the "basic" light setups, but is still very simple to accomplish. This is the basic 3 light portrait. It consists of a main light to either side of the camera at a 45degree angle from the photographer set up higher than the subject. On the opposite side of the the main light is the fill light. This is a light set lower than the main light, and again at a 45degree angle from the photographer. This light is used to fill in the shadows on the non main side. This light is usually 1 to 2 stops less than the main light. Last we have a background or separation light. This is placed either directly behind the subject, or off to one side slightly, and pointed at the background. This is usually set 1 to 2 stops higher than the main light. This will separate the subject from the background and eliminate any unwanted shadows. Below is a diagram of the setup:
I'm going to be shooting my favorite little model Matthew tonight, so stay tuned for some more of those(last one was a couple of days ago on the black & white post). Be sure to check out the Pink Productions page, as well as the info for our upcoming workshop. Jason


No comments:
Post a Comment