
Man what a long weekend. Gymnastics Friday, work and a workshop on Saturday, then Gymnastics for 14 hours on Sunday. I'm beat... The workshop went great! Very small intimate class(matter of fact only two people plus Shads wife). Thanks to JJ and Cathy. I hope you guys had a good time and learned a lot. To those who didn't make it, don't worry we're going to do another basics class as well as an advanced class and a photoshop class. not sure on the dates yet but I'll keep you posted. Also I want to send a big thank to K&R photo for sponsoring the workshop. They provided some great stuff to give away. I promised Cathy and JJ some links on Saturday so here we go. For the stock photo stuff that we were talking about I use IStock Photo. For the lenses we were talking about for Cathy's Sony, I found them Here. Also we talked about a lot, and like we said you're sure to forget a bunch. Don't hesitate to call Shad or me, or send us an email. We're here to help. Also if you guys have any suggestions on how we can make the class better, please let us know. We already talked about having more handouts, and possibly having more time for the room. We love feedback, it just makes us better. Another thing we were talking about was having some shooting workshops this spring when it gets warmer out. Actually meeting somewhere and doing some shooting instead of the classroom environment. What do you guys think about that? We'll go with what everyone wants, so give your opinions. Alright, enough about workshops. On to something a little more interesting, well I think it's interesting. Lets talk about white balance.
We talked about white balance on Saturday. We talked about how to change your settings, what they meant and why you would want to change them. We also talked about custom white balances, and how to set them. But just as a refresher, and for those who weren't able to come, lets go over it all again. Light color is measured on the Kelvin scale. They use a very specific scientific process to determine the "temperature" of color. The science behind determining color temperature values starts with the theoretical black body radiator, a block of black metal through which electric current is passed (performed as a computer model). As the metal is heated, it turns red-yellow, then white, then blue; as the temperature of the metal is measured at any given color produced, we then match the color to that temperature and a color temperature value is determined. At the low end you have a color temperature of 1500. This represents the color of light that you would expect to have from a candle. Moving up the scale, the next major color/temperature we come to is 3500. This is tungsten, which is the light omitted from most normal 60watt light bulbs found in the home. Again moving up we see the 5500daylight range. This is the white light that we get at noontime when the sun is the highest in the sky. On up we have the 6500 florescent range. This is the green color that comes from our standard florescent bulbs. Above 7500 we see blue tones. These are the tones that you will get when viewing the sky at twilight, or just before sunrise and just after sunset. Why do you need to know this information? Because the color of the light will determine the feel of your photograph. You wouldn't want to take a cheerful family photograph under 6500Kelvin lighting. It would give everyone a sick green look, not very flattering at all. We as photographers have to determine what the color of our lighting is, and adjust our cameras to compensate.
When looking at the white balance menu on your camera, you will see a number of options. The first is most likely Auto. Auto WB looks at the scene and compares it with thousands of known lighting situations built right into your camera. It compares it and makes a guess on what it thinks you should be set at. This is fine most of the time. Most of the time the camera makes an accurate determination on what the color balance should be, and adjusts accordingly. This choice is Indicated with an upper case A. The next setting that you will see is the florescent setting. This is indicated with a picture of a rectangle (supposed to look like a florescent light) and squigglys around it. This is the setting you would put your camera on if you were in a building with florescent lights overhead. Next you will see a picture of a light bulb. This picture is the tungsten setting. Used for shooting indoors lit with regular household bulbs. Moving along you will see a Sun. This selection is for shooting in daylight. Between the hours of 10am and 5pm. Then you might see a cloud icon. This is the cloudy function, and... you guessed it, used on cloudy days. Some of you have the actual color temperature numbers to choose from. This is controlled just how it sounds. You select what color temperature you're at, and it adjusts for you. Last but not least, custom white balance, or PRE. This is used to set your white balance instead of using a pre saved one. Why would you want to use a custom white balance? Maybe you're in a room with florescent, and window light. The two different colors mixing wouldn't be able to be handled by the auto. What you need to do is set your camera to pre(Nikon Users). hold the two PRE buttons down for 3 seconds. Release the buttons and press them again. Once you've done that, you need to zoom in on a
Grey Card, fill your frame with the grey, and press the shutter release. If it read the card correctly you will get a message that says "GOOD" on the screen. If not you will have to re-do it. This will allow your camera to adjust for the color of the light at hand. For serious photographers, custom white balances are mandatory. When you have to get the right color, and you don't want to have to mess with it in photoshop, custom white balance. We ran into this problem over the weekend while shooting the gymnastics. They had clusters of lights lighting the convention center where the gymnastics were. Three of the lights were a daylight 5500 color, but the fourth was tungsten colored. It was like this for each color, so we know they did it on purpose for some reason. Anyway, none of the "normal" WB options would have worked, so custom white balance was the answer. Here is a quick image I shot of some of the practice stuff:
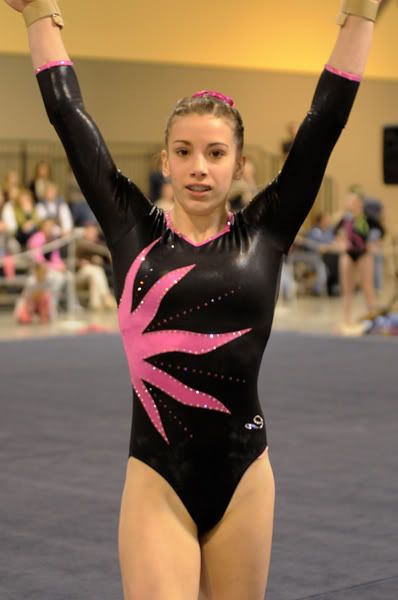
The shot at the top is of Shad doing his beam shooting. Check out the proper camera camera technique and everything. True professional. ;~) That's it for me today. I'm exhausted. Time for some sleep. See you tomorrow. Jason






Hey Jason and Shad,
ReplyDeleteI really enjoyed the class. I did learn alot and recommend it to everyone. I can actually take photos in manual mode now. WoW!!! I have been bgging my wife and kids so much they think their runway models. I am looking forward to the shooting workshops. It was great getting to talk with two pros who really know their stuff. Thanks,JJ
We're really glad we could help you. We can't wait for the weather to get better too, so we can get out and do some acctual shooting!
ReplyDeleteI missed your class and I'm very sad. Do you have a mailing list? I really want to attend the next class and the shooting workshops.
ReplyDeleteJust added a mailing list. It's on the main page top right corner. It's actually a link to the contact us secton of my website. But I have created a mailing list from there so fill out the info, and in the comments section note that you are interested in photo workshops. Thanks!
ReplyDelete