I talked earlier about my workflow in photoshop. I told you that the first thing I do when I get an image into photoshop is a levels adjustment but I didn't go into how to make that adjustment, or what it does. So lets talk about levels.
The reason that I make a levels adjustment is simple, before you can make any other decisions about colors or contrasts, you have to have your blacks and whites correct. This is what the levels adjustment does. So in my mind, levels is the most important adjustment you can make.
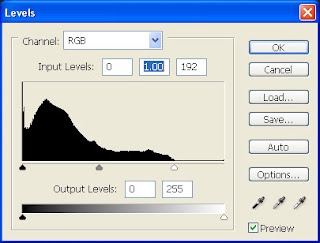
So you've opened a photo in photoshop and now you want to do a levels adjustment, here's how you do it. The first step is to go to layer, then new adjustment layer, then levels. Once you click OK, this will open up a new dialog box in you photo that looks similar to the image above. Looking at this box, you see lots of different things. You see a histogram represented with a black slider on the left, a grey slider in the middle, and a white slider on the right. You also see the output levels with a black and white slider. You also see the buttons OK,cancel,load,save,auto, and options. Below those you see three dropper tools. When using this box I have found that the most efficient way to adjust a photo is to use the histogram box. Here's what I do. While holding the ALT key take your mouse and click on the white slider in the histogram section. While still holding the ALT slider, start to drag the slider to the left. When you do this the entire image goes black. As you slide the slider to the left, you will see areas start to turn colors and eventually go to all white. The areas that go to all white, are "clipped" areas. Meaning they have lost all detail and are entirely white now. Generally you don't want any areas to be totally clipped. What I have found works best for me is to drag the slider (while holding ALT) until you start to see clipping or white areas appear, then take it back to the right slightly. When you release the ALT key, you see the image again, and you can see what effect it has had on your image. If it looks a little too bright, or blown out take click ALT and the slider again and drag it back to the right a little more. The key here is to slide it until it looks good to you. You are going to repeat the process with the black slider. Hold ALT and drag the black slider to the right. This time the entire image goes white and starts to work it's way toward totally black as you drag the slider to the right. Again totally black areas are completely without detail, and clipped. Clipping is bad, so I do the same as with my highlights. I drag until clipping occurs then drag the slider back to the left a little. Once you do this a few times, you will get a feel for it, and it will be like second nature. You will also be amazed at how this will increase the quality of the finished product of your images.
This is it for me for the day. See you again tomorrow. Jason


No comments:
Post a Comment