
Good morning everyone. I hope everyone got a chance to read yesterdays post, because for the next four days we're going to build on that post. The image you see above is my friend Amanda at an event I covered the other night for Pink Productions event company. Everything done to that image was done in Lightroom. I never had to go to photoshop for any of it. Before I get into today's post, I want to give everyone a little background info on my Lightroom experience. I have had lightroom for about 6 months now. I got it because everyone was saying how great it was, and how it improved their work flow etc. I didn't get it at all for the first 4 months. I tried playing with it, adjusting things, and just couldn't figure out how all of the controls worked. The turning point for me was reading Scott Kelby's book on lightroom 2. It is a wonderful book, and I recommend it to anyone that is wanting to learn Lightroom. It's an easy read, and it will have you up and running in Lightroom right away. So with that being said, lets get to some Lightroom!
The first thing you're going to want to do when firing up lightroom is to decide where you want to store your files. Like I said yesterday, Lightroom is a great image management program that can store the actual image file on a separate hard drive, but still allow you to see the thumbnail in lightroom when that hard drive is not connected. I'll show you what I do, and you can decide for yourself if this works for you. I don't want to store my images on my main laptop hard drive because it takes up so much space. Just since January I have over 30 gigs of photos imported into lightroom and we haven't hit wedding season yet. I fully expect to have at least 200 gigs of photos by the end of the year. So, I have two external(portable) hard drives connected when using lightroom. The first is the MAIN drive, the second is the BACKUP drive. When you click the import button at the bottom of the page on the left hand side of the screen when in the Library module as shown here circled in red:
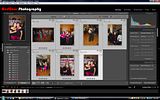
you will be able to select the location to store your images by clicking on the boxes circled in red here:
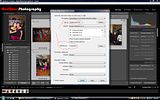
The top circle is the main drive. So click on the "choose" button and select whichever drive is going to be your main drive. Now before you go any further I suggest making a master folder in that drive called Lightroom photos and selecting that as the destination. This way the images that get imported go into a designated folder not just all over the drive. Lightroom will create a new folder for every new import day, but you need to tell it where to place those folders. This is where you choose that location.
The second box circled in red is the backup location. Again click the "choose" box and locate the drive that you would like to be your backup. This creates a duplicate copy of the files that you import into Lightroom. This is important if your main drive ever goes down. You will have a duplicate copy of the images to rely on.
On that same dialog box you can see the drop down menu called file naming. I like to keep it on the setting "file name". This keeps the same file name that the camera produced. There are different options that you can explore on your own, but for now, just keep it on file name.
Now you can click the cancel button and the settings that you just made will stay.
After you import images into Lightroom, you will have a screen that looks something like this:
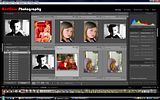
As you can see on the left side of the screen is the list of folders by date. This is how Lightroom initially keeps track of the files. It sorts them by date and places them into their own folder, under a main folder with the year as the label. When you click on any one of those folders you will see it's contents on the right side in the image preview area. In the example above, you see lightroom in "grid" view. This is the view where all of the little thumbnails are displayed. To see a larger preview of any one image you can double click on that particular image, and it will fill the entire preview space. This is called loup mode. This is important for the next step.
Once you have your images imported, what do you do with them? You sort them right? You go through and select the ones that are good, and the ones that are bad. Lightroom makes this easy. You can see at the bottom of the screen there is a "film strip" view of all of your thumbnails. When you switch into loup mode, you will be able to look at the film strip and know where you are in the collection of images. Light room lets you rate your images in a few different ways. It lets you assign a start rating from 1 to 5. It lets you set a color rating with 5 different options, and it lets you set the image as a "pick" "no pick" or "rejected". I don't know about you, but at least for my first run through of the images, I just want to weed out the bad photos. The ones that are either out of focus, don't have the correct exposure, or some other flaw. I do this with picks and rejections. The keyboard shortcuts for those are P for picks and X for rejects. When in loup view I use my right hand on the arrow keys to advance the frame that I'm viewing. I use my left hand to select either pick or reject. I do this until I get all of the way through the entire batch of images. Once you do this, you can go to the PHOTO option on the top tool bar and select "delete rejected photos". At this point you will remove all of the rejects from your image gallery so that you have a collection of images with potential. Now what I usually do is go back to the grid view by pressing the G on the keyboard. Then I press CTRL+A which selects all of the images. Then I right click on an image and select the flag drop down and click on unflagged. This will unflagg all of the images so you can do another round of picks later.
Now that we have all of our rejects out, we can begin the dwindling process. I usually go through a second time and select just the ones that I think have the potential to be final products. Once you have made your selection of your final image potentials go back to grid mode by pressing G, then click attributes at the top of the image viewing box. Click on the white flag next to the word attribute and it will hide all of the unflagged images. Now you have just a small amount of images to work with. Just your best ones. At this point I do a couple of things before I move on to the Develop module. I select all of the images again by pressing the CTRL+A then down in the right hand corner you'll see a box labeled KEYWORDS. That lets you add specific keywords that get embedded with the image file. This way if somewhere down the road you want to do a search of all of the images of your son, you can type in "Bobby"(or whatever his name is) and lightroom will pull all of the images that have "Bobby" as a keyword. Pretty cool huh?
After practicing with lightroom a few times, you will breeze through this initial process of sorting your images and wonder "why didn't I do this sooner?".
Ok so that's the down and dirty of the library module and how to import your photos. There are a lot of things that we didn't talk about in that module, but this will get you up and going, and you can play with things and see what they do, or get the book I was talking about above from Scott. Tomorrow we're going to start on the Develop Module. I probably won't get all of the way through it though because it's a pretty large module. See you all tomorrow! Jason





Looking forward to the develop module... I can't seem to get the nack of it!
ReplyDelete