
I'm on top of things today... I actually got this blog done last night so I didn't have to worry about it when I was groggy and sleepy. I have a great little tutorial for every Nikon shooter out there that wants to be able to trigger their camera with a pocket wizard, but doesn't want to pay $90 for the official pocket wizard cable. So here it is:
You may already know how to do it, and I may the only one that didn't know about this, but here goes. If you are a Nikon shooter and you have Pocket Wizards you may want to control your camera with the drive motor cable that Pocket Wizard offers. The problem is, the cable is $90+! There was no way that I was going to pay that price, so I did a little research and made my own.
Disclaimer first: If you don't know how to solder, or you don't know how to use a digital multimeter, don't try this. I'm not responsible if you screw up your camera or pocket wizard.
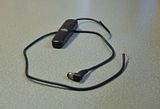
The first thing you will need is a 10 pin connector that plugs into the Nikon camera to control the shutter. I got mine from an off brand corded release that I had laying around. I just cut it in half. It looks like this:
Next you need an 1/8 inch MONO plug that looks like this:
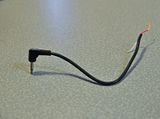
I used the small cable that came with my pocket wizards. I just cut off the PC end.
Now once you have those two plugs cut and both the outer and inner insulation stripped from the wires you will need to test them to see which wires are which. First test the 1/8 inch plug to see which wire goes to which part of the plug. In my case, the red wire went to the tip of my 1/8 plug, and the white wire went to the ground or ring part of the plug. Write this down, you will need to remember it.
Next you need to test out the 10 pin to see which wires are which. Look at this diagram below to reference:
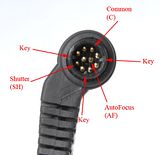
When you strip back the insulation on the 10 pin's cord you should see three wires. Set your Meter to Continuity, and attach one of your meter leads to one of the exposed wires. Now test the three pins labeled above and write down what the wire is. Do this for all three pins marked above.
Once you have this information, attach your Auto Focus, and shutter release together and solder them to the wire on the 1/8inch plug that led to the TIP. Solder the third wire to the remaining wire from your 1/8inch plug. Tape them all up and you're in business. Here is a finished shot of mine:
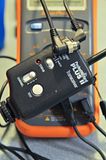
I didn't have any heat shrink left, but the next time I make it to the store I will be getting some to encase the connections.
The reasons that I wanted to be able to control my camera with a pocket wizard are these; first I want to be able to mount the camera to a tripod and stand next to it and converse with children and make faces and such to get them to smile. I think it's easier to get good smiles when you're not right behind the camera. If I can just hold the pocket wizard in my hand and snap without them knowing I'm about to, that would be great. The second reason is for weddings. We are going to start placing a camera on a clamp high up, maybe in the rafters if we can access it. We plan on having a wide angle lens and just snap away during the ceremony as well as do the same thing during receptions. This will give us some interesting shots I think. The pocket wizard makes that possible.
I had all of these pieces laying around, so it didn't cost me anything to make this cord. If you had to go buy the remote and the 1/8 inch plug you may have $40 or $50 invested in Thanks for reading! Jason





No comments:
Post a Comment