
Hey everyone! As you can see I've been on hiatus for a long time. There were some complaints and I decided to end my blogging. Recently some people have asked me to resume my blogging, and here I am! I do enjoy it that's for sure!
As my first post in a while, I thought I would talk about the biggest news for designers, retouchers, and well, just anyone in photography... Photoshop CS5! Now there are plenty of blogs, tutorials and general how to's to be found on the Internet. If you are new to CS5 do yourself a favor and check out Terry White's FREE 45 minutes of training found HERE. Terry is a Photoshop evangelist, and general promo guy working for Adobe. He has some good stuff on there. Since there is so much good info out there already about CS5 I'm not going to do another "what's new" about CS5, instead I'm going to give you my new workflow, and how CS5 has changed it!
Let's get started! Above you see the final image, but lets take a peek at the before image here:
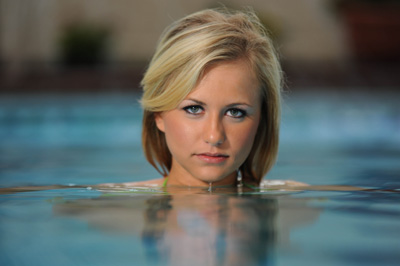
As you can see I did my normal stuff. I tweaked the eyes, adjusted color and saturation and did a nice three step portrait action on it. Want to see how to do all of that, and how CS5 makes it easier and faster? Click below, and read on!
As any of you that have read this blog for any amount of time know, I bring my images out of lightroom as part of my workflow. I could do all of these things in Photoshop, but I like the speed of Lightroom for certain things... So to begin with we're going to adjust the Clarity, Tone curve, and bump up the eyes.
With your image open in lightroom, go to the clarity slider and slide it to the positive side. I find that somewhere in the 60's is usually where I set my Clarity. You can see that below.

Next we're going to adjust the tone curve. Scroll down to the Tone Curve panel and change from Linear to Medium. Simple as pie.
The last thing we're going to do in Lightroom is the eyes. I have some great brushes that I have downloaded from HERE. From these brushes I've used the Whiten Eyes brush. I'm not going to go into how to use the brushes in Lightroom here. If you want to see all about those brushes refer back to my post HERE on brushes in Lightroom.
Once we're done with all of our Lightroom edits, we're going to take it out to CS5(I know what you're thinking, "bout time" but honestly the Lightroom edits don't take more than a couple of minutes to do. So now we have it out in Photoshop CS5, what do we do first? let me show you!
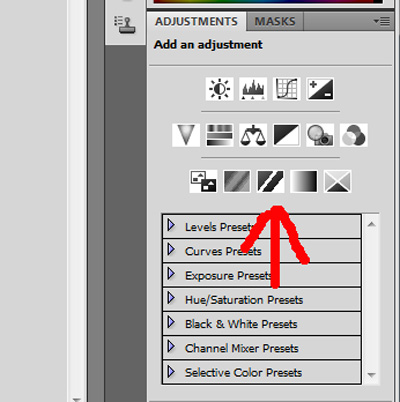
The first thing we're going to do is set our white, and black points in the image. To do this we need to create a new Threshold layer. To do this click on the threshold icon in the adjustments as shown here:
This is going to allow you to pick out just the white and black points in the image. To do this you're going to slide the threshold slider to the right until there is just a little white showing. Like shown here:

Now you should only have small spots of white showing on your screen. To set your color point, select your Color Sampler tool from the left tool bar. To do this right click on the Eye Dropper looking icon and select the one that says Color Sampler Tool. Now locate the small all white area on the image(it will be obvious), zoom in and click one time inside of the white area as shown here:

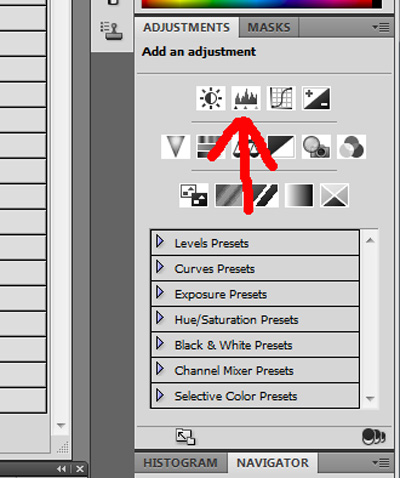
Now, you are going to go back to the Threshold control panel and slide the slider to the left until there is just small areas of black showing. Again you're going to click inside of the small black area to set a second point. Once you have set your two points delete the Threshold layer, you don't need it anymore. Now, to take advantage of those two points, you need to create a Levels layer. Go again to the Adjustments panel and click on the Levels icon as shown here:
Once you have done this you want to make sure that you have your Caps Lock on This is so that your cursor will be a precision cross hair instead of the icon(trust me you will want it for the next step). Now that you have the Levels panel open, click on the White Point icon as shown below, and then line up your cross hair with your #1 point as shown in the same image below:
Once you have done this, you will see that your image will lighten slightly. Now you're going to click on the Black Point icon(just above your white point icon) and line this cross hair up with your #2 point. You will see a dramatic difference when you click on the second point.
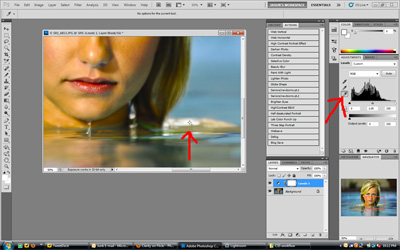
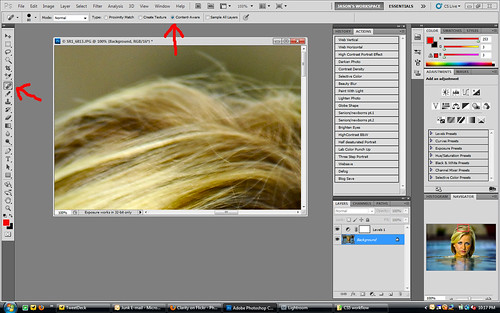
Once you're done with this, we're going to do utilize one of the new features of CS5, the Content aware for the healing brush. The healing brush isn't anything new to Photoshop, but the Content Aware option is new to CS5. What it does, is look at the pixels around what you're drawing over and fills the painted area automatically and quite well. I used to remove fly away hairs, imperfections, etc. in Lightroom because it was easier and faster than using the old healing brush, but now, I use the Healing Brush exclusively. Here's where to find it:
After I remove any blemishes, fly away hairs, unwanted objects in the image etc. with the healing brush, I run my three step portrait action on the image. I did a whole post on what that action is, and how to create one yourself HERE, basically it creates a nice vignette around the image, also does a bit of sharpening.
That's it for this image. That's all I did! Of course these aren't the only things that are added in CS5 that I use, but these are the things that I used for this image. You can see all of the new things that were added by checking out the link at the top of this post.
I'm interested to hear what you think about CS5, and about how it has changed your workflow in the comments section below. This will again be a regular thing. See you all next time!
More TK Jason


No comments:
Post a Comment