
Hey guys! Welcome back! Hope everyone had a wonderful fathers day weekend. The twins and I floated around the pool all day which resulted in an awful sunburn for me... Guess I should have applied a little more sunscreen and a little less time tossing the kids ;~) All in all we had a great time though!
I have a confession to make.... I LOVE Photoshop! I don't think a day goes by that I don't open Photoshop to do some sort of editing or manipulation. When Adobe released the latest rendition named CS5 I had to have it the first day, and let me tell you it's a huge, huge improvement on an already (almost)perfect product. There are many improvements and refinements added to CS5 but today I want to show you the one that I use the most. It's called Content Aware and it's used in many different places throughout the CS5 platform. Hit the jump and read on...
Content aware is a new algorithm Adobe added for CS5 that changes the game. This new algorithm looks at the surrounding pixels and attempts to reconstruct the selected area with what it thinks "would have" been there. Photoshop CS4 had content aware scaling that allowed you to adjust the size of the image without distorting things, however the content fill in CS5 is a whole new level.
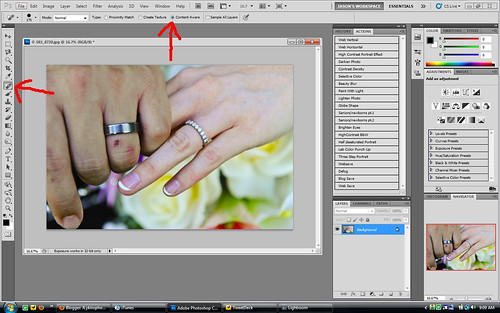
Even though it's used in numerous places throughout the CS5 platform, the place where I use it the most is under the SPOT HEALING BRUSH. The spot healing brush in previous versions of Photoshop did a pretty good job of "healing" blemishes and filling in other types of area for you. You usually had to return with the CLONE STAMP to smooth the edges or touch up some rough areas left by the SPOT HEALING BRUSH. No more! With CONTENT AWARE FILL the SPOT HEALING BRUSH automatically and seamlessly fills the selected area perfectly almost every time. Take a look below at a quick run through of how to use it.
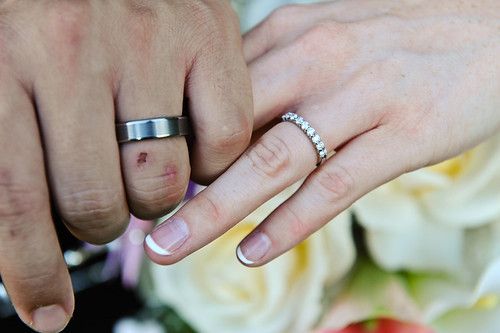
As you can see, the groom has some cuts and bruises on his knuckles that need to go. In the past I would have selected the finger with the lasso tool(to constrain the cloning) and used the CLONE STAMP tool to remove the blemishes. We don't have to do that anymore. You're going to select the SPOT HEALING BRUSH as shown below by the red arrow, and you want to make sure that CONTENT AWARE FILL is selected at the top of the screen(again shown with a red arrow).
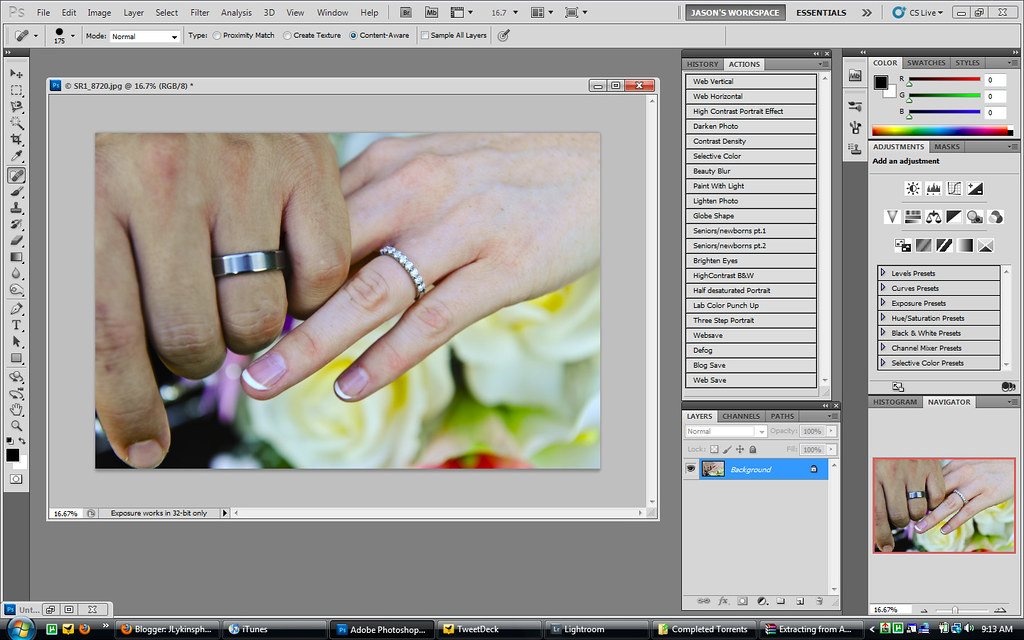
There is no need to select the finger with the lasso tool anymore. No need to worry about new layers like you would have with the CLONE STAMP. You are going to select your brush size(make it slightly larger than the area to be "HEALED") and simply paint over the area as shown here on the large cut on his ring knuckle:
I "painted" over the cut, the area went black for a brief second while Photoshop was rebuilding the area, then MAGIC, it was healed. That's all there is to it. This works not only on skin and blemishes, you can remove almost anything with this method. Below is the final result.

Now all of this new technology doesn't come without some drawbacks. When you add features like this, it requires resources. When I say resources I mean system RAM. Photoshop CS5 is a very resource hungry program. I have a dual core processor with 3 gigs of RAM and it works fine, but just be aware that you may need to add RAM or upgrade components to use all of the features of CS5.
I posted this link before, but I think it's such a great resource that it needs re posting. You can see a bunch of the new features, and how to use them(including the Content Aware Fill) for free Here: FREE CS5 TRAINING Presented by Adobe's very own Terry White. If you have or plan on buying CS5 I would recommend this video to you.
That's it for me today folks! Thanks for stopping by, and I hope this helps you with some of your editing.
More TK.....
Jason


No comments:
Post a Comment