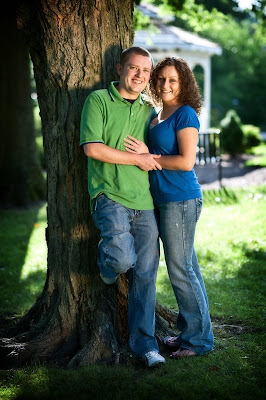
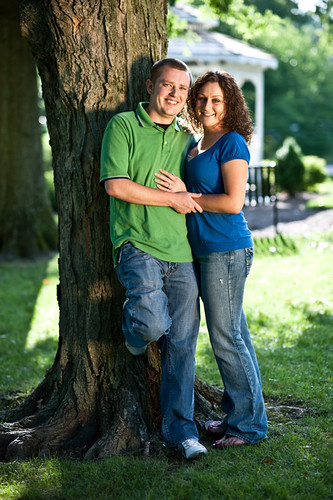
Hey everyone, hope you all had a great day yesterday. We presented the umbrella photo to the client yesterday. She didn't like the dark sky, or the size of the logo. Made the changes right there for her, she was happy. We are licensing the image to her for use in advertising but for prints, customers have to come to us. So if you live in Bellevue and would like a photo/poster etc. of the umbrella shoot, let me know. We are printing them with and without the logo. The shot you see above was taken last Sunday during an engagement session with a bride and groom for one of our upcoming weddings. I didn't take the photo, Shad did. I only took a hand full of photos that day as I was playing reflector boy(we alternate who does the reflector/light holding from shoot to shoot). Anyway, I have been reading Scott Kelby's book on Photoshop CS4 and in there he discusses his Three Step Portrait Finishing technique that I thought would work well for this particular portrait. Any of you that know me though, know that I'm not one to leave well enough alone, so I did a little automation and made this process into an action that I am going to share with you today. To start here is the beginning image:
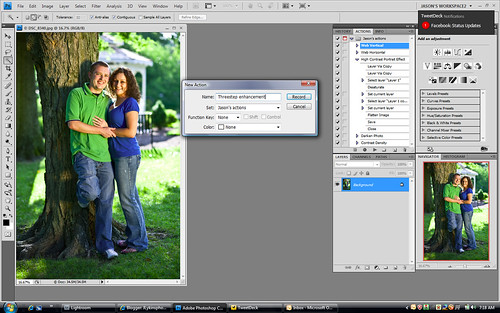
Open the image in Photoshop. Then before you do anything else select your actions panel and click on create a new action at the bottom of the panel. The create new action icon looks like the small post it note and is the second from the right at the bottom.
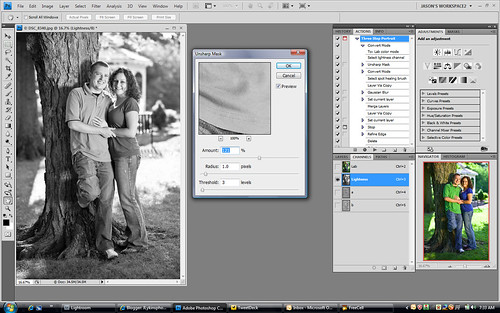
The first thing you want to do is go to IMAGE-MODE-LAB COLOR. This will convert your image to LAB COLOR mode. Once you have done that, click on your CHANNELS tab in the CHANNELS TOOL BOX(if you don't see CHANNELS in your tool boxes selection go to the top menu bar and select WINDOW then click on channels). Once in the CHANNELS tool bar select the LIGHTNESS channel. When you click on LIGHTNESS it will change your image to black and white(don't worry the color isn't gone). Now click at the top of the screen on FILTER-SHARPEN-UNSHARPEN MASK. A dialog box will pop up. Here are the settings you want:
When you are done, click OK. Now go back to IMAGE-MODE-RGB. Now duplicate your background layer by pressing CTRL+J. Now select your copied layer which should say LAYER 1 in the layers box(again if you don't see the layers box, click on WINDOW and select LAYERS). Go to your top menu and select FILTER, then GAUSSIAN BLUR. Set your radius to 20.5 then click OK. Now in the LAYERS dialog box, select the OPACITY and reduce it to 20%. The next thing you're going to do is merge your layers. You do this by pressing CTRL+E. This will merge your visible layers.
Now duplicate the layer that you have by pressing CTRL+J. Click directly above the new layer in blending mode. It will say NORMAL. Change this to MULTIPLY. This will make your image appear dark. Don't worry, we're going to fix that. This is something that isn't in Scott's book, but is very important when making the action. The next step in the process is to select the rectangle Marquee tool and draw a box in the image. Every image is different so you will want to change the size of this box depending on the image. To do this in an action, you have to insert a STOP. To do this you right click on the small box in the upper right hand corner of the ACTIONS box. Under that menu, you will see the command INSERT STOP. Click on it.
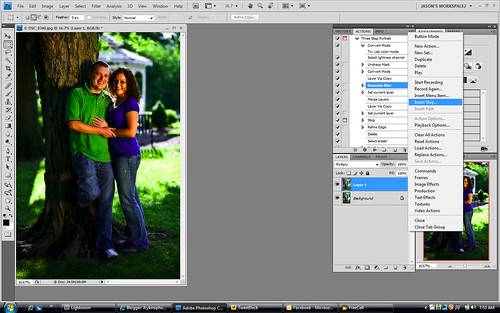
When you do you will get a small box that pops up and allows you to insert some text. Here is what I put in my text box: "Press stop and use the Rectangle Marquee tool to select a box roughly 1/2 to 1 inch in from canvas edge. Once you have completed the selection Press the action button again to continue". Do not click on the little box that says Allow continue. This would allow you to bypass this step, and you don't want to do that. Now, since you are making the action currently, you will have to go to the bottom of the actions box and press the stop button so that you can actually make your selection. The stop button is the little square box on the far left of the actions menu at the bottom.
Once you have pressed that stop button, select your rectangle marquee tool(like the text in your box says) and draw a box inside of your image. This box should be roughly 1/2 inch to 1 inch from all of the sides but it doesn't have to be perfect. Now go back to the bottom of your ACTIONS box and press the record button. It is the second button from the left and is a small circle. Once you have done this click the small box above your image in the tool bar that says REFINE EDGE. When you do, you will get a pop up that looks like this:
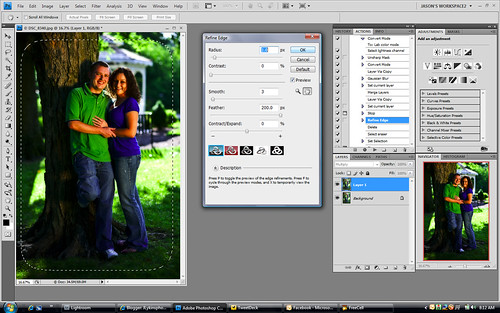
Use the settings shown here. Make sure that you have the blue box at the far left of the pop up selected. Once you have done this, click ok. Now press the DELETE OR BACKSPACE button on your keyboard. This will delete part of the MULTIPLIED LAYER. Once you have done this, press CTRL+D to deselect. Now all that is left is to press CTRL+E to merge the final layers and you're done. Press stop once again at the bottom of your actions box. You are done.
When you run this action on a photograph, a pop up will appear when it gets to the point in the action where you placed the STOP and the dialog box. When it does, there will be a button that says STOP on it. Press that button, then make your selection with the marquee tool. Once you have made your selection, press either the play button again at the bottom of your ACTIONS box, or if you are in BUTTON MODE for your actions, just press the action again(it will be colored in red until you press it again). That's it. Simple, automated portrait finishing. Puts a nice vignette around your image, as well as gives the image a dreamy look while still keeping thing sharp. Great stuff!
Enough from me. I have some editing to do. I'll see you all tomorrow! Jason




No comments:
Post a Comment