Hey everyone! Glad you found your way back over here, or if this is your first time reading this blog, welcome. I've got a little news/info to give you before I get to today's tutorial.
Many people may already know about Flash Zebra, and honestly I had heard about them before last week too. I just never really paid that much attention to the site because I never needed anything that they had. Flash Zebra is a website/wholesaler of camera components. They carry all of the odd ball cables, and connectors that you could want. The also carry the generic version of many popular cables like the motor drive cable to go from a Nikon to a Pocket Wizard. I went there searching for a cable to attach the Vivitar 283 flash I wrote about last week. I ended up making my own, but they had the best prices I found anywhere, so if you are looking for an odd ball cable, check them out.
Have you ever been on Flickr and saw an image that had some effect you liked? Ever said to yourself, "I wish I knew what they did to make it look like that." Well now there is a tool to extract the info from the metadata of the image. Mike Wiacek wrote a program that will extract the info for you and make a preset in lightroom to achieve the same effect. Here's the link...
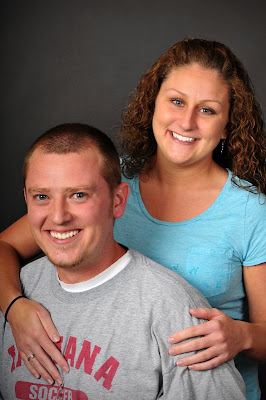
The shot you see above is of Tomi, and Matt. It was taken right after we finished showing them some of our wedding samples. This is something we like to do when a couple comes in to discuss wedding photography. We take a few shots of them together and burn them a disk to take with them. It not only gives them a little glimpse of how we work when posing, but it's a little something that separates us from the competition. Something that makes us stick in their mind. Anyway, the shot you see above is the finished product. Not that they needed any major touch up work, but every portrait we do gets a little treatment to make it "pop". Here's what I did..
The technique I'm about to describe was done in Photoshop CS3 but it could have just as easily been done in Elements. The first thing we need to do is open the image into photoshop. Here is what I started with:

Now like I said before, this isn't a bad photo. The both look nice, and the lighting is good. They probably would have been happy with it. I wanted to make it a little better.
Most people, whether they smoke or not don't have perfectly white teeth. From drinking dark colored pop/tea or whatever they just have a slight tint to their teeth. Tomi, and Matt actually have pretty white teeth but I still wanted to lighten them just a little. So get your DODGE tool from your tool bar on the left. It's the tool that looks like a black sucker. Adjust the size of your brush until it's as large as the mouth opening. You make it that large so that you apply the dodging evenly over all of the teeth and you don't end up with some areas lighter than others.

So I applied this lightening to both subjects being careful to not go too far making them look unnaturally white.
Next we want to make the eyes really stand out. Now Tomi has beautiful eyes, that truthfully don't need any enhancement, however I feel that I can always make them stand out just a little more with a few adjustments. Sometimes the whites of the eyes need to be lightened. Again you can do it with the dodge tool like you did with the teeth, but on this particular image I didn't have to do that because their eyes were very well lit. What we do want to do is sharpen them. Select your Elliptical Marquee tool by right clicking on the square tool at the top right of your tool bar on the left hand side of your screen. Now you want to select the eyes. To do this you need to make sure that you have the correct setting for your tool. Under the word image on the top of your screen there should be four small boxes. If not, then you haven't selected your Elliptical Marquee tool yet and you need to do that first. When you see the small boxes, make sure that the second box from the left is selected. That will allow you to make multiple selections with the tool instead of one at a time. Now when you have done that, zoom in so that you can see the persons eyes. If you have more than one person in the image, zoom in on one of them, we'll do the other ones in a minute. Now select just the eye. You may have to make a couple of selections to get the entire eye without going outside of the white. That's ok, just take your time and if you make a mistake and go to far press CTRL+Z to undo what you have done. Once you have both eyes selected go up to the FILTER menu, then to SHARPEN then SMART SHARPEN. You should have a screen that looks like this:

Set your Radius to 1.3 and your amount to 175%. Then click Ok. Now we need to go to the top and click on SELECT then down to DESELECT. We can now move over to the other subject in the photo and repeat the same process again. You can play with the amounts on the sliders because not all eyes will need the same amount of sharpening. This is why I do them separately instead of selecting both subjects eyes at the same time.
So now our image is looking pretty good, but we need to add a little something to make sure your attention is where it should be, on them. Go to FILTER-DISTORT-LENS CORRECTION. You will get a box that pops up like this:

Near the bottom of the screen there is a box that says SHOW GRID. Remove the check mark from that box. Now under Vignette drag the slider to the left until the image has some slight Vignetting, then click OK.
You're done. You have just spiced that image up to make it stand out. The eyes pop, the teeth are white. The customer should look at it and think/say wow you made me look good! That's the goal. To make them happy.
Alright, enough from me. Get out there and take some pictures. Before you do that though. Go back up your images. If you haven't done it in a few days, now is the time. Don't want to loose all of those great shots! See you tomorrow. Jason


Great tips. Whenever I whiten teeth, I always go to Yellows in the hue & saturation tool, then crank the Lightness. It allows me to be a little lazier with the lasso tool, because there's not really any yellow in the lips or the rest of the mouth, so the other areas aren't affected.
ReplyDeleteI haven't ever used the lens correction filter before. That looks really powerful.
Your timing for this post is great! LOL I was just trying to figure out how to add a Vignette to my portraits!
ReplyDeleteI used a different tutorial for whitening teeth.