
Welcome back everyone! Glad to have that brutal weekend behind me. We shot an outside wedding in 90+ degree weather. As always we wore all black, which didn't help things. We were there until 11 or 12 Saturday night, then back up and to the American Legion for a second round of directory photos by 7AM... Somewhere in between all of this madness I found time to work on a self project for The Strobist. Above is the end result. The whole idea behind the project was to photograph an architectural space in your house. The idea came from all of the houses for sale on the market these days. What is going to separate your house from the millions of others that are up for sale? When people are browsing houses online looking for their next home, what's going to make them stop and take a second look at your house instead of skipping over it like the 20 previous? Good photos. If you make your home look warm and inviting in the photos in the online ad, then you have a better chance of people taking a closer look. So read on for how to accomplish a photo like this...
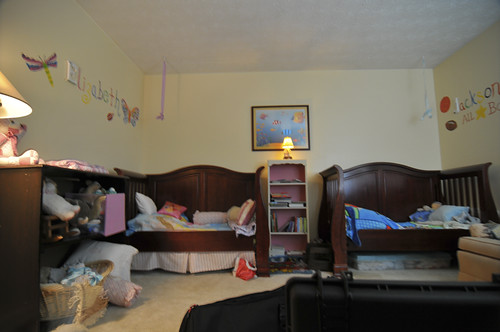
I decided that the cleanest lines I could find in my house to demonstrate this type of shooting were in my twins room. The whole idea is to light the room nicely without being able to see the flash units. It takes some ingenuity and a couple of well placed clamps to make that happen, but here's how I did it.
The first thing I like to do when setting up a shot like this is to figure out the camera position. That's the most important thing. Figure out what the composition is going to be, then build the lighting around that. I started in the middle of the one wall. You can see here:
I just pressed the shutter button and took a look at what came out. This gives you the ambient light picture as shown above. An accurate representation of the scene to be sure, but we want a little more out of it. Everything seems too Asymmetrical. I didn't like it, lets move to the doorway and shoot from there.
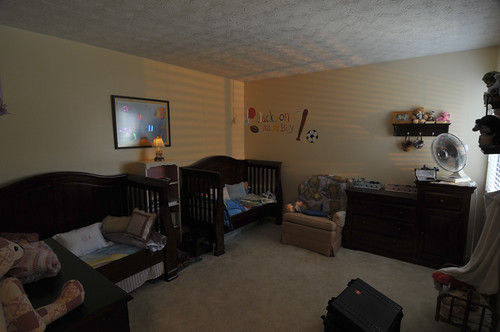
Again, it was alright, but the main thing that I didn't like was the glaring highlight from the photo on the wall. In the end I chose the right corner under the window. So that's step one, figuring out where to place yourself in the room to get the best shot.
Next is to figure out how to light that room. Nice even FLAT lighting is just that, nice even and flat. I didn't want that. I wanted to create some contrasts in the room to make it look a little more appealing. The first step for me was to get the window into play. There was an abundance of light coming from the sky outside, but unfortunately it was boring empty 2 in the afternoon sky. Even when I tilted the blinds to create a shadow on the wall it was boring. There was no shadow because this window never gets direct sunlight. It is just getting that great big even softbox type light coming from the sky. Great for portraits, bad for crating hard edged shadows like I was looking for. So what to do? Make your own sun.. In this photo:
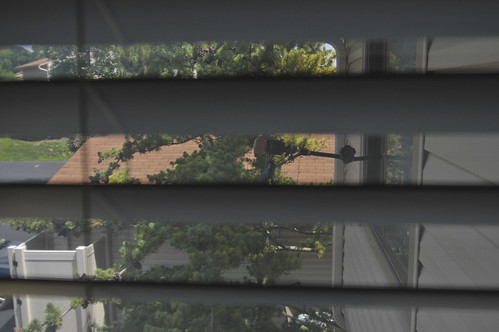
you can see that I placed a flash on a magic arm out the window of the next room over. It is zoomed to 200mm and has two full cuts of CTO warming gel on it. You can also see in the photo that there is a pocket wizard triggering the flash. Now if you are in a lower room, you don't need to clamp the flash to a magic arm, you can just place it on a stand outside of the window, but since I was on the second floor I had to do it like this. You can see in the main photo above that the results are dramatic. There is a nice contrasty shadow of the blinds on the wall just above the bed on the right.
Next I wanted to light the bed on the left a little bit because the bed on the right was getting a lot of extra light from the window light. I put a GRID on an SB800 with one full cut of .CTO Warming gel on it, and hand held it above my head to the camera left. It was pointed towards the bed and large bookcase to the left. Next I wanted to highlight my wife's wonderful art that she free handed above the bed, so I placed another SB800 to the Camera right with an Eight inch snoot pointed directly at the painting. After a little adjustment I got it positioned correctly to just put an oval of light around the name.
Here is a look at where I was sitting as well as the two flash units I was using to light the room:
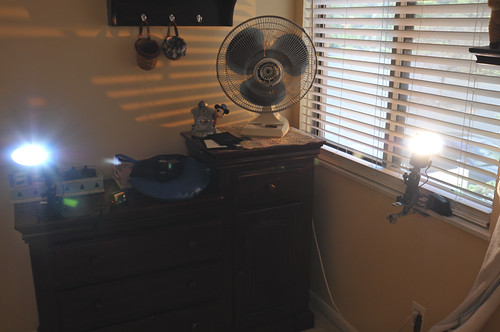
The flash attached to the window ledge is the one that I was holding over head. I just clamped it there for this setup shot. So that's it. That's all there is to taking a nice photo of an interior room of your house. Hopefully some of you can take this idea an run with it. Hopefully some of you will be able to either sell your house faster, or help a friend sell their house faster. All because of some nice photos taken by you.
So that's it for me today. I've got over 2000 images to get edited. See you all tomorrow! Jason


No comments:
Post a Comment