Showing posts with label Nikon. Show all posts

Thursday, October 7, 2010

Shooting for Social Media


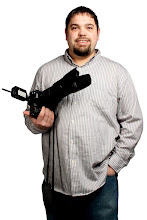
Hey everyone. Glad to see you back! The image you see above is of my brother Garrett. He's a producer for Clear Channel radio here in Cincinnati, specifically the AM sports side. As such he tries to have a pretty good social media presence. He has a blog, a couple of twitter accounts, Facebook etc. His problem was that he didn't have a consistent picture across the accounts, and branding is all about that, consistency. So the other day he was over to watch some football and I grabbed him for 5 minutes to do some quick shots for his profiles. Hit the jump for the rest of the shots, as well as a lighting diagram


This is what I did for lighting. I had a single SB900 camera left shooting through a shoot through umbrella on manual 1/8 power. The umbrella was roughly 2 feet from the subject and feathered to the left so that just the edge of the light was hitting his face. On camera right, I had a tri-grip white reflector held by an assistant. The settings on the camera were ISO1600 112mm on my 70-200 2.8 f/5.6 1/80th of a second. Here's a diagram:


Simple enough setup but highly effective. In the diagram you'll notice that the subject is a good distance away from the background. This is important. It's the inverse square law at work here. The further away the subject(and the main light source) the darker the background gets. In this case we wanted totally black, so we moved him as far away as was practical. Here are a few more from the shoot:

JRL_8372-Edit


JRL_8366-Edit

I took 12 shots total and these are the keepers. Social media is a huge part of every business now, take advantage of the need that has been created by and for this market. Thanks for stopping by, See you next time!

Read more on this article...

Tuesday, September 21, 2010

So you want Low Noise at High ISO


Hey Gang! Glad to see you're back. I'm not entirely sure what the image above has to do with high ISO and low noise... It was shot with a D300 in studio conditions at ISO200. I wanted to share this shot with you all though. It's my friend Heather, who after a horrific traffic accident used Yoga to regain mobility. She's an inspiration to anyone who has to overcome an obstacle.

On to some high ISO low noise goodness! I had a friend on twitter(by the way if you're not following on twitter, why not? it's @reddoorphoto)ask me about the noise capabilities of the D700 because he was considering buying a new camera and wanted better noise reduction/capabilities. I asked him if he had thought about a D300s instead. At half the price, it comes really close to the quality of the D700 in the noise department, plus it shoots video! To prove this to him I set out to do a little experiment... More on that after the jump:


We had an engagement session last night, so I took the opportunity to grab Shad's D300s and his D700 and do a quick, unscientific test. Same lens, same ISO(3200)spot metered off of the guys back in the shadows. Take a look at the results:

ISO comparison

To view it larger click HERE

The D700 is on the left, D300s on the right. I Spot metered for the back of his shirt that was in the shadows, so the background is blown, but that's ok. You can see the noise(what little there is) on the zoomed in section. I think the D300s file looks as good, or better than the D700 file. I'm pretty sure that both are perfectly acceptable. Is there a $1300 difference between the D300s and the D700? I don't think so. Unless you need the full frame for an ultra wide lens like the Sigma 10-24 FX, I can't see a justification to go with the D700 instead of the D300s. This was of course a real world test, not a scientific laboratory test, but the proof is in the image above. What do you think? Let me know in the comments below.

Thanks for stopping by, see you next time! Jason

Read more on this article...

Monday, February 16, 2009

Homemade Snoot


As promised today I'm going to show you how to make a homemade snoot. Like I said yesterday, a snoot is a light modifier that limits the spread of light as it comes from your light source whether it be a speedlight, studio strobe, or constant light source. Basically it's a long tube attached to the end of your light source. I have seen them made from cereal boxes over at the Strobist , and really nice professionally made ones like they have over at HonL . I prefer something in the middle. After all i don't want to show up at someones wedding with a frosted flakes box wrapped around my flash, not very professional looking. To make a snoot like shown above, you'll need to spend about 7 to 10 dollars at your local Micheals, or Hobby Lobby. Luckily for me, my wife was already going over there so I just added my materials to her list, and it didn't cost me anything! :~) Ok that's a lie, I'm sure it will cost me at some point, but for the moment I have a free snoot.

Photobucket

These are all of the products you need. You will need about 3 feet of hook and loop(Velcro) which can be found at Micheals or Walmart for 2 to 3 dollars. You will also need a sheet of the foam paper or foam board. The wife said that it cost .99. A pair of scissors, a strait edge or ruler, and possibly a razor blade. Here's the process:

Photobucket

First you want to take your flash(in my case my SB800) and attach Velcro to it. Make sure that you install the little diffuser that goes on top and place the Velcro below it. You won't be able to get that diffuser on if you place the Velcro in the way. Pay attention to which side of the Velcro you attach to the flash(fuzzy side, or the rough side) you will want to remember this for later. Now lay your flash down on the piece of black foam paper and wrap it around your flash starting on the right side of the flash. Wrap it all of the way around and overlap the staring point by about 1/2 to 3/4 of an inch. Mark this point and remove the flash. Lay the piece of foam paper flat on the table and using a strait edge mark all of the way across the foam. Using either a razor blade, or a pair of scissors cut the foam. Now, take the opposite side of the Velcro that you placed on the flash, and attach it to the flash all of the way around. Leave the backing on the Velcro at this point because we're not ready to attach it yet. Once you have attached it to the flash all of the way around cut off the excess. Remove the Velcro that you just cut from the flash and set the flash aside. Now lay your piece of foam board on the table that you cut in the previous step. Remove the backing from the Velcro, and starting at one edge stick the Velcro to the foam paper. You should be about 1/2 inch to 3/4 of an inch short depending on how much you overlapped. Now attach your foam board to your flash like below:
Photobucket

Wrap it all of the way around until you have an overlap at the end. once you get to this point you will place another piece of Velcro along the entire seam where the foam overlaps making a complete cylinder from top to bottom. It should look just like the image at the top of this page. Now let me show you what it does.

This is a picture without the snoot attached:

Photobucket

This is the same shot taken with the snoot attached:

Photobucket

Obvious difference. The times that I use a snoot or grid(which produces a similar effect) are when I want to keep everything else in the photograph dark and just illuminate a face or a certain feature. A snoot is great for that. Or, lets say you have your lights setup and any you find that there needs to be an additional amount of light in a very specific place on a subject, you would use a snoot. That's it for me today, see you tomorrow. Jason Read more on this article...

Wednesday, February 11, 2009

Crop Factor


I thought with the announcement of the new lens and the whole confusion about crop factor, and DX FX formats, I should talk about what it all means. The image you see above was taken on Fuji 35mm film. An image taken on 35mm film is actually 24mm X 36mm which is the same size as the FX format. FX stands for "full frame". This is represented above by the entire frame. The Standard digital size or DX is 23.6mm X 15.8mm. This is represented above by the inner white box. There are also what's called Medium format digital cameras(Hasselblad style cameras) which are 48mm x 36mm. These are considered medium format cameras, and they cost quite a bit more than the standard Nikon, or Canon's do. When we are talking about the size in mm we are talking about the physical size of the image sensor inside of the camera. This is important because the larger the image sensor, the more area you have to receive light. A 12 megapixel DX sensor and a 12 megapixel FX sensor are completely different. Yes they have the same amount of pixels, but since the FX image sensor is so much larger, the pixels(or light receivers) can be larger. This translates into better performance in low light situations.

Let's talk about the "crop factor" for a minute. What you see above is the crop factor. The DX sensor is physically smaller, so it can't capture as much of the image as the FX can. Most of the lenses (especially prime or fixed length lenses) were made for the FX or full frame format. This means that they can take advantage of the entire field of view that the lens has to offer. For example, the image above was taken with a 50mm prime Nikkor lens on a film camera. If I had placed that same lens on my Nikon D300 and taken the same picture, the most I could have gotten in the photo would be what is inside the white box. THE FOCAL LENGTH DIDN'T CHANGE, but the field of view did. I could see less of the image because my digital camera's sensor is smaller and couldn't take advantage of the entire field of view being offered by the lens. Some people mistake this field of view change as a change in the focal length, it is not. Just because you have a DX(smaller) sensor attached to a lens that is made for film or full frame digital sensors, doesn't mean that the focal length has changed. A 50mm is still a 50mm no matter what.

When you are out at the camera store shopping for a new lens, the sales person may start talking about the 1.5 crop factor, and what your effective focal length is. What they are doing is this, the FX sensor, and 35mm film is roughly 1.5 times the size of the smaller DX sensor. So what they do is multiply whatever focal length lens you are looking at, by 1.5. Lets use a 200mm lens as an example if you multiply the 200mm lens by 1.5 you get 300mm. This means that with that 200mm lens, you are seeing the same amount of the picture that you would if you had a 300mm lens on a full frame(FX) or film camera. This DOES NOT MEAN THAT YOU GET A 300mm LENS FOR THE PRICE OF THE 200mm. It simply means that you have a different amount of viewable area with a DX camera than you do with a FX camera. Don't let them fool you.

If you have any questions about this, or need some more examples of how the crop factor works, please email me, or leave comments on here. Sometimes this can be a hard concept to understand. Read on to hear about Nikon's awesome new lens. Jason Read more on this article...

New Nikkor Lens


Nikon just announced the release of its first DX only prime lens. When I say DX only, that means that it is not meant for film cameras, or full frame digital cameras like the D700,D3,or D3X. It will work with them, but only in DX crop mode which cuts the megapixels in half. It's a 35mm f/1.8 "prime" lens. I obviously don't have any experience with it yet seeing as how it was just released two days ago, but I would imagine that the quality is Just as good as all of the other prime lenses produced by Nikon. At the moment I can't find this lens listed anywhere for sale yet, however Nikon is listing an estimated price of $199.95. For that cheap, I'll pick one up to try out. There isn't anything in this focal range available outside of a zoom for the DX or cropped format, so it may make a nice addition to the gear bag. If you want to check out the lens for yourself click here . Read more on this article...

Thursday, February 5, 2009

CLS-Beyond


Welcome back everyone. I hope everybody enjoys the comic strip WTD. I have to tell you that It's one of my favorite comics. Today I want to do a little more on the Nikon CLS system. We've already talked about how to get the flash off of the camera. We talked about the beauty of the Radio poppers, we talked about a little technique. What we haven't talked about are those times when we need more light than one unit will provide. Say for example you are lighting a large group of people, and you have them standing in 4 seperate rows, what now? I'm going to cover that today, as well as some of the other settings availible in the wireless mode besides TTL. So lets jump right in.


In the example I gave above, you want to light a large group of people but you still want to be mobile, meaning you don't want to have to carry a heavy stobe setup on location. When you have a large group like this(more than two rows deep) you start to have problems with light falloff past the second row. This happens because of something called the inverse square law. Without getting too technical the math end of it, what you get is every time you double the distance of your subject from the light source(the flash) the light hitting the furthest subject will be 1/4 of the intensity of the light coming from the flash. So what this means to you is, the light hitting the people in the 4th row, will be 1/4 the amount of light hitting the people in the 1st row. This will result in very poorly exposed subjects in the rear. The way to combat this is increasing the amount of light you are putting out. Nikon CLS is great for accomplishing this. With the aid of a bracket similar to the one shown in the photo above, you can effectively mount two flash units with one umbrella/softbox. The really nice thing is that since the Nikon flashes are fired wirelessly you don't have to add any additional hookups or cords. All you have to do is mount it and shoot. The TTL will take care of the rest. Remember that TTL is Through The Lens metering. The meter in the camera says what the light output has to be to light the entire scene, the camera will adjust the flashes accordingly. This takes the pressure off of you as a photographer to be creative and not have to worry so much about the technical aspects. You can focus on the more important things like composition, and subject rapport.

What if you find that because of a particular color on the background, or becuase of a particular color that the model/subject is wearing TTL isn't adjusting the flash output properly? What to do then? There is a setting labeled M in the CLS controls on the master flash/camera. In this setting you can manually adjust the output of the flash from 1/1 down to 1/128. This is a lot of range for a flash. This is especially useful if the background is black/white. I ran into this very problem two weeks ago shooting the awards for gymnastics in Covington. The trick was to set the flash to M(manual) mode and adjust it accordingly. I can and will do posts on how to get the proper exposure when adjusting your flash in manual mode, but the BEST online resource I have found for this is over at the Strobist . David Hobby does the best job I have ever seen when it comes to off camera flash. There is more information on that site than I will ever know. So if you want to know how to adjust for the proper exposure and can't wait for my post on it, check that site out. There are a couple of other options on the menu of the flash, but we'll talk more about them next week. See ya tomorrow. Jason Read more on this article...

Thursday, January 29, 2009

Nikon CLS part 2


Wow, what a busy few days. Between the inches of snow and working on a business plan for this upcoming year, I have been burning it at both ends. I hope everyone made it through the snow storm ok, luckily I have 4wheel drive so I didn't get stuck anywhere. On to some more CLS. So we ended the last segment with enabling the wireless on your flash units. Today we're going to talk about what to do with them now that you have them wireless.

The first thing that we should note about the CLS wireless capabilities are the limitations. The limitations for the units are theses. The units have to be within line of sight of each other. This means that the small IR (infrared) eye on the side of the "remote" flash has to be pointed at the camera. Sometimes you can get away with them being pointed not directly at the camera but that's only when you are in a tight enough space that the remote flash can pick up light that is being bounced off of the ceiling/walls. If however you are using the SU-800 wireless controller, there isn't any preflash to bounce off of the walls, or ceilings so you HAVE to be within line of sight. (Shad and I found this out last weekend the hard way)

So now you have your flash off camera, what are you going to do with it? Well there are a lot of things that you can do with it. Lots of different lighting scenarios that are now an option because your light source is movable. Now instead of your light source being trapped on top of your camera, you are free to move it anywhere within line of sight that you want, and you can attach any kind of light modifier that you want. My favorite modifier is a simple light stand and shoot through umbrella. The reason I prefer a shoot through umbrella when working with hot shoe strobes is because of power. Hot shoe mounted flash units don't have a lot of power so you have to make use of every little bit that they have. The shoot through umbrellas work at closer distances, and in my opinion they have less harsh light output. When you use an umbrella, or softbox, or shoot through panel, you are taking your light source from a small concentrated point and making it a much larger, softer diffused light. Also with the addition of two flash units and two light stands, you can light a large group of people, something that is not possible with an on camera flash. The really great thing is that the flashes auto adjust in TTL. This means that you don't have to go to each flash when you add a new unit, they automatically adjust output to compensate. This is a huge time saver, and it also keeps you from having to buy a flash meter to get the exposure just right. But what about when you want to place a flash out of the line of sight, then what do you do? Read on...


Here's the scenario. You have a Model setup and posed. You have two flash units on stands with umbrella's. One high on the camera right and one lower on camera left. You take your shot, and it looks ok, but you don't have much separation of the background. It's hard to tell where the models dark brown hair stops and the background begins. You need a background light. So, you want to place a speedlight on a small stand behind your model facing the background. But wait How are you going to do this? There isn't a strait line of sight, and yes you may be able to pick up some of the bouncing flash to trigger it, but for this example lets assume that you can't. What do we do now? We hook up a set of these:

Photobucket


This is a Radio Popper . These little beauties are gods gift to CLS users. What it does is, it mounts on top of your master flash unit attached to your camera(or the SU-800) and reads the flash trigger signal from the master unit. It then transmits that signal via RF(remote frequency) to the receiver units attached to your remote flashes. This allows you to place your flash unit outside of the line of sight and still fire it wirelessly, while still keeping the total control of your system on your camera. You can shoot through walls, This is an amazing add on to the Nikon CLS system, and to be honest, I don't know why they didn't have the units communicate through RF to begin with. There would then be no need for this aftermarket unit. I don't work for Nikon but if there is anyone reading this that does, please lets have some RF on the next version of CLS...

That's if for me today. I have a shoot tonight where we're going to be using between 6 and 8 speed lights all working in CLS so I'll take some setup shots to show you. Jason Read more on this article...