Tweet
Hey Everyone! Glad to see you here! Today I want to show you another of the wonderful improvements to Photoshop CS5, Content Aware Fill. Specifically where it applies to the Spot Healing Brush. This has been a godsend to Photographers the world over and I use it on almost every image that I take. So watch the video, and let me know what you think. Jason
Read more on this article...
Wednesday, August 18, 2010
Tuesday, August 17, 2010
Creating a Fireworks image
Tweet

Hey guys! Glad to see you back! With the upcoming Labor day weekend just around the corner. I wanted to take a little time and explain how to get a really nice fireworks image. It's part Shooting, and part post processing. The image you see above is from last year's WEBN Fireworks show here in Cincinnati. This shot is featured in the United Way Promotion for this year's WEBN fireworks promotion HERE. So hit the jump to see how the shot's were taken and then how they were put together in post.
The key to creating a really good quality fireworks image is the background. Get to your location early. Get a good position that doesn't have anything obstructing your view, and setup your tripod. These things should all be a given to you, but just in case I wanted to spell them out. The next thing is to get a really nice frame of the area without fireworks going off. For the image above, I took several just so I would have quite a few to work with, but here's the one that the image is based on.

Once the fireworks start, usually the air fills with smoke and the Background starts to look awful. Getting a nice background image is important so we have something to add the actual fireworks to later.
The next thing is to concentrate on the fireworks themselves. I always shoot in manual when shooting fireworks because the camera will see all of the blackness in the background and usually create an exposure way too long for the actual fireworks. Remember the fireworks themselves are very bright so we need to expose accordingly. There is no set exposure to shoot fireworks at, but I generally start around f/5.6 1/125th. See what that looks like and adjust accordingly. It's really a matter of trial and error with fireworks, so play with the settings until you get shots that look nice to you.
So now you're home, the fireworks are over, and you have all of these images of exploding color, and some shots of the background. What now? Open your background(pre firework image) in Photoshop. Start deciding how many fireworks you would like to add to the image. Start to visualize what will look good; what will fill the image with color, but won't be overkill. Now sort through and find the individual fireworks that will fill this frame. For me I chose the following shots:


Now we're going to start by doing a rough selection of the first firework to be added to the frame. You can use whatever method you would like to select the firework. I happened to use the Elliptical Marquee tool for this image.

Once you have your explosion selected, you are going to copy the selection either by pressing CTRL+C or by clicking EDIT-COPY. Now you are going to select your background layer that is currently devoid of fireworks and paste anywhere in the image by either pressing CTRL+V or clicking EDIT-PASTE. This will create a new layer over the background layer. The new layer will have the single firework that you had selected and copied. You may have to resize your firework to make it fit into the new image. To do this press CTRL+T to open free transform. Grab one of the corners of the transform box with your mouse and drag in until you are satisfied.
Now, once you have resized, you need to mask out the area surrounding the firework that you copied. Chances are the sky will be slightly different in color than the sky of your background(as you can see in this image).

You will create a layer mask by clicking the third button from the left of the layers box(it looks like a circle inside of a box). This will create a layer mask for your layer, as shown here:

Select your brush tool from your toolbar on the left. Make sure your foreground color is white, and start to paint over the offending color right on the image. When you're using a layer mask you are actually paining away the layer almost as if erasing it, but what's really happening is you are just hiding it.
You are going to repeat this process for as many fireworks as you would like to add to your image until it's full. That's all there is to it! Simple enough! You will have a beautiful shot of the fireworks as you saw them, minus the smoke and haze! I hope this helps you get beautiful fireworks shots! See you all next time. Jason
Read more on this article...

Hey guys! Glad to see you back! With the upcoming Labor day weekend just around the corner. I wanted to take a little time and explain how to get a really nice fireworks image. It's part Shooting, and part post processing. The image you see above is from last year's WEBN Fireworks show here in Cincinnati. This shot is featured in the United Way Promotion for this year's WEBN fireworks promotion HERE. So hit the jump to see how the shot's were taken and then how they were put together in post.
The key to creating a really good quality fireworks image is the background. Get to your location early. Get a good position that doesn't have anything obstructing your view, and setup your tripod. These things should all be a given to you, but just in case I wanted to spell them out. The next thing is to get a really nice frame of the area without fireworks going off. For the image above, I took several just so I would have quite a few to work with, but here's the one that the image is based on.
Once the fireworks start, usually the air fills with smoke and the Background starts to look awful. Getting a nice background image is important so we have something to add the actual fireworks to later.
The next thing is to concentrate on the fireworks themselves. I always shoot in manual when shooting fireworks because the camera will see all of the blackness in the background and usually create an exposure way too long for the actual fireworks. Remember the fireworks themselves are very bright so we need to expose accordingly. There is no set exposure to shoot fireworks at, but I generally start around f/5.6 1/125th. See what that looks like and adjust accordingly. It's really a matter of trial and error with fireworks, so play with the settings until you get shots that look nice to you.
So now you're home, the fireworks are over, and you have all of these images of exploding color, and some shots of the background. What now? Open your background(pre firework image) in Photoshop. Start deciding how many fireworks you would like to add to the image. Start to visualize what will look good; what will fill the image with color, but won't be overkill. Now sort through and find the individual fireworks that will fill this frame. For me I chose the following shots:
Now we're going to start by doing a rough selection of the first firework to be added to the frame. You can use whatever method you would like to select the firework. I happened to use the Elliptical Marquee tool for this image.
Once you have your explosion selected, you are going to copy the selection either by pressing CTRL+C or by clicking EDIT-COPY. Now you are going to select your background layer that is currently devoid of fireworks and paste anywhere in the image by either pressing CTRL+V or clicking EDIT-PASTE. This will create a new layer over the background layer. The new layer will have the single firework that you had selected and copied. You may have to resize your firework to make it fit into the new image. To do this press CTRL+T to open free transform. Grab one of the corners of the transform box with your mouse and drag in until you are satisfied.
Now, once you have resized, you need to mask out the area surrounding the firework that you copied. Chances are the sky will be slightly different in color than the sky of your background(as you can see in this image).
You will create a layer mask by clicking the third button from the left of the layers box(it looks like a circle inside of a box). This will create a layer mask for your layer, as shown here:
Select your brush tool from your toolbar on the left. Make sure your foreground color is white, and start to paint over the offending color right on the image. When you're using a layer mask you are actually paining away the layer almost as if erasing it, but what's really happening is you are just hiding it.
You are going to repeat this process for as many fireworks as you would like to add to your image until it's full. That's all there is to it! Simple enough! You will have a beautiful shot of the fireworks as you saw them, minus the smoke and haze! I hope this helps you get beautiful fireworks shots! See you all next time. Jason
Read more on this article...
Monday, August 16, 2010
Refine Edge in CS5
Tweet
Hey everyone! Glad to see you made it back. Today I want to show you one of my favorite improvements in Photoshop CS5, the refine edge control. Now the refine edge control isn't new to Photoshop CS5, but there are some great improvements introduced with CS5 that makes it feel like a whole new feature. So watch the video, and let me know what you think! Jason
Read more on this article...
Friday, July 30, 2010
Studio time just for fun...
Tweet
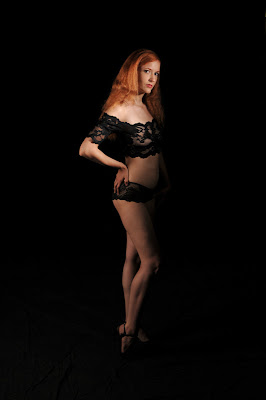
Hey everyone. Glad to see you found your way back. It's been a typical week for us over at RedDoor. Studio shoots, on location corporate work, and tonight we have a wedding. All in all it's been an eventful week. Last Sunday my good friend Frank Tuttle of Tuttle Images came down to shoot and brought along a few models with him. We spent the day working our way around the studio, shooting different themes, and sets. It was a good day. It's nice to have time to shoot just for fun. No real purpose, no one to please but yourself(although sometimes we can be our own hardest critics). Above is Grace. She is a wonderful model from the Columbus area. Such a pleasure to work with. She had many, many different looks, and the ability to "turn it on" on command.
For this particular shot, Frank did the lighting setup. I think he did a wonderful job. The main in this situation was a gridded strobe camera right about 2 feet from the subject's face around f/5.6. Fill was from a brolly box camera left and feathered way up roughly f/4. Below is a diagram showing the setup.

Hit the jump for more lighting setups, shots, and even a little video showing Franks workflow(and dancing that day)!

Like I said, Grace was wonderful to work with, and she had so many different looks that we were able to move around the studio quickly. Here, we did what's commonly referred to as Clam Shell Lighting. We placed a 5foot octobox above grace set to roughly f/5.6. Just below her face we had a strip box set to f/4. This gives us a high key, almost shadowless "glamour shot" of grace and her wonderful skin. Notice the two distinct catch lights in her eyes? One from the lower strip box, and one from the upper octobox. There was about a 2 foot gap between the two boxes in the front that we shot through.
A helpful tip for shooting this setup: The idea is to get a high key, bright image. To do this, we often times "open up" our aperture by one stop. For example, this setup metered at around f/5.6, but to get the brighter look, we shot at f/4. This made the image 1 stop brighter than it would have been at f/5.6.

While Grace was a wonderful model, it was Casey that took the "prize" for best outfits. First she came out in what I would call "50's housewife attire" and had the attitude to go with it. It was great. She posed on several different sets, one of which being the "industrial area" of the studio. The idea for a shot like that is to make her look as out of place as possible. It puts an emphasis on her, drawing your eyes in. She was a wonderful sport, shooting the below shots even though getting her leg up that high with heels on was difficult.

and of course what 50's housewife would be complete without her "Betty Crocker" cookbook:

Shad even talked me into stepping in front of the camera for a shot or two:


But not to be outdone, Frank shows us his great interaction with the models, and of course his dancing skills:
Thanks for stopping in and checking out my latest work. See you again soon. Jason
Read more on this article...

Hey everyone. Glad to see you found your way back. It's been a typical week for us over at RedDoor. Studio shoots, on location corporate work, and tonight we have a wedding. All in all it's been an eventful week. Last Sunday my good friend Frank Tuttle of Tuttle Images came down to shoot and brought along a few models with him. We spent the day working our way around the studio, shooting different themes, and sets. It was a good day. It's nice to have time to shoot just for fun. No real purpose, no one to please but yourself(although sometimes we can be our own hardest critics). Above is Grace. She is a wonderful model from the Columbus area. Such a pleasure to work with. She had many, many different looks, and the ability to "turn it on" on command.
For this particular shot, Frank did the lighting setup. I think he did a wonderful job. The main in this situation was a gridded strobe camera right about 2 feet from the subject's face around f/5.6. Fill was from a brolly box camera left and feathered way up roughly f/4. Below is a diagram showing the setup.
Hit the jump for more lighting setups, shots, and even a little video showing Franks workflow(and dancing that day)!
Like I said, Grace was wonderful to work with, and she had so many different looks that we were able to move around the studio quickly. Here, we did what's commonly referred to as Clam Shell Lighting. We placed a 5foot octobox above grace set to roughly f/5.6. Just below her face we had a strip box set to f/4. This gives us a high key, almost shadowless "glamour shot" of grace and her wonderful skin. Notice the two distinct catch lights in her eyes? One from the lower strip box, and one from the upper octobox. There was about a 2 foot gap between the two boxes in the front that we shot through.
A helpful tip for shooting this setup: The idea is to get a high key, bright image. To do this, we often times "open up" our aperture by one stop. For example, this setup metered at around f/5.6, but to get the brighter look, we shot at f/4. This made the image 1 stop brighter than it would have been at f/5.6.
While Grace was a wonderful model, it was Casey that took the "prize" for best outfits. First she came out in what I would call "50's housewife attire" and had the attitude to go with it. It was great. She posed on several different sets, one of which being the "industrial area" of the studio. The idea for a shot like that is to make her look as out of place as possible. It puts an emphasis on her, drawing your eyes in. She was a wonderful sport, shooting the below shots even though getting her leg up that high with heels on was difficult.
and of course what 50's housewife would be complete without her "Betty Crocker" cookbook:
Shad even talked me into stepping in front of the camera for a shot or two:
But not to be outdone, Frank shows us his great interaction with the models, and of course his dancing skills:
Thanks for stopping in and checking out my latest work. See you again soon. Jason
Read more on this article...
Monday, July 26, 2010
2010 World Wide Photo Walk Cincinnati
Tweet
 Group Photo By Wendy Ramsey
Hey everyone! Glad to see you're back! Over the weekend I had the privilege of leading the World Wide Photowalk organized and sponsored by Scott Kelby. This is the second year that I've led a walk and just like last year, it was a blast! There were 50 Photographers signed up, but I think because of the temperature being in the 90's(with a heat index in the 100's!) some people didn't show up. Some emailed me in the days leading up to the walk to tell me that they weren't going to be there. All total we had about 25-30 photographers show up. We still had fun!
We ended up at the Hofbrauhaus in Newport Ky where everyone enjoyed all of the beer cheese and bratt's they could eat!

They even had live entertainment:

Hit the jump for some photos from the walk...


Many thanks to the photographers that joined in the fun this year! If you didn't make it out this time around, be sure to look for it again next year! Jason
Read more on this article...
 Group Photo By Wendy Ramsey
Hey everyone! Glad to see you're back! Over the weekend I had the privilege of leading the World Wide Photowalk organized and sponsored by Scott Kelby. This is the second year that I've led a walk and just like last year, it was a blast! There were 50 Photographers signed up, but I think because of the temperature being in the 90's(with a heat index in the 100's!) some people didn't show up. Some emailed me in the days leading up to the walk to tell me that they weren't going to be there. All total we had about 25-30 photographers show up. We still had fun!
We ended up at the Hofbrauhaus in Newport Ky where everyone enjoyed all of the beer cheese and bratt's they could eat!
They even had live entertainment:
Hit the jump for some photos from the walk...
Many thanks to the photographers that joined in the fun this year! If you didn't make it out this time around, be sure to look for it again next year! Jason
Read more on this article...
Friday, July 23, 2010
Shooting Tethered with Lightroom3
Tweet
Hey everyone! Glad to see you made it back! It's my goal to provide useful, easy to understand content that helps you with your photography. The fact that you're here, reading it, lets me know that I'm doing a good job.
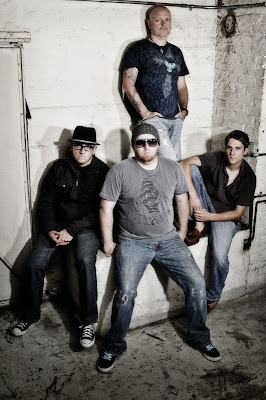
That's Reverse From Zero pictured above. They're a Cincinnati based rock alternative band. They were over the other night for some updated group shots to go with their new EP. These guys are a blast to work with! Fun, outgoing, "willing to try anything" type of guys. They were happy with the outcome, and so were we. I took this opportunity to try out Lightroom 3's new tethered shooting option for the first time in a live situation.(note: I never try out something totally new with a client. I had already played around with the tethering feature just to get the controls down.) Previous to this latest version of Lightroom, we were using Nikon's camera control 2 for our tethering needs. This worked "ok" but was slow, and there were a bunch of steps you had to go through just to get it up and running. Lightroom 3 eliminated those steps, and has made the image playback almost instant. So hit the jump to see how it works, some sample pictures, then some more from our Reverse from Zero shoot...
I don't know about you, but I'm a "freak" when it comes to eye sharpness. When I'm shooting portraits, I want the eyes to be so tac sharp that they're the first thing that you see, and the area of the photo that you keep going back to. That being said, it's a real pain in the butt to use the display on the back of your camera to see if they're really that sharp. Sure you can zoom in, and get a pretty good idea but to really see what it's going to look like you need a large monitor. I prefer something 24inches or larger. When we're shooting in the studio, we have a 24inch monitor hooked to a laptop so we can see the shots as they happen, and then zoom in to certain areas if we want to check sharpness etc. To do this you need a tethering program. For the longest time the only option we had was Nikon's Camera Control 2. With this program you could set your shots to come into the computer, save in a specific folder, then have Lightroom "watch" that folder and automatically import the images into Lightroom etc. It was a process to say the least. With the introduction of Lightroom 3 Adobe has done away with the need to use a third party program and allows you to tether right into your catalog strait from your camera.
Setting up Lightroom to tether is simple. The first thing you want to do is attach your camera to your computer via a USB cable. Turn your camera on so that the computer recognizes it. Launch Lightroom 3. Once your catalog has loaded go to FILE-TETHERED CAPTURE-START TETHERED CAPTURE. As shown here:

When you click on Start tethered capture, you will get a dialog box asking you for some input. It wants to know what you want to call this shoot. For this particular shoot I named it the band's name "Reverse from Zero". You also have a file naming option. Which I set to Session Name-Sequence. There's the destination to be imported to. I keep all of my images on an external drive, so my location shows that. Then there is the information. Just as in Import, you can add metadata, as well as keywords. Here's a snap shot of that dialog box so you can see what I'm talking about:

Once you fill out this info and click OK, you will get a control bar at the bottom of the screen that looks like this:

This bar shows the basic information coming from your camera. It has your shutter speed, aperture, ISO, and white balance. It also shows the camera model you're shooting with. On the right side of the tool bar you see an option for Develop settings. This allows you to add whatever develop settings you want as the image is brought into Lightroom. For example, if you take the first photo, and you see that you want to give it a little more midtone contrast, you can make your adjustment to your first image, select the develop settings button on the tethering tool bar and select the "Same as previous" option at the top of the flyout window as shown here:

As you can see, there are a whole bunch of options to choose from when it comes to the develop settings. If you want a certain look to be applied to your image immediately when it comes into Lightroom, this is the way to do it.
When you start shooting, you will immediately(especially if you ever used the old method) see how fast the images show up on the screen. I'm using a relatively mediocre laptop(dual core processor, with 3 gigs of ram), and the shots show up almost instantly. If you've never shot tethered, I urge you to try it out. It is one of the best ways to see all of the detail in the images, as well as catch problems while you're shooting and can still fix them, instead of after the shoot when it's too late. So that's it. That's the new tethering option in Lightroom 3 in a nutshell. It's a simple strait forward approach to managing a shoot and making sure that the images are in focus, where you want them to be.
As promised, here are some more shots from the same shoot. Thanks for stopping by, see you next time! Jason


Read more on this article...

Hey everyone! Glad to see you made it back! It's my goal to provide useful, easy to understand content that helps you with your photography. The fact that you're here, reading it, lets me know that I'm doing a good job.
That's Reverse From Zero pictured above. They're a Cincinnati based rock alternative band. They were over the other night for some updated group shots to go with their new EP. These guys are a blast to work with! Fun, outgoing, "willing to try anything" type of guys. They were happy with the outcome, and so were we. I took this opportunity to try out Lightroom 3's new tethered shooting option for the first time in a live situation.(note: I never try out something totally new with a client. I had already played around with the tethering feature just to get the controls down.) Previous to this latest version of Lightroom, we were using Nikon's camera control 2 for our tethering needs. This worked "ok" but was slow, and there were a bunch of steps you had to go through just to get it up and running. Lightroom 3 eliminated those steps, and has made the image playback almost instant. So hit the jump to see how it works, some sample pictures, then some more from our Reverse from Zero shoot...
I don't know about you, but I'm a "freak" when it comes to eye sharpness. When I'm shooting portraits, I want the eyes to be so tac sharp that they're the first thing that you see, and the area of the photo that you keep going back to. That being said, it's a real pain in the butt to use the display on the back of your camera to see if they're really that sharp. Sure you can zoom in, and get a pretty good idea but to really see what it's going to look like you need a large monitor. I prefer something 24inches or larger. When we're shooting in the studio, we have a 24inch monitor hooked to a laptop so we can see the shots as they happen, and then zoom in to certain areas if we want to check sharpness etc. To do this you need a tethering program. For the longest time the only option we had was Nikon's Camera Control 2. With this program you could set your shots to come into the computer, save in a specific folder, then have Lightroom "watch" that folder and automatically import the images into Lightroom etc. It was a process to say the least. With the introduction of Lightroom 3 Adobe has done away with the need to use a third party program and allows you to tether right into your catalog strait from your camera.
Setting up Lightroom to tether is simple. The first thing you want to do is attach your camera to your computer via a USB cable. Turn your camera on so that the computer recognizes it. Launch Lightroom 3. Once your catalog has loaded go to FILE-TETHERED CAPTURE-START TETHERED CAPTURE. As shown here:
When you click on Start tethered capture, you will get a dialog box asking you for some input. It wants to know what you want to call this shoot. For this particular shoot I named it the band's name "Reverse from Zero". You also have a file naming option. Which I set to Session Name-Sequence. There's the destination to be imported to. I keep all of my images on an external drive, so my location shows that. Then there is the information. Just as in Import, you can add metadata, as well as keywords. Here's a snap shot of that dialog box so you can see what I'm talking about:
Once you fill out this info and click OK, you will get a control bar at the bottom of the screen that looks like this:
This bar shows the basic information coming from your camera. It has your shutter speed, aperture, ISO, and white balance. It also shows the camera model you're shooting with. On the right side of the tool bar you see an option for Develop settings. This allows you to add whatever develop settings you want as the image is brought into Lightroom. For example, if you take the first photo, and you see that you want to give it a little more midtone contrast, you can make your adjustment to your first image, select the develop settings button on the tethering tool bar and select the "Same as previous" option at the top of the flyout window as shown here:
As you can see, there are a whole bunch of options to choose from when it comes to the develop settings. If you want a certain look to be applied to your image immediately when it comes into Lightroom, this is the way to do it.
When you start shooting, you will immediately(especially if you ever used the old method) see how fast the images show up on the screen. I'm using a relatively mediocre laptop(dual core processor, with 3 gigs of ram), and the shots show up almost instantly. If you've never shot tethered, I urge you to try it out. It is one of the best ways to see all of the detail in the images, as well as catch problems while you're shooting and can still fix them, instead of after the shoot when it's too late. So that's it. That's the new tethering option in Lightroom 3 in a nutshell. It's a simple strait forward approach to managing a shoot and making sure that the images are in focus, where you want them to be.
As promised, here are some more shots from the same shoot. Thanks for stopping by, see you next time! Jason
Read more on this article...
Monday, July 19, 2010
Gel that light
Tweet
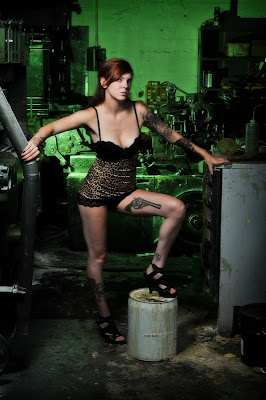
Hey everyone! Glad you made it back to see us over here! Busy, busy weekend for us at RedDoor. We had a great workshop on Saturday that went off without a hitch thanks to the wonderful Jill(pictured above). The theme of the workshop was "Inked", and let me tell you Jill WAS INKED! As always we had a few setups in mind going into the shoot, but we're fluid. We like to flow with things, and do whatever comes to mind. That is what happened for the shot above. We have some industrial equipment in the back corner of our studio left by the print shop that was in there before us. We haven't used it(up until this point) for any photo shoots, but with Jill's look, and the theme... I couldn't resist. Hit the jump for some behind the scenes looks at the lighting setup for this shot, plus much more from the workshop!
I like gels. Scratch that, I love gels! With the simple addition of a piece of colored "film" you can turn a blah photo in to a WOW! photo. Case in point,if I had just added a flash in the background of this image to light the industrial equipment, you wouldn't get near the effect. The addition of the green(actually 3 pieces of full cut CTG) sets the mood for this shot.
The setup is pretty simple. We had one Sb900 speedlight camera left behind a piece of equipment and the subject. This was set at 1/4power on manual mode. The Main light for the subject was a Sb900 on a boom shooting through a 24X24inch soft box. The fill was a 3foot by 6foot silver reflector camera right just out of frame. Below is a diagram showing the setup.

Also I have a setup shot showing everything(minus the hidden flash for the background).

As you can see everything is triggered with Pocket wizard wireless transmitters to ensure consistent firing.
The addition of the green does two things in this situation. First it sets the ominous mood. When I see a background lit with a really strong green, blue, or red gel my mind goes back to Dick Tracy, or theatrical crime scenes. You know the alley way, or the abandoned factory that the damsel in distress shouldn't have been in, in the first place. You see the moody, colored background and you know something sinister is about to take place. That's what I was going for here. Second, and equally important is separation. When you have two different "light planes" that is, two areas of the image that are lit differently you give your subject a more 3 dimensional look. That's our goal as photographers after all right, to take a 2 dimensional photograph and have the subject feel like they were there. Lighting different areas of the image separately helps us accomplish this.
On that note, lets take a look at another image from the workshop. This time the model is out in the open. She's about 10 feet from the boiler room door and the industrial fan. Equally She is 10feet away from the graffiti wall to the right. Again we used a gel(this time a red one) to add some dimension to the boiler room, and let you(the viewer) know that it was supposed to be hot back there. We didn't stop there though. We added a gridded strobe to the graffiti wall camera right. It was set about 25degrees from the wall with a 1/8 honeycomb as to just "skim" the wall with light. We didn't want full on POW blast of light. Just a subtle touch, again to separate the model and give her some dimension in the room. The model was lit by a Strip box on a boom above her an camera left at around f/8. We filled the opposite side with another strip box camera right feathered forward a touch and set to f/4. I wanted a large transition area between the model and the background. So the model is lit, then shadow, shadow, shadow, then the background is lit. This creates clear and concise areas of light.

(Click on the image to make it full sized)
Again I have a setup shot of the whole thing with one of the students(I say students, but in reality these are quality photographers that do wonderful work) shooting the model.

(Click on the image to make it full sized)
(note: the octobox above the camera pointed at the subject is not firing, it is just on a boom above the model)
Here are a few more from the shoot with the same lighting setups just a little different angle or crop:


These next two were done first actually. I always, always start on white seamless with the models. It gives me an opportunity to work with them, get them into the rhythm of the shoot before we move on to more obscure things.


As for this last image, we laid out some fur that we have laying around the studio. Set a Strip box above and slightly camera left of the subject. We also had a kicker coming from a gridded strobe camera right at about 1 stop over the main light just to add a bit of dimension to the subject.

I had a blast at this shoot! We really got to experiment with some of my favorite kinds of lighting, and really play with some colors and gels. I hope you've enjoyed the images, and the lighting explanations. See you all again soon! Jason
Read more on this article...

Hey everyone! Glad you made it back to see us over here! Busy, busy weekend for us at RedDoor. We had a great workshop on Saturday that went off without a hitch thanks to the wonderful Jill(pictured above). The theme of the workshop was "Inked", and let me tell you Jill WAS INKED! As always we had a few setups in mind going into the shoot, but we're fluid. We like to flow with things, and do whatever comes to mind. That is what happened for the shot above. We have some industrial equipment in the back corner of our studio left by the print shop that was in there before us. We haven't used it(up until this point) for any photo shoots, but with Jill's look, and the theme... I couldn't resist. Hit the jump for some behind the scenes looks at the lighting setup for this shot, plus much more from the workshop!
I like gels. Scratch that, I love gels! With the simple addition of a piece of colored "film" you can turn a blah photo in to a WOW! photo. Case in point,if I had just added a flash in the background of this image to light the industrial equipment, you wouldn't get near the effect. The addition of the green(actually 3 pieces of full cut CTG) sets the mood for this shot.
The setup is pretty simple. We had one Sb900 speedlight camera left behind a piece of equipment and the subject. This was set at 1/4power on manual mode. The Main light for the subject was a Sb900 on a boom shooting through a 24X24inch soft box. The fill was a 3foot by 6foot silver reflector camera right just out of frame. Below is a diagram showing the setup.
Also I have a setup shot showing everything(minus the hidden flash for the background).
As you can see everything is triggered with Pocket wizard wireless transmitters to ensure consistent firing.
The addition of the green does two things in this situation. First it sets the ominous mood. When I see a background lit with a really strong green, blue, or red gel my mind goes back to Dick Tracy, or theatrical crime scenes. You know the alley way, or the abandoned factory that the damsel in distress shouldn't have been in, in the first place. You see the moody, colored background and you know something sinister is about to take place. That's what I was going for here. Second, and equally important is separation. When you have two different "light planes" that is, two areas of the image that are lit differently you give your subject a more 3 dimensional look. That's our goal as photographers after all right, to take a 2 dimensional photograph and have the subject feel like they were there. Lighting different areas of the image separately helps us accomplish this.
On that note, lets take a look at another image from the workshop. This time the model is out in the open. She's about 10 feet from the boiler room door and the industrial fan. Equally She is 10feet away from the graffiti wall to the right. Again we used a gel(this time a red one) to add some dimension to the boiler room, and let you(the viewer) know that it was supposed to be hot back there. We didn't stop there though. We added a gridded strobe to the graffiti wall camera right. It was set about 25degrees from the wall with a 1/8 honeycomb as to just "skim" the wall with light. We didn't want full on POW blast of light. Just a subtle touch, again to separate the model and give her some dimension in the room. The model was lit by a Strip box on a boom above her an camera left at around f/8. We filled the opposite side with another strip box camera right feathered forward a touch and set to f/4. I wanted a large transition area between the model and the background. So the model is lit, then shadow, shadow, shadow, then the background is lit. This creates clear and concise areas of light.
(Click on the image to make it full sized)
Again I have a setup shot of the whole thing with one of the students(I say students, but in reality these are quality photographers that do wonderful work) shooting the model.
(Click on the image to make it full sized)
(note: the octobox above the camera pointed at the subject is not firing, it is just on a boom above the model)
Here are a few more from the shoot with the same lighting setups just a little different angle or crop:
These next two were done first actually. I always, always start on white seamless with the models. It gives me an opportunity to work with them, get them into the rhythm of the shoot before we move on to more obscure things.
As for this last image, we laid out some fur that we have laying around the studio. Set a Strip box above and slightly camera left of the subject. We also had a kicker coming from a gridded strobe camera right at about 1 stop over the main light just to add a bit of dimension to the subject.
I had a blast at this shoot! We really got to experiment with some of my favorite kinds of lighting, and really play with some colors and gels. I hope you've enjoyed the images, and the lighting explanations. See you all again soon! Jason
Read more on this article...
Friday, July 16, 2010
Scott Kelby's Photo Recipies Live
Tweet

Hey everyone! Glad to see you back. If this is your first time here, welcome! Many of you know that I'm a big supporter of the iPad as a tool for photographers. I did a post a week or two ago about the benefits of owning an iPad as a photographer, as well as ways that it can make you money. Now I want to show you how it can make you a better photographer. Scott Kelby, (author of many, many popular and highly regarded photography and photoshop books)just released his first iPad application. This application is based upon his series of books entitled The Digital Photography Book. It gives you a behind the scenes look at what goes into a photo shoot, and what he was thinking as he made the shots. Hit the jump to learn more about this app, and where you can find it for you iPad or iPhone...
Terry White did a wonderful review of this app over at his site bestappsite.com, and true to Terry White form, he did an awesome job of reviewing it, so you should definitely check that out when you get a chance.
For me, this app was a no brainer. I'm a NAPP member, long time follower of Scott Kelby's work, and pretty much follow what's going on down at NAPP headquarters on a regular basis. Terry wrote in his review that the size startled him initially. 1.3GB's is a large App but I was pretty sure if it was that big, there would be lots of useful content. Boy was I right! There are 14 categories to chose from. They are:
* Window Light Portrait
* Couples Portrait
* 3-Light Setup
* Clamshell Lighting Parts 1 & 2
* Shooting Food
* Shooting Flowers
* Location Shooting
* One Light Overhead
* Hard Lighting
* Ring Flash Adapter
* Pano Shots
* Portrait Lighting
* Dramatic Portrait Look
* Product Shots
They're organized in an easy to navigate menu:

Once inside the category you select, you have a few options. First you can just watch the entire caegory(which I highly recommend). Here you will see the shoot from start to finish. Scott does a good job of explaining the scene setup, the lighting, the camera settings, posing, and much, much more! He doesn't hold anything back.


You can view certain clips(this would be helpful if you wanted to see a certain part of the segment). Then there's the behind the scenes option. This is a really cool section because he adds additional information that he was thinking and didn't say at the time of shooting, or stuff that came to mind later.

At $9.99 this is a really good deal. $9.99 is cheaper than most photography books with far less content. I recommend this application to anyone that is interested into photography. Newb to Pro, everyone can learn from this information!
You can find it in the APP STORE.
See you all next time! Jason
Read more on this article...

Hey everyone! Glad to see you back. If this is your first time here, welcome! Many of you know that I'm a big supporter of the iPad as a tool for photographers. I did a post a week or two ago about the benefits of owning an iPad as a photographer, as well as ways that it can make you money. Now I want to show you how it can make you a better photographer. Scott Kelby, (author of many, many popular and highly regarded photography and photoshop books)just released his first iPad application. This application is based upon his series of books entitled The Digital Photography Book. It gives you a behind the scenes look at what goes into a photo shoot, and what he was thinking as he made the shots. Hit the jump to learn more about this app, and where you can find it for you iPad or iPhone...
Terry White did a wonderful review of this app over at his site bestappsite.com, and true to Terry White form, he did an awesome job of reviewing it, so you should definitely check that out when you get a chance.
For me, this app was a no brainer. I'm a NAPP member, long time follower of Scott Kelby's work, and pretty much follow what's going on down at NAPP headquarters on a regular basis. Terry wrote in his review that the size startled him initially. 1.3GB's is a large App but I was pretty sure if it was that big, there would be lots of useful content. Boy was I right! There are 14 categories to chose from. They are:
* Window Light Portrait
* Couples Portrait
* 3-Light Setup
* Clamshell Lighting Parts 1 & 2
* Shooting Food
* Shooting Flowers
* Location Shooting
* One Light Overhead
* Hard Lighting
* Ring Flash Adapter
* Pano Shots
* Portrait Lighting
* Dramatic Portrait Look
* Product Shots
They're organized in an easy to navigate menu:
Once inside the category you select, you have a few options. First you can just watch the entire caegory(which I highly recommend). Here you will see the shoot from start to finish. Scott does a good job of explaining the scene setup, the lighting, the camera settings, posing, and much, much more! He doesn't hold anything back.
You can view certain clips(this would be helpful if you wanted to see a certain part of the segment). Then there's the behind the scenes option. This is a really cool section because he adds additional information that he was thinking and didn't say at the time of shooting, or stuff that came to mind later.
At $9.99 this is a really good deal. $9.99 is cheaper than most photography books with far less content. I recommend this application to anyone that is interested into photography. Newb to Pro, everyone can learn from this information!
You can find it in the APP STORE.
See you all next time! Jason
Read more on this article...
Subscribe to:
Posts (Atom)


